本文实例讲述了javascript原型链学习记录之继承实现方式。分享给大家供大家参考,具体如下:
在慕课网学习继承的笔记:
继承的几种方式:
① 使用构造函数实现继承
function Parent(){
  this.name = 'parent';
}
function Child(){
Parent.call(this); //在子类函数体里面执行父类的构造函数
this.type = 'child';//子类自己的属性
}
Parent.call(this),this即实例,使用this执行Parent方法,那么就用this.name = 'parent'把属性
挂载在了this(实例)上面,以此实现了继承。
缺点:以上只是让Child得到了Parent上的属性,Parent的原型链上的属性并未被继承。
② 使用原型链实现继承
function Parent(){
  this.name = 'parent';
}
function Child(){
  this.type = 'child';
}
Child.prototype = new Parent();
解释:Child.prototype === Chlid实例的__proto__ === Child实例的原型
所以当我们引用new Child().name时,Child上没有,然后寻找Child的原型child.__proto__即Child.prototype即new Parent(),Parent的实例上就有name属性,所以Child实例就在原型链上找到了name属性,以此实现了继承。
缺点:可以看出,Child的所有实例,它们的原型都是同一个,即Parent的实例:
var a = new Child();
var b = new Child();
a.__proto === b.__proto__; //true
所以,当使用 a.name = 'a'重新给name赋值时,b.name也变成了'a',反之亦然。
用instanceof和constructor都无法确认实例到底是Child的还是Parent的。
③ 结合前两种取长补短
function Parent(){
  this.name = 'parent';
}
function Child(){
  Parent.call(this);
  this.type = 'child';
}
Child.prototype = new Parent();
缺点:在Child()里面用Parent.call(this);执行了一次Parent(),然后又使用Child.prototype = new Parent()执行了一次Parent()。
改进1:
function Parent(){
  this.name = 'parent';
}
function Child(){
  Parent.call(this);
  this.type = 'child';
}
Child.prototype = Parent.prototype;
缺点:用instanceof和constructor都无法确认实例到底是Child的还是Parent的。
原因: Child.prototype = Parent.prototype直接从Parent.prototype里面拿到constructor,即Parent。
改进2:
function Parent(){
  this.name = 'parent';
}
function Child(){
  Parent.call(this);
  this.type = 'child';
}
Child.prototype = Object.create(Parent.prototype);
Child.prototype.constructor = Child;
画图说明吧:
var a = new Child();
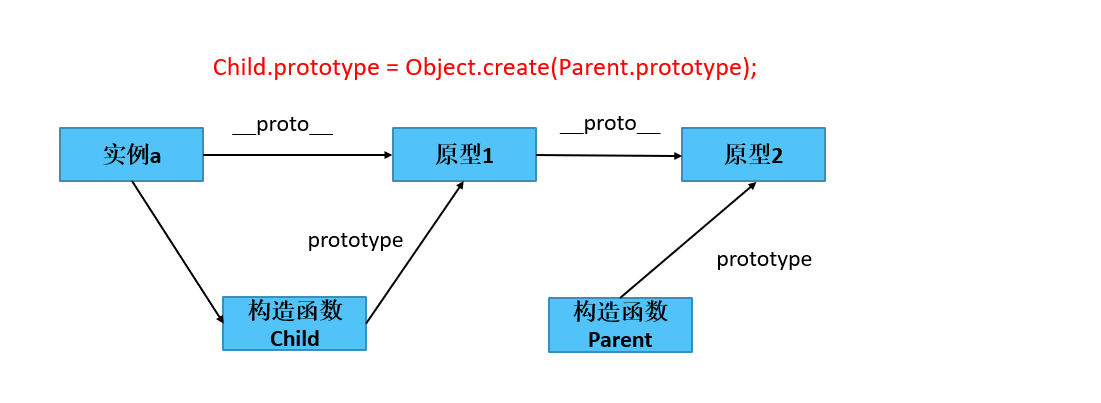
所以这样写我们就构造出了原型链。
希望本文所述对大家JavaScript程序设计有所帮助。

