前言
相信很多Java开发都遇到过一个面试题:Resource和Autowired的区别是什么?这个问题的答案相信基本都清楚,但是这两者在Spring中是如何实现的呢?这就要分析Spring源码才能知道了。友情提示:本篇主要是讲解Autowired的实现原理,不会分析Spring初始化的过程,不熟悉的读者可以先阅读笔者之前的一篇文章《这一次搞懂Spring的Bean实例化原理》。
正文
在Spring Bean的整个创建过程中会调用很多BeanPostProcessor接口的的实现类:
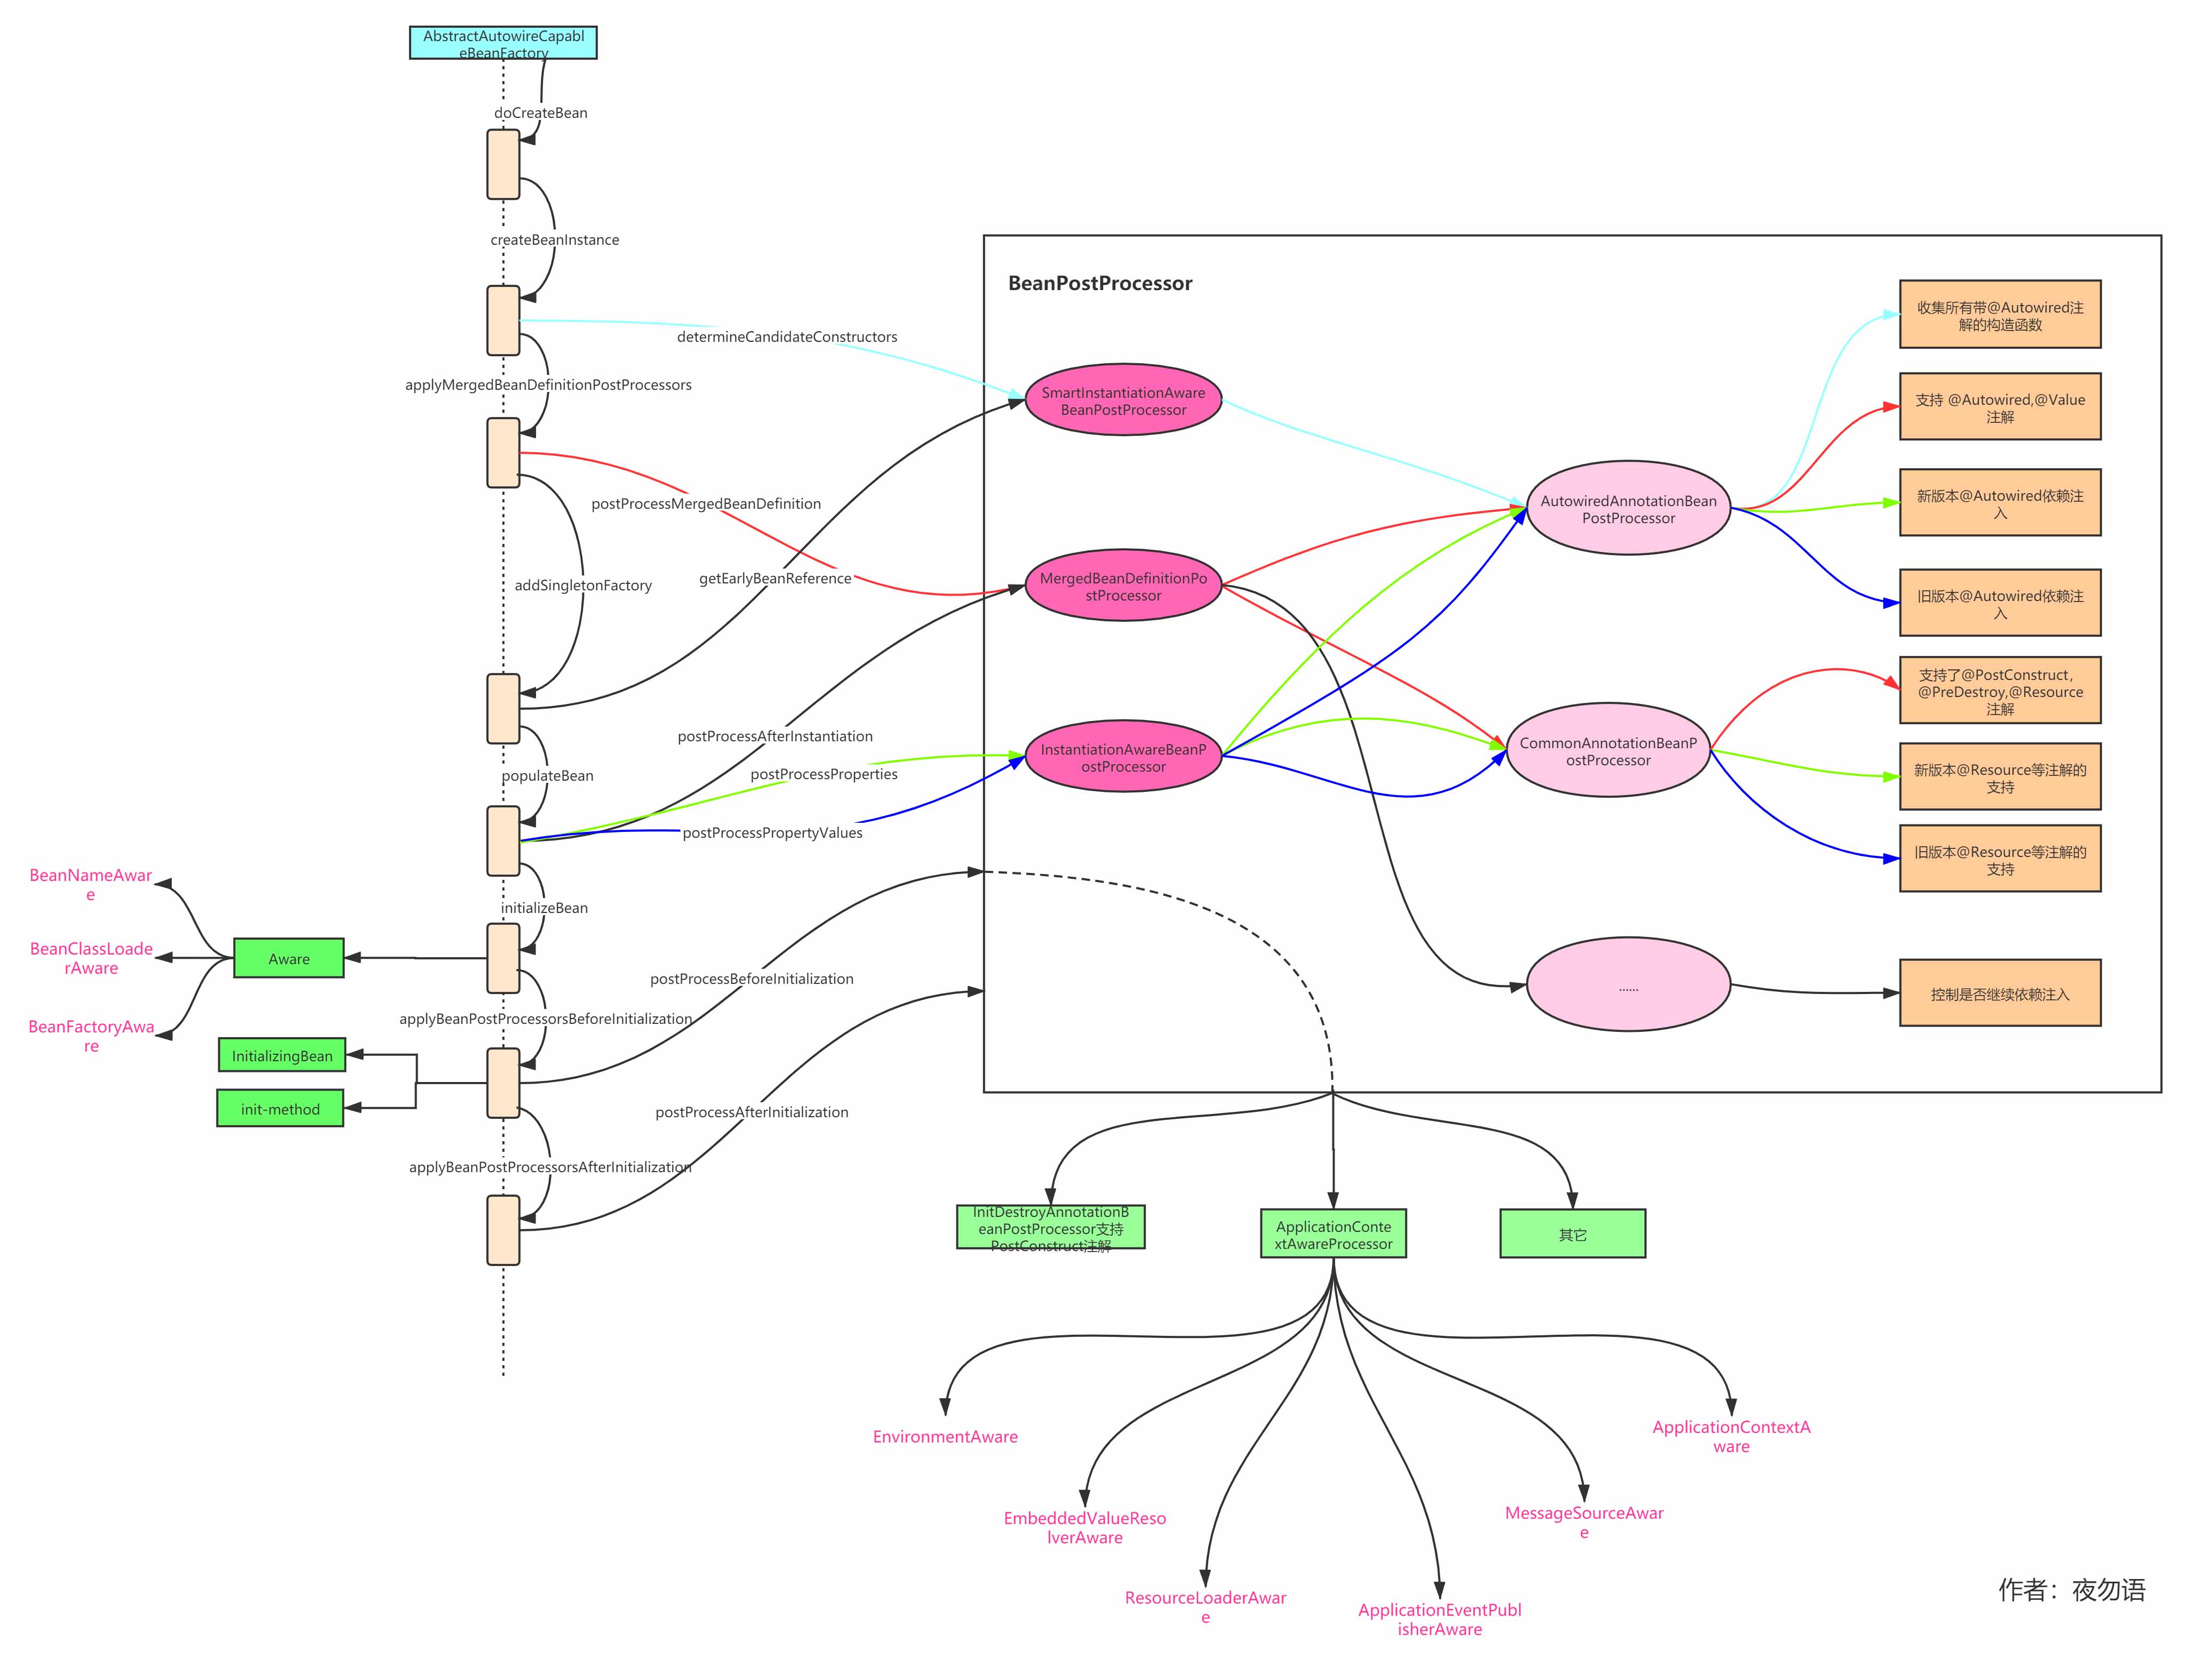
上图是我整理的Spring Bean的创建过程及整个过程中各个BeanPostProcessor和回调的调用,右边相同颜色的连线代表是同一组调用,主要看到AutowiredAnnotationBeanPostProcessor和CommonAnnotationBeanPostProcessor,前者就是支持 @Autowired和@Value注解,后者则是支持@PostConstruct、@PreDestroy、@Resource注解。先了解这两个Processor的作用,下面从头分析。
从图中可以看到,在createBeanInstance方法中会调用SmartInstantiationAwareBeanPostProcessor类型的determineCandidateConstructors,这个方法是做什么的呢?看代码:
protected BeanWrapper createBeanInstance(String beanName, RootBeanDefinition mbd, @Nullable Object[] args) {
 ......
 // Candidate constructors for autowiring?
 //寻找当前正在实例化的bean中有@Autowired注解的构造函数
 Constructor<?>[] ctors = determineConstructorsFromBeanPostProcessors(beanClass, beanName);
 if (ctors != null || mbd.getResolvedAutowireMode() == AUTOWIRE_CONSTRUCTOR ||
 mbd.hasConstructorArgumentValues() || !ObjectUtils.isEmpty(args)) {
 //如果ctors不为空,就说明构造函数上有@Autowired注解
 return autowireConstructor(beanName, mbd, ctors, args);
 }
 ......

 // No special handling: simply use no-arg constructor.
 return instantiateBean(beanName, mbd);
 }

 protected Constructor<?>[] determineConstructorsFromBeanPostProcessors(@Nullable Class<?> beanClass, String beanName)
 throws BeansException {

 if (beanClass != null && hasInstantiationAwareBeanPostProcessors()) {
 for (BeanPostProcessor bp : getBeanPostProcessors()) {
 if (bp instanceof SmartInstantiationAwareBeanPostProcessor) {
  SmartInstantiationAwareBeanPostProcessor ibp = (SmartInstantiationAwareBeanPostProcessor) bp;
  Constructor<?>[] ctors = ibp.determineCandidateConstructors(beanClass, beanName);
  if (ctors != null) {
  return ctors;
  }
 }
 }
 }
 return null;
 }
createBeanInstance方法是去实例化Bean,而调用AutowiredAnnotationBeanPostProcessor.determineCandidateConstructors的目的就是先去找到带有@Autowired注解的构造方法(自动注入有三种模式:属性、构造方法、普通方法),也就是通过构造方法注入,如果没有找到则通过反射调用无参构造实例化。平时我们基本上都是使用的属性注入,所以一般都不会进入determineCandidateConstructors方法,所以这里也不详细阐述,感兴趣的读者可自行看看。
接着回到doCreateBean方法中,就可以看到调用了applyMergedBeanDefinitionPostProcessors方法:
 protected void applyMergedBeanDefinitionPostProcessors(RootBeanDefinition mbd, Class<?> beanType, String beanName) {
 for (BeanPostProcessor bp : getBeanPostProcessors()) {
 if (bp instanceof MergedBeanDefinitionPostProcessor) {
 /**
  * CommonAnnotationBeanPostProcessor 支持了@PostConstruct,@PreDestroy,@Resource注解
  * AutowiredAnnotationBeanPostProcessor 支持 @Autowired,@Value注解
  */
 MergedBeanDefinitionPostProcessor bdp = (MergedBeanDefinitionPostProcessor) bp;
 bdp.postProcessMergedBeanDefinition(mbd, beanType, beanName);
 }
 }
 }
这个方法本质上就是调用MergedBeanDefinitionPostProcessor类型的postProcessMergedBeanDefinition方法,通过这个方法去收集@Autowired、@Resource等注解,这里主要分析AutowiredAnnotationBeanPostProcessor的实现:
 public void postProcessMergedBeanDefinition(RootBeanDefinition beanDefinition, Class<?> beanType, String beanName) {
 InjectionMetadata metadata = findAutowiringMetadata(beanName, beanType, null);
 metadata.checkConfigMembers(beanDefinition);
 }

 private InjectionMetadata findAutowiringMetadata(String beanName, Class<?> clazz, @Nullable PropertyValues pvs) {
 // Fall back to class name as cache key, for backwards compatibility with custom callers.
 String cacheKey = (StringUtils.hasLength(beanName) ? beanName : clazz.getName());
 // Quick check on the concurrent map first, with minimal locking.
 InjectionMetadata metadata = this.injectionMetadataCache.get(cacheKey);
 if (InjectionMetadata.needsRefresh(metadata, clazz)) {
 synchronized (this.injectionMetadataCache) {
 metadata = this.injectionMetadataCache.get(cacheKey);
 if (InjectionMetadata.needsRefresh(metadata, clazz)) {
  if (metadata != null) {
  metadata.clear(pvs);
  }
  //主要看这个方法
  metadata = buildAutowiringMetadata(clazz);
  this.injectionMetadataCache.put(cacheKey, metadata);
 }
 }
 }
 return metadata;
 }

 private InjectionMetadata buildAutowiringMetadata(final Class<?> clazz) {
 List<InjectionMetadata.InjectedElement> elements = new ArrayList<>();
 Class<?> targetClass = clazz;

 do {
 final List<InjectionMetadata.InjectedElement> currElements = new ArrayList<>();

 // 找到带有@Autowired注解的属性并封装为AnnotationAttributes
 ReflectionUtils.doWithLocalFields(targetClass, field -> {
 AnnotationAttributes ann = findAutowiredAnnotation(field);
 if (ann != null) {
  if (Modifier.isStatic(field.getModifiers())) {
  if (logger.isInfoEnabled()) {
  logger.info("Autowired annotation is not supported on static fields: " + field);
  }
  return;
  }
  boolean required = determineRequiredStatus(ann);
  currElements.add(new AutowiredFieldElement(field, required));
 }
 });

 // 找到带有@Autowired注解的方法并封装为AnnotationAttributes
 ReflectionUtils.doWithLocalMethods(targetClass, method -> {
 Method bridgedMethod = BridgeMethodResolver.findBridgedMethod(method);
 if (!BridgeMethodResolver.isVisibilityBridgeMethodPair(method, bridgedMethod)) {
  return;
 }
 AnnotationAttributes ann = findAutowiredAnnotation(bridgedMethod);
 if (ann != null && method.equals(ClassUtils.getMostSpecificMethod(method, clazz))) {
  if (Modifier.isStatic(method.getModifiers())) {
  if (logger.isInfoEnabled()) {
  logger.info("Autowired annotation is not supported on static methods: " + method);
  }
  return;
  }
  if (method.getParameterCount() == 0) {
  if (logger.isInfoEnabled()) {
  logger.info("Autowired annotation should only be used on methods with parameters: " +
   method);
  }
  }
  boolean required = determineRequiredStatus(ann);
  PropertyDescriptor pd = BeanUtils.findPropertyForMethod(bridgedMethod, clazz);
  currElements.add(new AutowiredMethodElement(method, required, pd));
 }
 });

 elements.addAll(0, currElements);
 targetClass = targetClass.getSuperclass();
 }
 while (targetClass != null && targetClass != Object.class);

 return new InjectionMetadata(clazz, elements);
 }
收集的逻辑主要在findAutowiringMetadata方法中,层层调用后可以看到是通过findAutowiredAnnotation这个方法去找到带有@Autowired和@Value注解的属性和方法:
 private final Set<Class<? extends Annotation>> autowiredAnnotationTypes = new LinkedHashSet<>(4);

 public AutowiredAnnotationBeanPostProcessor() {
 this.autowiredAnnotationTypes.add(Autowired.class);
 this.autowiredAnnotationTypes.add(Value.class);
 try {
 this.autowiredAnnotationTypes.add((Class<? extends Annotation>)
  ClassUtils.forName("javax.inject.Inject", AutowiredAnnotationBeanPostProcessor.class.getClassLoader()));
 logger.trace("JSR-330 'javax.inject.Inject' annotation found and supported for autowiring");
 }
 catch (ClassNotFoundException ex) {
 // JSR-330 API not available - simply skip.
 }
 }


 private AnnotationAttributes findAutowiredAnnotation(AccessibleObject ao) {
 if (ao.getAnnotations().length > 0) { // autowiring annotations have to be local
 for (Class<? extends Annotation> type : this.autowiredAnnotationTypes) {
 AnnotationAttributes attributes = AnnotatedElementUtils.getMergedAnnotationAttributes(ao, type);
 if (attributes != null) {
  return attributes;
 }
 }
 }
 return null;
 }
最后将其封装为AutowiredFieldElement和AutowiredMethodElement对象的list并连同Class一起封装成InjectionMetadata返回,这就完成了相关注解的收集。
收集完成后在哪里使用呢?对Bean生命周期熟悉的读者都知道,之后就会进行依赖注入,自然相关的调用就在populateBean这个方法里:
protected void populateBean(String beanName, RootBeanDefinition mbd, @Nullable BeanWrapper bw) {

 ......

 PropertyValues pvs = (mbd.hasPropertyValues() ? mbd.getPropertyValues() : null);

 if (mbd.getResolvedAutowireMode() == AUTOWIRE_BY_NAME || mbd.getResolvedAutowireMode() == AUTOWIRE_BY_TYPE) {
 MutablePropertyValues newPvs = new MutablePropertyValues(pvs);
 // Add property values based on autowire by name if applicable.
 if (mbd.getResolvedAutowireMode() == AUTOWIRE_BY_NAME) {
 autowireByName(beanName, mbd, bw, newPvs);
 }
 // Add property values based on autowire by type if applicable.
 if (mbd.getResolvedAutowireMode() == AUTOWIRE_BY_TYPE) {
 autowireByType(beanName, mbd, bw, newPvs);
 }
 pvs = newPvs;
 }

 boolean hasInstAwareBpps = hasInstantiationAwareBeanPostProcessors();
 boolean needsDepCheck = (mbd.getDependencyCheck() != AbstractBeanDefinition.DEPENDENCY_CHECK_NONE);

 PropertyDescriptor[] filteredPds = null;

 //重点看这个if代码块,重要程度 5
 if (hasInstAwareBpps) {
 if (pvs == null) {
 pvs = mbd.getPropertyValues();
 }
 for (BeanPostProcessor bp : getBeanPostProcessors()) {
 if (bp instanceof InstantiationAwareBeanPostProcessor) {
  InstantiationAwareBeanPostProcessor ibp = (InstantiationAwareBeanPostProcessor) bp;
  // 依赖注入过程,@Autowired的支持
  PropertyValues pvsToUse = ibp.postProcessProperties(pvs, bw.getWrappedInstance(), beanName);
  if (pvsToUse == null) {
  if (filteredPds == null) {
  filteredPds = filterPropertyDescriptorsForDependencyCheck(bw, mbd.allowCaching);
  }

  // 老版本用这个完成依赖注入过程,@Autowired的支持
  pvsToUse = ibp.postProcessPropertyValues(pvs, filteredPds, bw.getWrappedInstance(), beanName);
  if (pvsToUse == null) {
  return;
  }
  }
  pvs = pvsToUse;
 }
 }
 }
 if (needsDepCheck) {
 if (filteredPds == null) {
 filteredPds = filterPropertyDescriptorsForDependencyCheck(bw, mbd.allowCaching);
 }
 checkDependencies(beanName, mbd, filteredPds, pvs);
 }

 // xml中<property>标签的依赖注入
 if (pvs != null) {
 applyPropertyValues(beanName, mbd, bw, pvs);
 }
 }
mbd.getResolvedAutowireMode() == AUTOWIRE_BY_NAME || mbd.getResolvedAutowireMode() == AUTOWIRE_BY_TYPE
很多读者包括网上很多文章在看到这个判断时,都认为自动注入的逻辑就是这里,但实际上并不是,这里是自动注入没错,但却是针对以前xml配置,如下:
<?xml version="1.0" encoding="UTF-8"?>
<beans xmlns="http://www.springframework.org/schema/beans"
  xmlns:xsi="http://www.w3.org/2001/XMLSchema-instance"
  xsi:schemaLocation="
   http://www.springframework.org/schema/beans
   http://www.springframework.org/schema/beans/spring-beans-2.5.xsd"
  default-autowire="byName">
 <bean id="a" class="com.A" autowire="byName"/>
 <bean id="b" class="com.B" autowire="byType"/>
</beans>
头文件中的default-autowire属性就是开启全局自动注入,而bean标签上的autowire则是特定针对当前bean的,会覆盖全局配置。这样我们配置后,bean标签就无需配置prototype子标签,也能自动注入对应的对象。这些属性包含了以下几个值:
no:默认值。表示不进行自动注入。对应BeanDefinition中autowireMode的值为 0。
byName:根据名称进行自动注入。对应BeanDefinition中autowireMode的值为1。
byType:根据类型进行自动注入,如果容器中找到两个及以上符合该类型的Bean就将抛出异常。对应BeanDefinition中autowireMode的值为2。
constructor:等同于byType,只是当指定autowire=”constructor”时表示将通过构造方法根据类型进行自动注入。对应BeanDefinition中autowireMode的值为3。
这就是xml配置中的自动注入,而我们使用@Autowired注解时,BeanDefinition中autowireMode的值为 0,即表示不进行自动注入。插一句题外话,网上很多人在争论@Autowired是自动注入还是手动注入,我个人认为都算自动注入,不能说它没有进入这段逻辑就不能叫自动注入,只是它以另外一种方式实现了,至少也没有让我们自己手动new并设置属性。
那这另外一种方式是什么呢?就是下面这个代码干的事:
if (hasInstAwareBpps) {
 if (pvs == null) {
 pvs = mbd.getPropertyValues();
 }
 for (BeanPostProcessor bp : getBeanPostProcessors()) {
 if (bp instanceof InstantiationAwareBeanPostProcessor) {
 InstantiationAwareBeanPostProcessor ibp = (InstantiationAwareBeanPostProcessor) bp;
 // 依赖注入过程,@Autowired的支持
 PropertyValues pvsToUse = ibp.postProcessProperties(pvs, bw.getWrappedInstance(), beanName);
 if (pvsToUse == null) {
 if (filteredPds == null) {
  filteredPds = filterPropertyDescriptorsForDependencyCheck(bw, mbd.allowCaching);
 }

 // 老版本用这个完成依赖注入过程,@Autowired的支持
 pvsToUse = ibp.postProcessPropertyValues(pvs, filteredPds, bw.getWrappedInstance(), beanName);
 if (pvsToUse == null) {
  return;
 }
 }
 pvs = pvsToUse;
 }
 }
}
可以看到这里又是调用了InstantiationAwareBeanPostProcessor类型的postProcessProperties和postProcessPropertyValues方法,后者是老版本中的实现,已经废弃,所以直接看postProcessProperties,还是进入到AutowiredAnnotationBeanPostProcessor类中:
public PropertyValues postProcessProperties(PropertyValues pvs, Object bean, String beanName) {
 InjectionMetadata metadata = findAutowiringMetadata(beanName, bean.getClass(), pvs);
 try {
 metadata.inject(bean, beanName, pvs);
 }
 catch (BeanCreationException ex) {
 throw ex;
 }
 catch (Throwable ex) {
 throw new BeanCreationException(beanName, "Injection of autowired dependencies failed", ex);
 }
 return pvs;
 }
findAutowiringMetadata这个方法不陌生的,刚刚已经分析了,是去收集对应注解并封装为InjectionMetadata对象放入到缓存,这里就是从缓存中拿到值,注入则是通过inject实现的:
public void inject(Object target, @Nullable String beanName, @Nullable PropertyValues pvs) throws Throwable {
 Collection<InjectedElement> checkedElements = this.checkedElements;
 Collection<InjectedElement> elementsToIterate =
 (checkedElements != null ? checkedElements : this.injectedElements);
 if (!elementsToIterate.isEmpty()) {
 for (InjectedElement element : elementsToIterate) {
 if (logger.isTraceEnabled()) {
 logger.trace("Processing injected element of bean '" + beanName + "': " + element);
 }
 if(element.isField) {
 Field field = (Field)element.member;
 System.out.println("==IOC/DI===beanName==" + beanName + "==field[" + field.getName() +"]-> getBean(" + field.getName() + ")");
 }
 element.inject(target, beanName, pvs);
 }
 }
}
最后就是调用element.inject实现注入,element我们刚刚也看到了,就是AutowiredFieldElement和AutowiredMethodElement,分别实现属性注入和方法注入,这里我们看最常用的属性注入就行了:
protected void inject(Object bean, @Nullable String beanName, @Nullable PropertyValues pvs) throws Throwable {
 Field field = (Field) this.member;
 Object value;
 if (this.cached) {
 value = resolvedCachedArgument(beanName, this.cachedFieldValue);
 }
 else {
 DependencyDescriptor desc = new DependencyDescriptor(field, this.required);
 desc.setContainingClass(bean.getClass());
 Set<String> autowiredBeanNames = new LinkedHashSet<>(1);
 Assert.state(beanFactory != null, "No BeanFactory available");
 TypeConverter typeConverter = beanFactory.getTypeConverter();
 try {
 // 找到依赖对象
 value = beanFactory.resolveDependency(desc, beanName, autowiredBeanNames, typeConverter);
 }
 catch (BeansException ex) {
 throw new UnsatisfiedDependencyException(null, beanName, new InjectionPoint(field), ex);
 }
 synchronized (this) {
 if (!this.cached) {
 if (value != null || this.required) {
  this.cachedFieldValue = desc;
  registerDependentBeans(beanName, autowiredBeanNames);
  if (autowiredBeanNames.size() == 1) {
  String autowiredBeanName = autowiredBeanNames.iterator().next();
  if (beanFactory.containsBean(autowiredBeanName) &&
  beanFactory.isTypeMatch(autowiredBeanName, field.getType())) {
  this.cachedFieldValue = new ShortcutDependencyDescriptor(
   desc, autowiredBeanName, field.getType());
  }
  }
 }
 else {
  this.cachedFieldValue = null;
 }
 this.cached = true;
 }
 }
 }

 if (value != null) {
 ReflectionUtils.makeAccessible(field);
 field.set(bean, value);
 }
}
这段代码整体逻辑比较清晰,首先根据field创建一个依赖对象的抽象DependencyDescriptor对象,然后通过beanFactory.resolveDependency解析拿到对应的实例,最后通过反射注入即可。
因此我们主要看resolveDependency方法中做了什么:
public Object resolveDependency(DependencyDescriptor descriptor, @Nullable String requestingBeanName,
 @Nullable Set<String> autowiredBeanNames, @Nullable TypeConverter typeConverter) throws BeansException {

 descriptor.initParameterNameDiscovery(getParameterNameDiscoverer());
 if (Optional.class == descriptor.getDependencyType()) {
 return createOptionalDependency(descriptor, requestingBeanName);
 }
 else if (ObjectFactory.class == descriptor.getDependencyType() ||
 ObjectProvider.class == descriptor.getDependencyType()) {
 return new DependencyObjectProvider(descriptor, requestingBeanName);
 }
 else if (javaxInjectProviderClass == descriptor.getDependencyType()) {
 return new Jsr330Factory().createDependencyProvider(descriptor, requestingBeanName);
 }
 else {
 Object result = getAutowireCandidateResolver().getLazyResolutionProxyIfNecessary(
 descriptor, requestingBeanName);
 if (result == null) {
 result = doResolveDependency(descriptor, requestingBeanName, autowiredBeanNames, typeConverter);
 }
 return result;
 }
}
一般情况下,都是走的else分支并调用doResolveDependency方法:
public Object doResolveDependency(DependencyDescriptor descriptor, @Nullable String beanName,
 @Nullable Set<String> autowiredBeanNames, @Nullable TypeConverter typeConverter) throws BeansException {

 InjectionPoint previousInjectionPoint = ConstructorResolver.setCurrentInjectionPoint(descriptor);
 try {
 Object shortcut = descriptor.resolveShortcut(this);
 if (shortcut != null) {
 return shortcut;
 }

 Class<?> type = descriptor.getDependencyType();
 Object value = getAutowireCandidateResolver().getSuggestedValue(descriptor);
 if (value != null) {
 if (value instanceof String) {
 String strVal = resolveEmbeddedValue((String) value);
 BeanDefinition bd = (beanName != null && containsBean(beanName) ? getMergedBeanDefinition(beanName) : null);
 value = evaluateBeanDefinitionString(strVal, bd);
 }
 TypeConverter converter = (typeConverter != null ? typeConverter : getTypeConverter());
 return (descriptor.getField() != null ?
  converter.convertIfNecessary(value, type, descriptor.getField()) :
  converter.convertIfNecessary(value, type, descriptor.getMethodParameter()));
 }

 // 有多个实现类需要注入,特指注入的是数组、集合或者Map
 Object multipleBeans = resolveMultipleBeans(descriptor, beanName, autowiredBeanNames, typeConverter);
 if (multipleBeans != null) {
 return multipleBeans;
 }

 // 找到依赖对象的所有实现类
 Map<String, Object> matchingBeans = findAutowireCandidates(beanName, type, descriptor);
 if (matchingBeans.isEmpty()) {
 if (isRequired(descriptor)) {
 raiseNoMatchingBeanFound(type, descriptor.getResolvableType(), descriptor);
 }
 return null;
 }

 String autowiredBeanName;
 Object instanceCandidate;

 // 依赖的对象有多个实例
 if (matchingBeans.size() > 1) {
 // 根据@Primary、@Priority和名称依次进行匹配注入
 autowiredBeanName = determineAutowireCandidate(matchingBeans, descriptor);
 if (autowiredBeanName == null) {
 if (isRequired(descriptor) || !indicatesMultipleBeans(type)) {
  return descriptor.resolveNotUnique(descriptor.getResolvableType(), matchingBeans);
 }
 else {
  // In case of an optional Collection/Map, silently ignore a non-unique case:
  // possibly it was meant to be an empty collection of multiple regular beans
  // (before 4.3 in particular when we didn't even look for collection beans).
  return null;
 }
 }
 instanceCandidate = matchingBeans.get(autowiredBeanName);
 }
 else {
 // We have exactly one match.
 Map.Entry<String, Object> entry = matchingBeans.entrySet().iterator().next();
 autowiredBeanName = entry.getKey();
 instanceCandidate = entry.getValue();
 }

 if (autowiredBeanNames != null) {
 autowiredBeanNames.add(autowiredBeanName);
 }
 // 如果拿到的是class对象,通过getBean实例化返回
 if (instanceCandidate instanceof Class) {
 instanceCandidate = descriptor.resolveCandidate(autowiredBeanName, type, this);
 }
 Object result = instanceCandidate;
 if (result instanceof NullBean) {
 if (isRequired(descriptor)) {
 raiseNoMatchingBeanFound(type, descriptor.getResolvableType(), descriptor);
 }
 result = null;
 }
 if (!ClassUtils.isAssignableValue(type, result)) {
 throw new BeanNotOfRequiredTypeException(autowiredBeanName, type, instanceCandidate.getClass());
 }
 return result;
 }
 finally {
 ConstructorResolver.setCurrentInjectionPoint(previousInjectionPoint);
 }
}
这里面首先是通过 getAutowireCandidateResolver().getSuggestedValue(descriptor)拿到@Value注解的值,然后通过TypeConverter进行转换,默认可转换的类型是JDK和Spring内置的一些类型,自然不包含我们自定义的类,所以如果不进行扩展在@Autowired注入我们自定义类对象时同时使用@Value注解是会报错的。
接着是调用resolveMultipleBeans方法实现对Map、List、数组等属性的注入,本质上还是调用findAutowireCandidates方法找到所有的实现类的对象装入对应的集合数组中,所以直接看findAutowireCandidates:
protected Map<String, Object> findAutowireCandidates(
 @Nullable String beanName, Class<?> requiredType, DependencyDescriptor descriptor) {

 String[] candidateNames = BeanFactoryUtils.beanNamesForTypeIncludingAncestors(
 this, requiredType, true, descriptor.isEager());
 Map<String, Object> result = new LinkedHashMap<>(candidateNames.length);

 ......

 for (String candidate : candidateNames) {
 if (!isSelfReference(beanName, candidate) && isAutowireCandidate(candidate, descriptor)) {
 addCandidateEntry(result, candidate, descriptor, requiredType);
 }
 }

 ......
 return result;
}

private void addCandidateEntry(Map<String, Object> candidates, String candidateName,
 DependencyDescriptor descriptor, Class<?> requiredType) {

 if (descriptor instanceof MultiElementDescriptor) {
 Object beanInstance = descriptor.resolveCandidate(candidateName, requiredType, this);
 if (!(beanInstance instanceof NullBean)) {
 candidates.put(candidateName, beanInstance);
 }
 }
 else if (containsSingleton(candidateName) || (descriptor instanceof StreamDependencyDescriptor &&
 ((StreamDependencyDescriptor) descriptor).isOrdered())) {
 Object beanInstance = descriptor.resolveCandidate(candidateName, requiredType, this);
 candidates.put(candidateName, (beanInstance instanceof NullBean ? null : beanInstance));
 }
 else {
 candidates.put(candidateName, getType(candidateName));
 }
}
首先通过beanNamesForTypeIncludingAncestors方法拿到依赖类所有的实现类的beanName,然后调用addCandidateEntry将beanName及对应的实例或者Class对象放入到Map中。
接着回到doResolveDependency方法中:
if (matchingBeans.size() > 1) {
 // 根据@Primary、@Priority和名称依次进行匹配注入
 autowiredBeanName = determineAutowireCandidate(matchingBeans, descriptor);
 if (autowiredBeanName == null) {
 if (isRequired(descriptor) || !indicatesMultipleBeans(type)) {
 return descriptor.resolveNotUnique(descriptor.getResolvableType(), matchingBeans);
 }
 else {
 // In case of an optional Collection/Map, silently ignore a non-unique case:
 // possibly it was meant to be an empty collection of multiple regular beans
 // (before 4.3 in particular when we didn't even look for collection beans).
 return null;
 }
 }
 instanceCandidate = matchingBeans.get(autowiredBeanName);
}
else {
 // We have exactly one match.
 Map.Entry<String, Object> entry = matchingBeans.entrySet().iterator().next();
 autowiredBeanName = entry.getKey();
 instanceCandidate = entry.getValue();
}

if (autowiredBeanNames != null) {
 autowiredBeanNames.add(autowiredBeanName);
}
// 如果拿到的是class对象,通过getBean实例化返回
if (instanceCandidate instanceof Class) {
 instanceCandidate = descriptor.resolveCandidate(autowiredBeanName, type, this);
}
Object result = instanceCandidate;
如果只有一个实例则直接返回该实例,如果实现类有多个则调用determineAutowireCandidate进行判断该使用哪一个实例对象,判断规则如下:
首先判断实现类上是否有@Primary注解,找到一个则返回当前实例,找到多个则报错。
若没有标注@Primary注解,则判断是否指定了优先级,且只能是通过@Priority注解指定的,@Order不支持。
上述都没有拿到合适的Bean则通过属性名称获取Bean。
拿到对应的实例后,最后进行反射注入即可。以上就是@Autowired的实现细节。
总结
本篇从源码角度详细分析了@Autowired的实现细节,只有真正阅读了源码才能了解更多的细节,在开发中更加清楚如何注入多个实例以及如何指定注入的优先级,同时在面试中也能更有理有据,而不是统一的大众回答,先根据byType,再根据byName。另外对于方法注入和@Resource注解的处理本篇没有涉及,但是相信看完本文读者自己也能轻松分析这部分源码。

