## JavaScript实现双向链表
### 一、双向链表简介
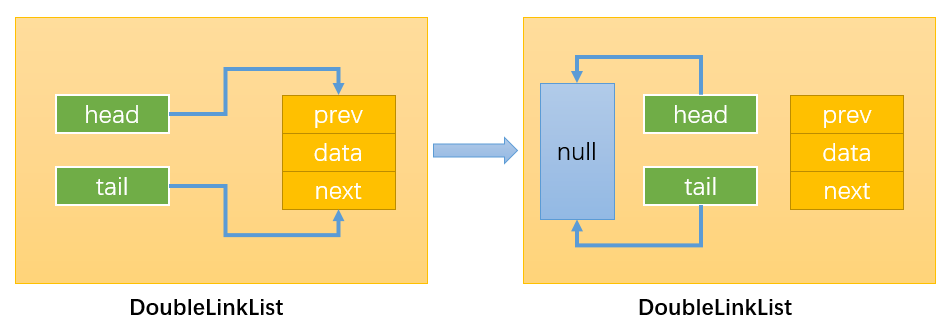
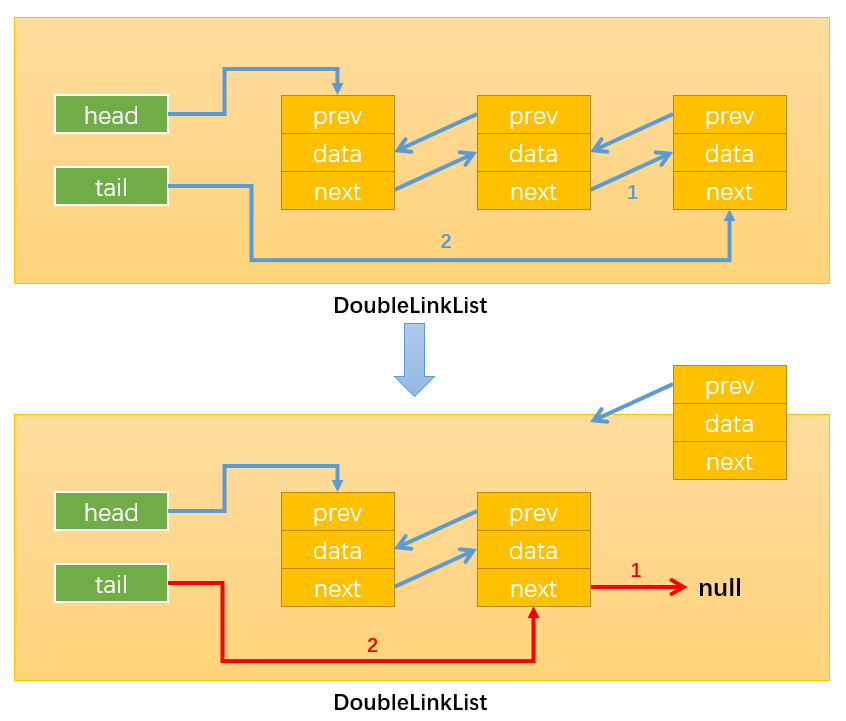
**双向链表**:既可以**从头遍历到尾**,又可以**从尾遍历到头**。也就是说链表连接的过程是**双向**的,它的实现原理是:一个节点既有**向前连接的引用**,也有一个**向后连接的引用**。
**双向链表的缺点:**
* 每次在**插入或删除**某个节点时,都需要处理四个引用,而不是两个,实现起来会困难些;
* 相对于单向链表,所占**内存空间更大**一些;
* 但是,相对于双向链表的便利性而言,这些缺点微不足道。
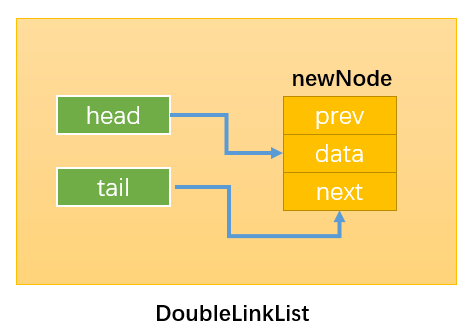
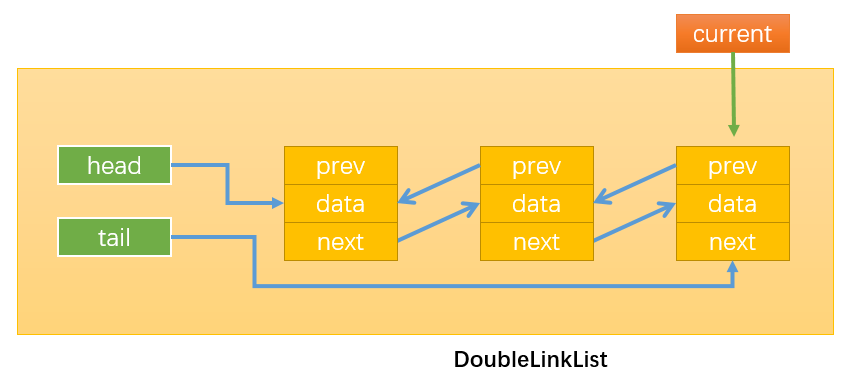
**双向链表的结构:**
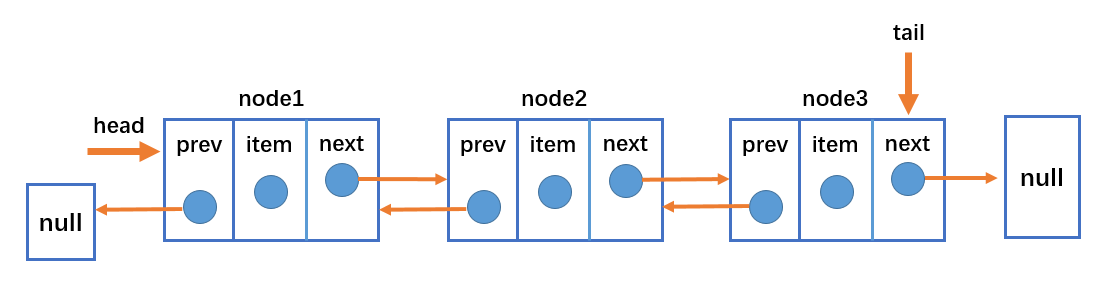
* 双向链表不仅有**head**指针指向第一个节点,而且有**tail**指针指向最后一个节点;
* 每一个节点由三部分组成:**item**储存数据、**prev**指向前一个节点、**next**指向后一个节点;
* 双向链表的第一个节点的prev指向**null**;
* 双向链表的最后一个节点的next指向**null**;
**双向链表常见的操作(方法):**
* append(element):向链表尾部添加一个新的项;
* inset(position,element):向链表的特定位置插入一个新的项;
* get(element):获取对应位置的元素;
* indexOf(element):返回元素在链表中的索引,如果链表中没有元素就返回-1;
* update(position,element):修改某个位置的元素;
* removeAt(position):从链表的特定位置移除一项;
* isEmpty():如果链表中不包含任何元素,返回trun,如果链表长度大于0则返回false;
* size():返回链表包含的元素个数,与数组的length属性类似;
* toString():由于链表项使用了Node类,就需要重写继承自JavaScript对象默认的toString方法,让其只输出元素的值;
* forwardString():返回正向遍历节点字符串形式;
* backwordString():返回反向遍历的节点的字符串形式;
### 二、封装双向链表类
#### 2.0.创建双向链表类
先创建双向链表类DoubleLinklist,并添加基本属性,再实现双向链表的常用方法:
```
//封装双向链表类
function DoubleLinklist(){
//封装内部类:节点类
function Node(data){
this.data = data
this.prev = null
this.next = null
}
//属性
this.head = null
this.tail ==null
this.length = 0
}
```
#### 2.1.append(element)
**代码实现:**
```
//append方法
DoubleLinklist.prototype.append = data => {
//1.根据data创建新节点
let newNode = new Node(data)
//2.添加节点
//情况1:添加的是第一个节点
if (this.length == 0) {
this.tail = newNode
this.head = newNode
//情况2:添加的不是第一个节点
}else {
newNode.prev = this.tail
this.tail.next = newNode
this.tail = newNode
}
//3.length+1
this.length += 1
}
```
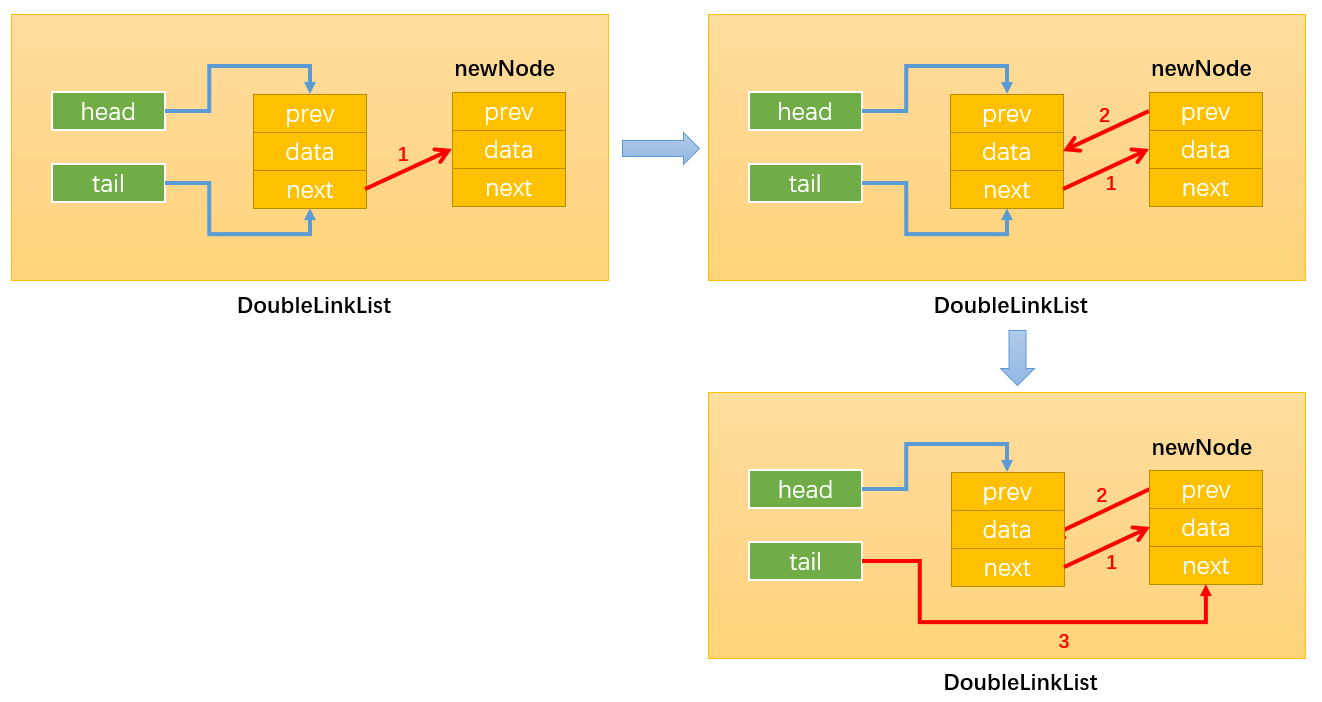
**过程详解:**
添加节点时分为多种情况:
* 情况1:添加的是第一个节点:只需要让head和tail都指向新节点即可;

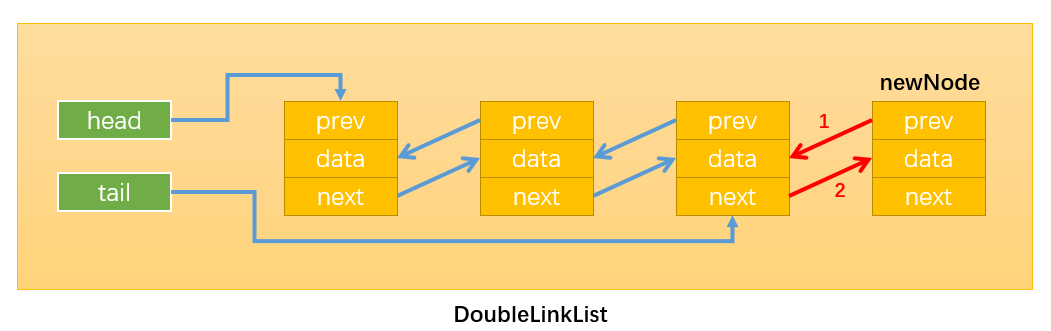
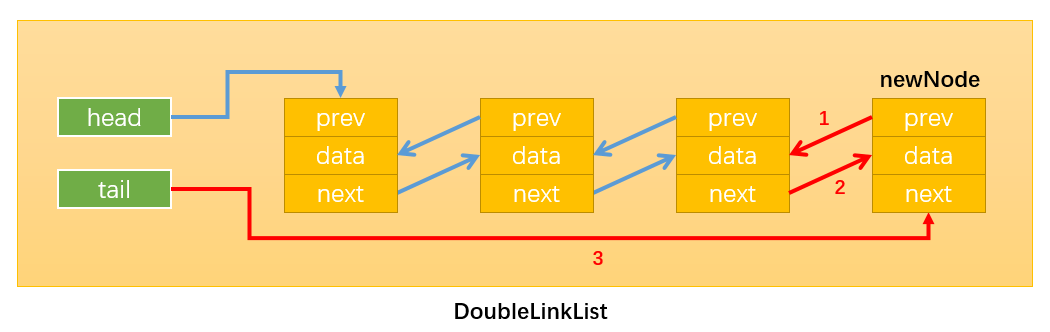
* 情况2:添加的不是第一个节点,如下图所示:只需要改变相关引用的指向即可。
* 通过:newNode.prev = this.tail:建立指向1;
* 通过:this.tail.next = newNode:建立指向2;
* 通过:this.tail = newNode:建立指向3
要注意改变变量指向的顺序,最后修改tail指向,这样未修改前tail始终指向原链表的最后一个节点。
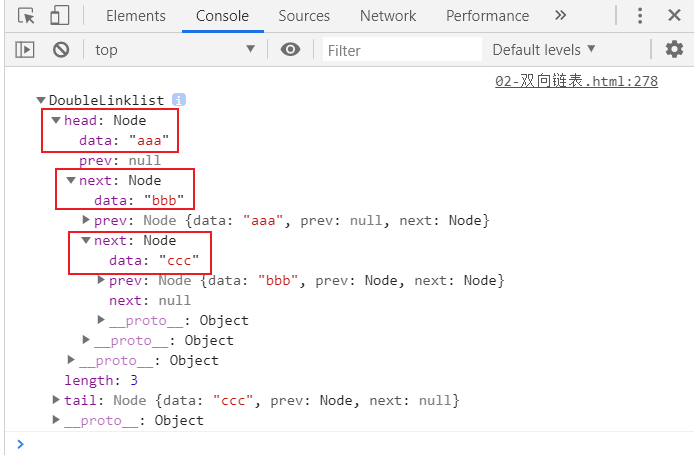
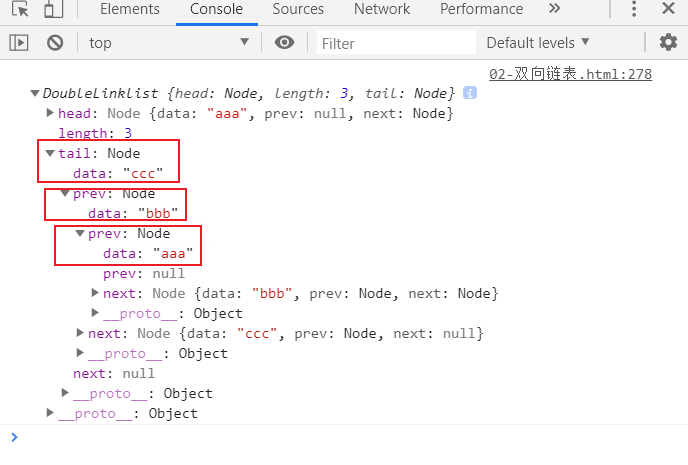
**测试代码:**
```
//测试代码
//1.创建双向链表
let list = new DoubleLinklist()
//2.测试append方法
list.append('aaa')
list.append('bbb')
list.append('ccc')
console.log(list);
```
**测试结果:**
* next方向:
* prev方向:
#### 2.2.toString()汇总
**代码实现:**
```
//将链表转变为字符串形式
//一.toString方法
DoubleLinklist.prototype.toString = () => {
return this.backwardString()
}
//二.forwardString方法
DoubleLinklist.prototype.forwardString = () => {
//1.定义变量
let current =this.tail
let resultString = ""
//2.依次向前遍历,获取每一个节点
while (current) {
resultString += current.data + "--"
current = current.prev
}
return resultString
}
//三.backwardString方法
DoubleLinklist.prototype.backwardString = () => {
//1.定义变量
let current = this.head
let resultString = ""
//2.依次向后遍历,获取每一个节点
while (current) {
resultString += current.data + "--"
current = current.next
}
return resultString
}
```
**过程详解:**
三种获取字符串的方法:**toString()**、**forwardString()**、**backwardString()**实现原理相似,仅以backWardString方法为例:
* 定义current变量记录当前指向的节点。首先让current指向第一个节点,然后通过 current = current.next 依次向后遍历。在while循环中以(current)作为条件遍历链表,只要current != null就一直遍历,由此可获取链表所有节点的数据。

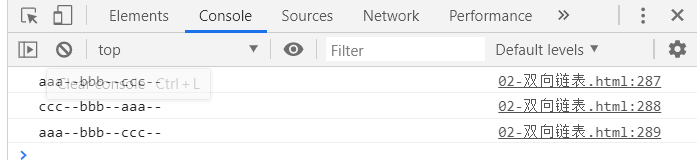
**测试代码:**
```
//测试代码
//1.创建双向链表
let list = new DoubleLinklist()
//2.测试字符串方法
list.append('aaa')
list.append('bbb')
list.append('ccc')
console.log(list.toString());
console.log(list.forwardString());
console.log(list.backwardString());
```
**测试结果:**
#### 2.3.insert(position,element)
**代码实现:**
```
//insert方法
DoubleLinklist.prototype.insert = (position, data) => {
//1.越界判断
if (position < 0 || position > this.length) return false
//2.根据data创建新的节点
let newNode = new Node(data)
//3.插入新节点
//原链表为空
//情况1:插入的newNode是第一个节点
if (this.length == 0) {
this.head = newNode
this.tail = newNode
//原链表不为空
}else {
//情况2:position == 0
if (position == 0) {
this.head.prev = newNode
newNode.next = this.head
this.head = newNode
//情况3:position == this.length
} else if(position == this.length){
this.tail.next = newNode
newNode.prev = this.tail
this.tail = newNode
//情况4:0 < position < this.length
}else{
let current = this.head
let index = 0
while(index++ < position){
current = current.next
}
//修改pos位置前后节点变量的指向
newNode.next = current
newNode.prev = current.prev
current.prev.next = newNode
current.prev = newNode
}
}
//4.length+1
this.length += 1
return true//返回true表示插入成功
}
```
**过程详解:**
插入节点可分为多种情况:
**当原链表为空时**:
* 情况1:插入的新节点是链表的第一个节点;只需要让head和tail都指向newNode即可。
**当原链表不为空时**:
* 情况2:当position == 0,即在链表的首部添加节点:如下图所示:
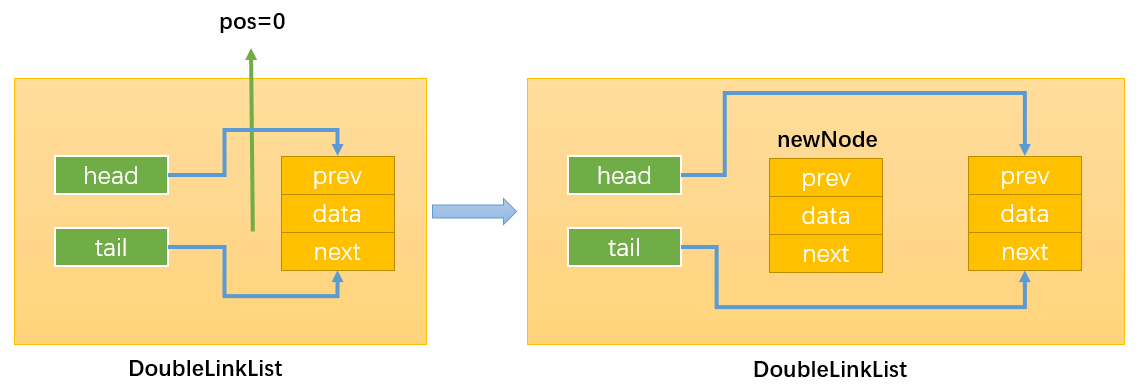
首先,通过:this.head.prev = newNode,改变指向1;
然后,通过:newNode.next = this.head,改变指向2;
最后,通过:this.head = newNode,改变指向3;

* 情况3:position == this.length,即在链表的尾部添加节点,如下图所示:

首先,通过:this.tail.next = newNode,改变指向1;(注意这里使用this.tail指向原链表最后一个节点,而不是this.head。因为当length>1时,this.head != this.tail。)
然后,通过:newNode.prev = this.tail,改变指向2;
最后,通过:this.tail = newNode,改变指向3;
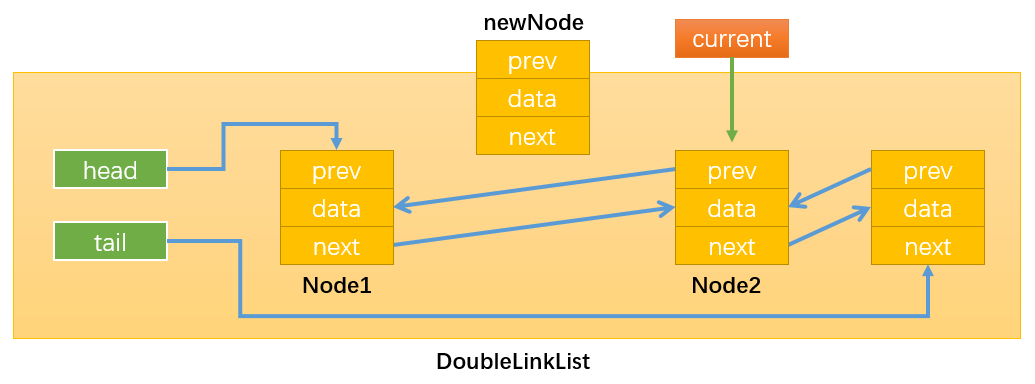
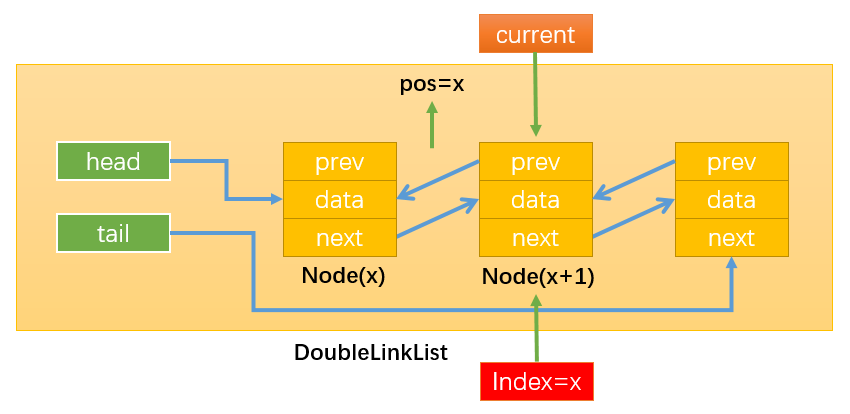
* 情况4:0 < position < this.length,即在链表的中间插入新节点,假设在position = 1的位置插入,如下图所示:

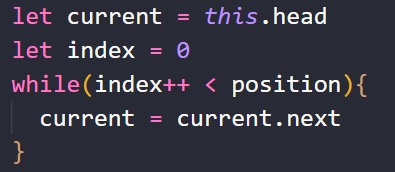
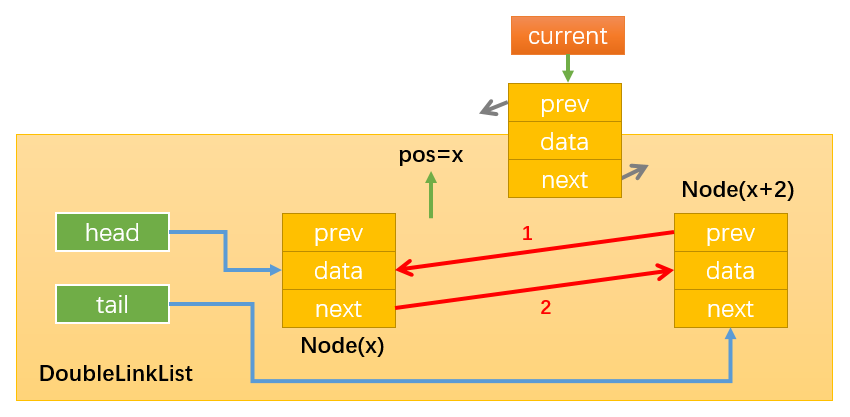
首先,需要定义变量current按照之前的思路,通过while循环找到position位置的后一个节点,循环结束后index = position
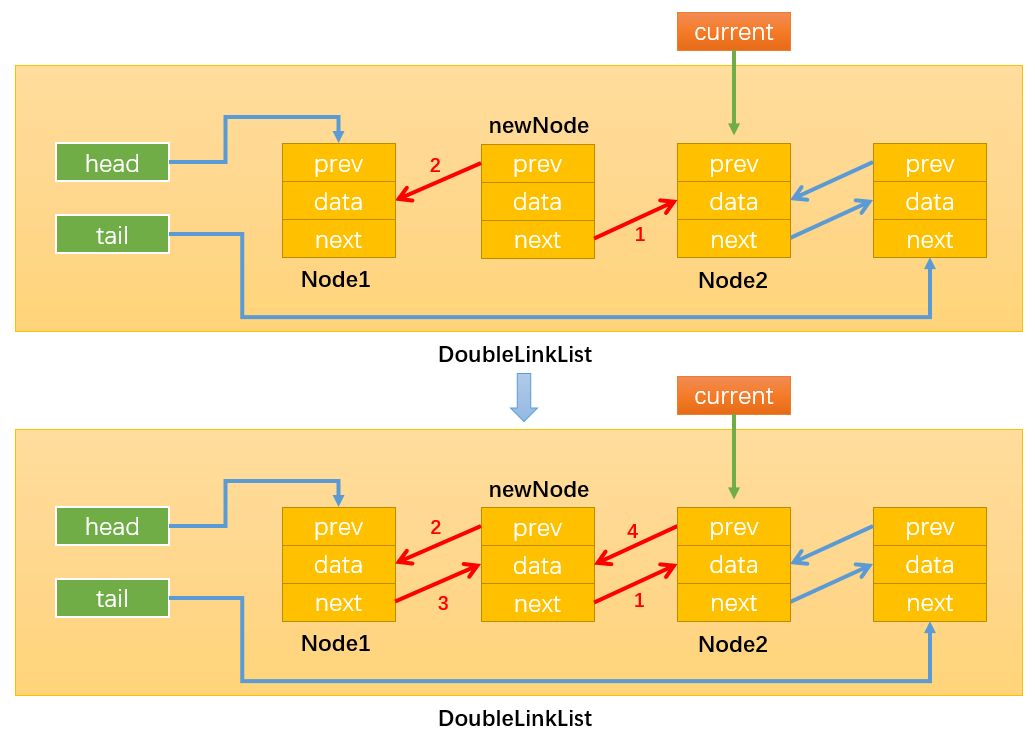
如下图所示:当position = 1时,current就指向了Node2。这样操作current就等同于间接地操作Node2,还可以通过current.prev间接获取Node1。得到了newNode的前一个节点和后一个节点就可以通过改变它们的prev和next变量的指向来插入newNode了。
通过:newNode.next = current,改变指向1;
通过:newNode.prev = current.prev,改变指向2;
通过:current.prev.next = newNode,改变指向3;
> 注意必须最后才修改current.prev的指向,不然就无法通过current.prev获取需要操作的Node1了。
通过:current.prev = current,改变指向4;
**测试代码:**
```
//测试代码
//1.创建双向链表
let list = new DoubleLinklist()
//2.测试insert方法
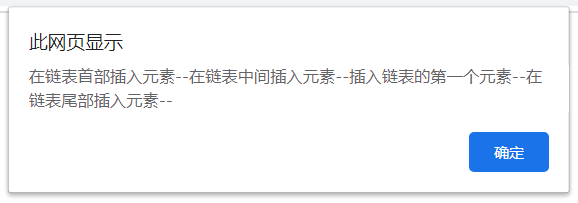
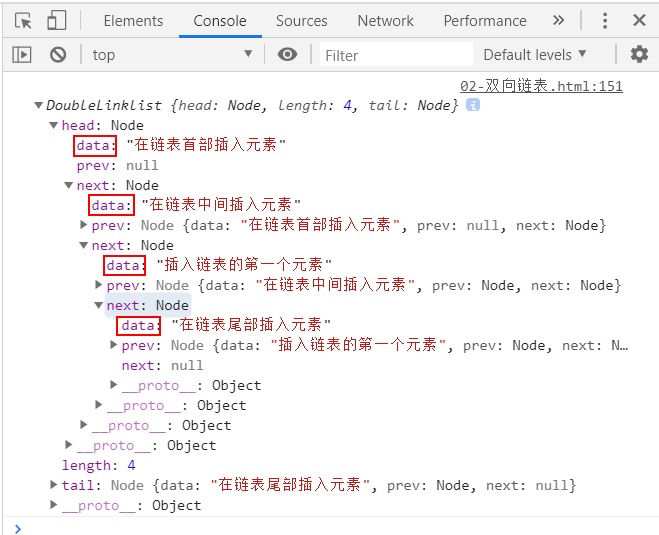
list.insert(0, '插入链表的第一个元素')
list.insert(0, '在链表首部插入元素')
list.insert(1, '在链表中间插入元素')
list.insert(3, '在链表尾部插入元素')
console.log(list);
alert(list)
```
**测试结果:**
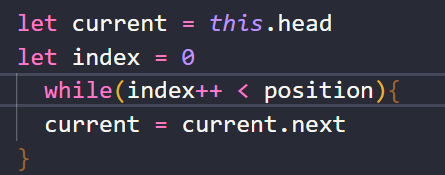
#### 2.4.get(position)
**代码实现:**
```
//get方法
DoubleLinklist.prototype.get = position => {
//1.越界判断
if (position < 0 || position >= this.length) {//获取元素时position不能等于length
return null
}
//2.获取元素
let current = null
let index = 0
//this.length / 2 > position:从头开始遍历
if ((this.length / 2) > position) {
current = this.head
while(index++ < position){
current = current.next
}
//this.length / 2 =< position:从尾开始遍历
}else{
current = this.tail
index = this.length - 1
while(index-- > position){
current = current.prev
}
}
return current.data
}
```
**过程详解:**
定义两个变量current和index,按照之前的思路通过while循环遍历分别获取当前节点和对应的索引值index,直到找到需要获取的position位置后的一个节点,此时index = pos =x,然后return current.data即可。
如果链表的节点数量很多时,这种查找方式效率不高,改进方法为:
> 一定要通过this.length来获取链表的节点数否则就会报错。
* 当this.length / 2 > position:从头(head)开始遍历;
* 当this.length / 2 < position:从尾(tail)开始遍历;
**测试代码:**
```
//测试代码
//1.创建双向链表
let list = new DoubleLinklist()
//2.测试get方法
list.append('a')
list.append('b')
list.append('b1')
list.append('b2')
list.append('b3')
list.append('b4')
list.append('b5')
list.append('b6')
list.append('b7')
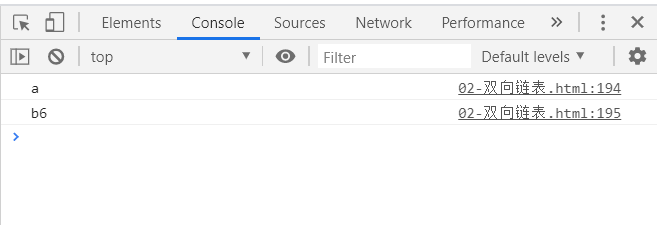
console.log(list.get(0));
console.log(list.get(7));
```
**测试结果:**
#### 2.5.indexOf(element)
**代码实现:**
```
//indexOf方法
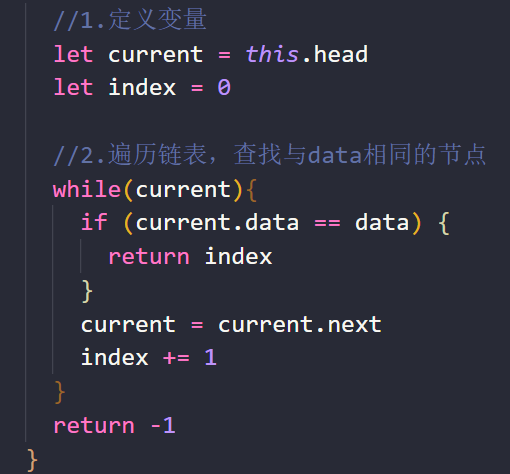
DoubleLinklist.prototype.indexOf = data => {
//1.定义变量
let current = this.head
let index = 0
//2.遍历链表,查找与data相同的节点
while(current){
if (current.data == data) {
return index
}
current = current.next
index += 1
}
return -1
}
```
**过程详解:**
以(current)作为条件,通过while循环遍历链表中的所有节点(停止条件为current = null)。在遍历每个节点时将current指向的当前节点的data和传入的data进行比较即可。
**测试代码:**
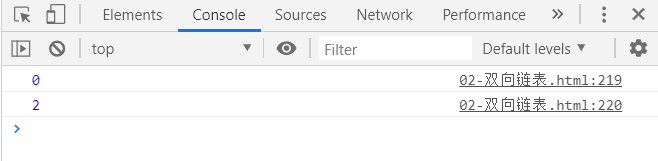
```
//测试代码
//1.创建双向链表
let list = new DoubleLinklist()
//2.测试indexOf方法
list.append('a')
list.append('b')
list.append('c')
console.log(list.indexOf('a'));
console.log(list.indexOf('c'));
```
**测试结果:**
#### 2.7.update(position,element)
**代码实现:**
```
//update方法
DoubleLinklist.prototype.update = (position, newData) => {
//1.越界判断
if (position < 0 || position >= this.length) {
return false
}
//2.寻找正确的节点
let current = this.head
let index = 0
//this.length / 2 > position:从头开始遍历
if (this.length / 2 > position) {
while(index++ < position){
current = current.next
}
//this.length / 2 =< position:从尾开始遍历
}else{
current = this.tail
index = this.length - 1
while (index -- > position) {
current = current.prev
}
}
//3.修改找到节点的data
current.data = newData
return true//表示成功修改
}
```
**过程详解:**
以(index++ < position)为条件,通过while循环遍历链表中的节点(停止条件为index = position)。循环结束后,current指向需要修改的节点。
**测试代码:**
```
//测试代码
//1.创建双向链表
let list = new DoubleLinklist()
//2.测试update方法
list.append('a')
list.append('b')
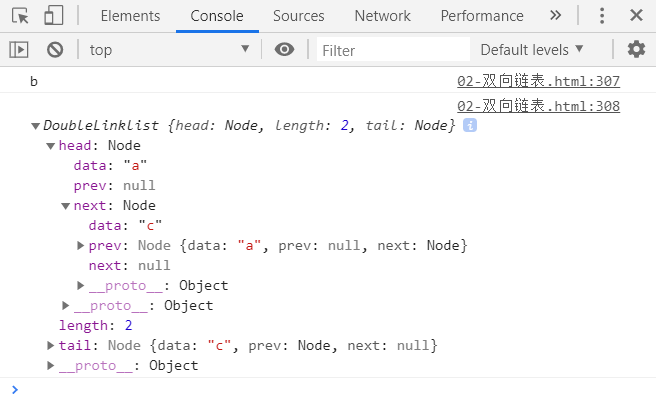
console.log(list.update(1, 'c'));
console.log(list);
```
**测试结果:**

#### 2.8.removeAt(position)
**代码实现:**
```
//removeAt方法
DoubleLinklist.prototype.removeAt = position => {
//1.越界判断
if (position < 0 || position >= this.length) {
return null
}
//2.删除节点
//当链表中length == 1
//情况1:链表只有一个节点
let current = this.head//定义在最上面方便以下各种情况返回current.data
if (this.length == 1) {
this.head = null
this.tail = null
//当链表中length > 1
} else{
//情况2:删除第一个节点
if (position == 0) {
this.head.next.prev = null
this.head = this.head.next
//情况3:删除最后一个节点
}else if(position == this.length - 1){
current = this.tail//该情况下返回被删除的最后一个节点
this.tail.prev.next = null
this.tail = this.tail.prev
}else{
//情况4:删除链表中间的节点
let index = 0
while(index++ < position){
current = current.next
}
current.next.prev = current.prev
current.prev.next = current.next
}
}
//3.length -= 1
this.length -= 1
return current.data//返回被删除节点的数据
}
```
**过程详解:**
删除节点时有多种情况:
**当链表的length = 1时**:
* 情况1:删除链表中的所有节点:只需要让链表的head和tail指向null即可。
**当链表的length > 1时**:
* 情况2:删除链表中的第一个节点:
通过:this.head.next.prev = null,改变指向1;
通过:this.head = this.head.next,改变指向2;
虽然Node1有引用指向其它节点,但是没有引用指向Node1,那么Node1会被自动回收。

* 情况3:删除链表中的最后一个节点:
通过:this.tail.prev.next = null,修改指向1;
通过:this.tail = this.tail.prev,修改指向2;
* 情况4:删除链表中间的节点:
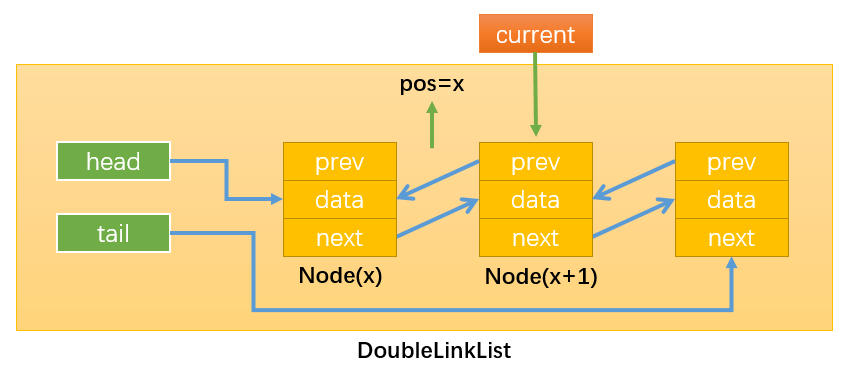
通过while循环找到需要删除的节点,比如position = x,那么需要删除的节点就是Node(x+1),如下图所示:

通过:current.next.prev = current.prev,修改指向1;
通过:current.prev.next = current.next,修改指向2;
这样就没有引用指向Node(x+1)了(current虽指向Node(x+1),但current时临时变量,该方法执行完就会被销毁),随后Node(x+1)就会被自动删除。
**测试代码:**
```
//测试代码
//1.创建双向链表
let list = new DoubleLinklist()
//2.测试removeAt方法
list.append('a')
list.append('b')
list.append('c')
console.log(list.removeAt(1));
console.log(list);
```
**测试结果:**
#### 2.9.其他方法
其他方法包括:**remove(element)、isEmpty()、size()、getHead()、getTail()**
**代码实现:**
```
/*--------------------其他方法-------------------*/
//八.remove方法
DoubleLinklist.prototype.remove = data => {
//1.根据data获取下标值
let index = this.indexOf(data)
//2.根据index删除对应位置的节点
return this.removeAt(index)
}
//九.isEmpty方法
DoubleLinklist.prototype.isEmpty = () => {
return this.length == 0
}
//十.size方法
DoubleLinklist.prototype.size = () => {
return this.length
}
//十一.getHead方法:获取链表的第一个元素
DoubleLinklist.prototype.getHead = () => {
return this.head.data
}
//十二.getTail方法:获取链表的最后一个元素
DoubleLinklist.prototype.getTail = () => {
return this.tail.data
}
```
**测试代码:**
```
//测试代码
//1.创建双向链表
let list = new DoubleLinklist()
/*------------其他方法的测试--------------*/
list.append('a')
list.append('b')
list.append('c')
list.append('d')
//remove方法
console.log(list.remove('a'));
console.log(list);
//isEmpty方法
console.log(list.isEmpty());
//size方法
console.log(list.size());
//getHead方法
console.log(list.getHead());
//getTead方法
console.log(list.getTail());
```
**测试结果:**

#### 2.10.完整实现
//封装双向链表
function DoubleLinklist(){
//封装内部类:节点类
function Node(data){
this.data = data
this.prev = null
this.next = null
}
//属性
this.head = null
this.tail ==null
this.length = 0
//常见的操作:方法
//一.append方法
DoubleLinklist.prototype.append = data => {
//1.根据data创建新节点
let newNode = new Node(data)
//2.添加节点
//情况1:添加的是第一个节点
if (this.length == 0) {
this.tail = newNode
this.head = newNode
//情况2:添加的不是第一个节点
}else {
newNode.prev = this.tail
this.tail.next = newNode
this.tail = newNode
}
//3.length+1
this.length += 1
}
//二.将链表转变为字符串形式
//2.1.toString方法
DoubleLinklist.prototype.toString = () => {
return this.backwardString()
}
//2.2.forwardString方法
DoubleLinklist.prototype.forwardString = () => {
//1.定义变量
let current =this.tail
let resultString = ""
//2.依次向前遍历,获取每一个节点
while (current) {
resultString += current.data + "--"
current = current.prev
}
return resultString
}
//2.3.backwardString方法
DoubleLinklist.prototype.backwardString = () => {
//1.定义变量
let current = this.head
let resultString = ""
//2.依次向后遍历,获取每一个节点
while (current) {
resultString += current.data + "--"
current = current.next
}
return resultString
}
//三.insert方法
DoubleLinklist.prototype.insert = (position, data) => {
//1.越界判断
if (position < 0 || position > this.length) return false
//2.根据data创建新的节点
let newNode = new Node(data)
//3.插入新节点
//原链表为空
//情况1:插入的newNode是第一个节点
if (this.length == 0) {
this.head = newNode
this.tail = newNode
//原链表不为空
}else {
//情况2:position == 0
if (position == 0) {
this.head.prev = newNode
newNode.next = this.head
this.head = newNode
//情况3:position == this.length
} else if(position == this.length){
this.tail.next = newNode
newNode.prev = this.tail
this.tail = newNode
//情况4:0 < position < this.length
}else{
let current = this.head
let index = 0
while(index++ < position){
current = current.next
}
//修改pos位置前后节点变量的指向
newNode.next = current
newNode.prev = current.prev
current.prev.next = newNode
current.prev = newNode
}
}
//4.length+1
this.length += 1
return true//返回true表示插入成功
}
//四.get方法
DoubleLinklist.prototype.get = position => {
//1.越界判断
if (position < 0 || position >= this.length) {//获取元素时position不能等于length
return null
}
//2.获取元素
let current = null
let index = 0
//this.length / 2 > position:从头开始遍历
if ((this.length / 2) > position) {
current = this.head
while(index++ < position){
current = current.next
}
//this.length / 2 =< position:从尾开始遍历
}else{
current = this.tail
index = this.length - 1
while(index-- > position){
current = current.prev
}
}
return current.data
}
//五.indexOf方法
DoubleLinklist.prototype.indexOf = data => {
//1.定义变量
let current = this.head
let index = 0
//2.遍历链表,查找与data相同的节点
while(current){
if (current.data == data) {
return index
}
current = current.next
index += 1
}
return -1
}
//六.update方法
DoubleLinklist.prototype.update = (position, newData) => {
//1.越界判断
if (position < 0 || position >= this.length) {
return false
}
//2.寻找正确的节点
let current = this.head
let index = 0
//this.length / 2 > position:从头开始遍历
if (this.length / 2 > position) {
while(index++ < position){
current = current.next
}
//this.length / 2 =< position:从尾开始遍历
}else{
current = this.tail
index = this.length - 1
while (index -- > position) {
current = current.prev
}
}
//3.修改找到节点的data
current.data = newData
return true//表示成功修改
}
//七.removeAt方法
DoubleLinklist.prototype.removeAt = position => {
//1.越界判断
if (position < 0 || position >= this.length) {
return null
}
//2.删除节点
//当链表中length == 1
//情况1:链表只有一个节点
let current = this.head//定义在最上面方便以下各种情况返回current.data
if (this.length == 1) {
this.head = null
this.tail = null
//当链表中length > 1
} else{
//情况2:删除第一个节点
if (position == 0) {
this.head.next.prev = null
this.head = this.head.next
//情况3:删除最后一个节点
}else if(position == this.length - 1){
current = this.tail//该情况下返回被删除的最后一个节点
this.tail.prev.next = null
this.tail = this.tail.prev
}else{
//情况4:删除链表中间的节点
let index = 0
while(index++ < position){
current = current.next
}
current.next.prev = current.prev
current.prev.next = current.next
}
}
//3.length -= 1
this.length -= 1
return current.data//返回被删除节点的数据
}
/*--------------------其他方法-------------------*/
//八.remove方法
DoubleLinklist.prototype.remove = data => {
//1.根据data获取下标值
let index = this.indexOf(data)
//2.根据index删除对应位置的节点
return this.removeAt(index)
}
//九.isEmpty方法
DoubleLinklist.prototype.isEmpty = () => {
return this.length == 0
}
//十.size方法
DoubleLinklist.prototype.size = () => {
return this.length
}
//十一.getHead方法:获取链表的第一个元素
DoubleLinklist.prototype.getHead = () => {
return this.head.data
}
//十二.getTail方法:获取链表的最后一个元素
DoubleLinklist.prototype.getTail = () => {
return this.tail.data
}
}
### 三、链表结构总结
单向链表有head和next两个属性,双向链表有head、tail、next、prev四个属性。处理好它们的指向,相当于将它们正确地连接在一起,这样就组成了一条链,这就是简单链表的实现。
在实际开发中链表使用得非常多,比如Java中的**LinkList**就是双向链表。
#### 3.1.注意点
* 在链表中current = current.next 可以从左往右看,看成是current --> current.next,即current指向current的下一个节点。
* 删除节点的原理:只要没有引用指向该对象,无论该对象是否有引用指向其他对象,该对象都会被回收(删除)。
* 参数中凡是有position的都要进行越界判断。
#### 3.2.链表的增删改查
以双向链表为例:**链表的增删改查无非就是获取链表中相应的节点改变其中的prev和next两个变量的指向**。
* **情况一**:只需要**head**和**tail**两个变量就可以获取需要操作的变量(这里指的是能够轻松获取,当然你想通过head.next.next...或tail.prev.prev...来获取想要的节点也可以),在这种情况下链表的长度length:**0 <= length <=2**。
* **情况二**:不能靠tail和head来获取到需要操作的变量时,可采用while循环遍历的方式,找到需要操作的节点:

在这种情况下,如果我们想要在链表的position = x的位置插入新节点,那么可以通过current获取position的后一个节点Node(x+1),通过current.prev获取position位置的前一个节点Node(x);之后修改Node(x+1)和Node(x)中的prev和next两个变量的指向即可在pos=x 的位置插入新节点。
#### 3.3.修改链表引用指向
**应先修改newNode引用的指向,再修改其他引用**
* 情况1:通过head和tail引用就能获取需要操作的节点时,最后更改head或tail变量的指向(因为它们分别指向链表的第一个和最后一个节点,获取其他节点时可能需要用到它们)。
* 情况2:使用current获取到需要操作的节点时,最后更改curren.next或current.prev的指向。因为current.next和current.prev表示的是Node(x+2)和Node(x)这两个节点,如下图所示,一旦变更它们的指向就无法获取Node(x)或Node(x+2)了,

#### 3.4.遍历链表
**积累两种遍历思路**
* 获取指定的position = x 位置的后一个节点和索引值:


循环结束后index = position = x,变量current就指向了Node(x+1),变量index的值为Node(x+1)的索引值x。
* 遍历链表中的所有节点:

当current.next = null时停止循环,此时current指向链表的最后一个节点。
> 参考资料:[JavaScript数据结构与算法](https://www.bilibili.com/video/av86801505?from=search&seid=4967761411915016256)

