## 目录
[TOC]
## 使用的主要库及工具
1. `requests`
2. `aiohttp`
3. `lxml`
4. `Beautiful Soup`
5. `pyquery`
6. `asyncio`
7. `fake_useragent`
8. `pymongo`
9. `MongoDB`
10. `python3.7`
## 一.内容简介
1. 分析网页代码,爬取网页信息(爬取10页信息);
2. 体验下利用不同的解析库来获取代理(`IP:Port`和类型);
3. 对获取的代理进行测试筛选;
4. 将筛选成功的代理存入MongoDB。
## 二. 过程
### (一) 分析
网页代码
#### 1.页面分析
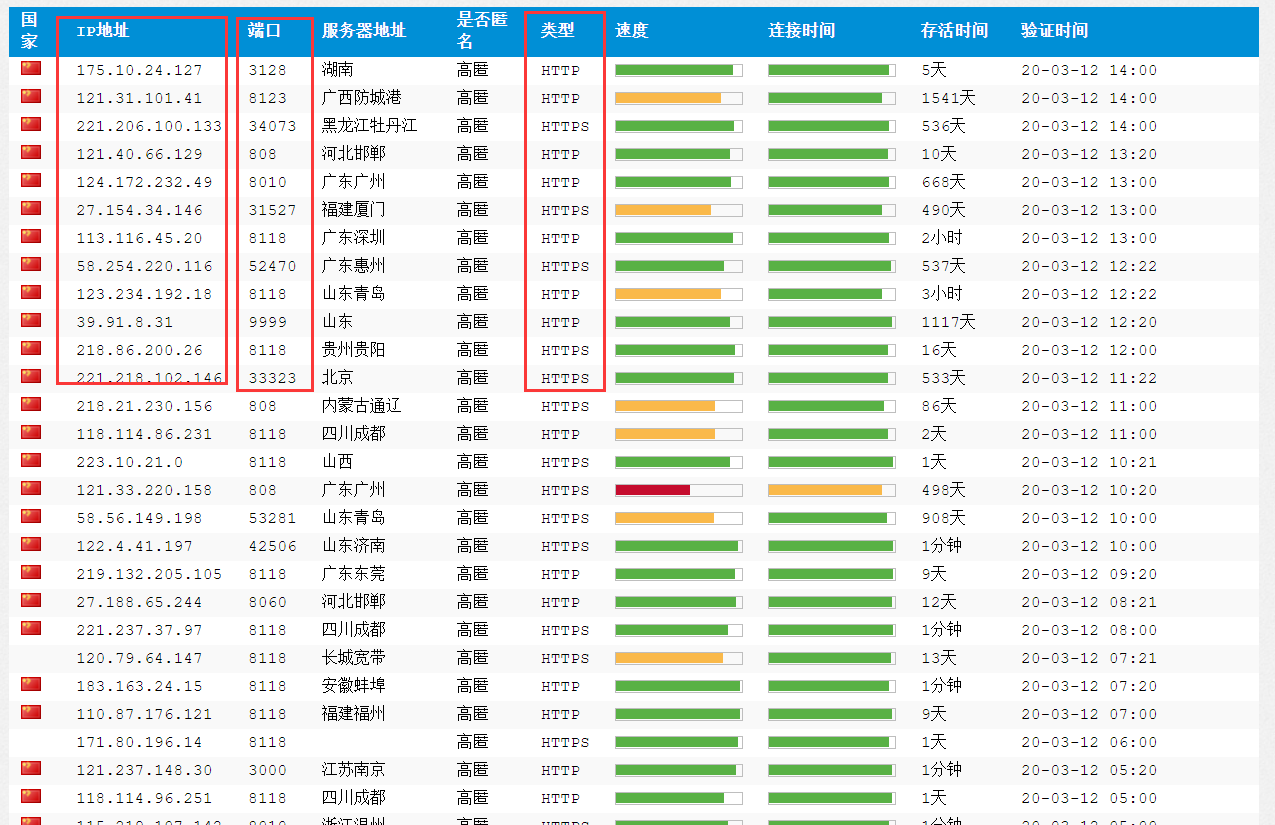
要爬取的网站页面第一页如下,IP地址、端口以及类型是我们的抓取目标。
进入第二页,观察`url`的变化:
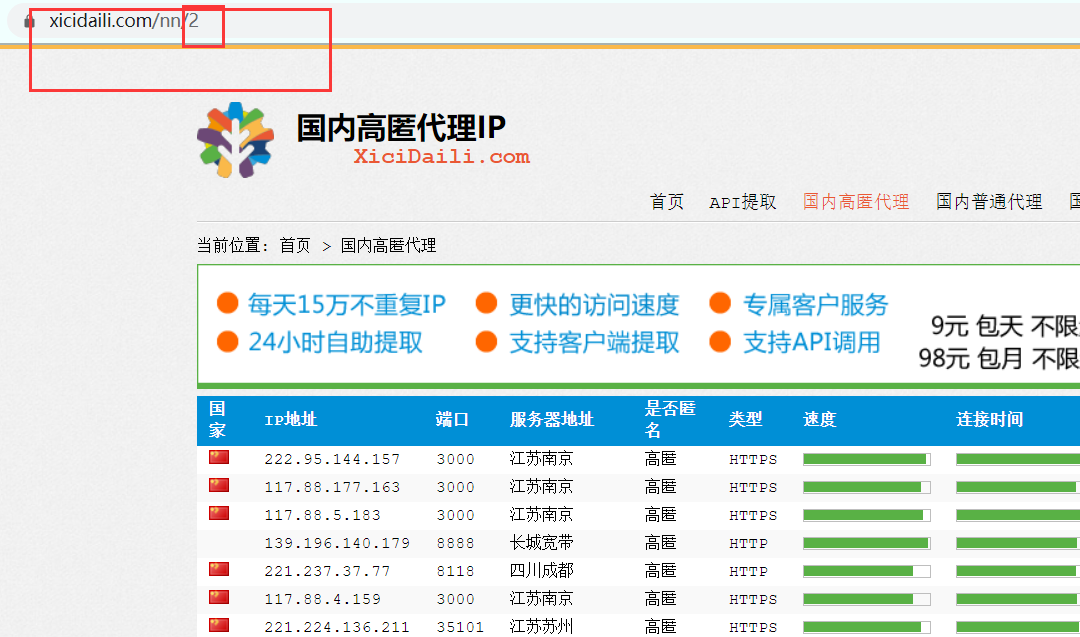
可以发现,`url`从变成了,后面几页以此类推,从而可以得出链接后面所跟的数字就代表了是第几页。
接下来在页面中打开开发者工具,进入`Network`,定位到接收的页面内容,如下:
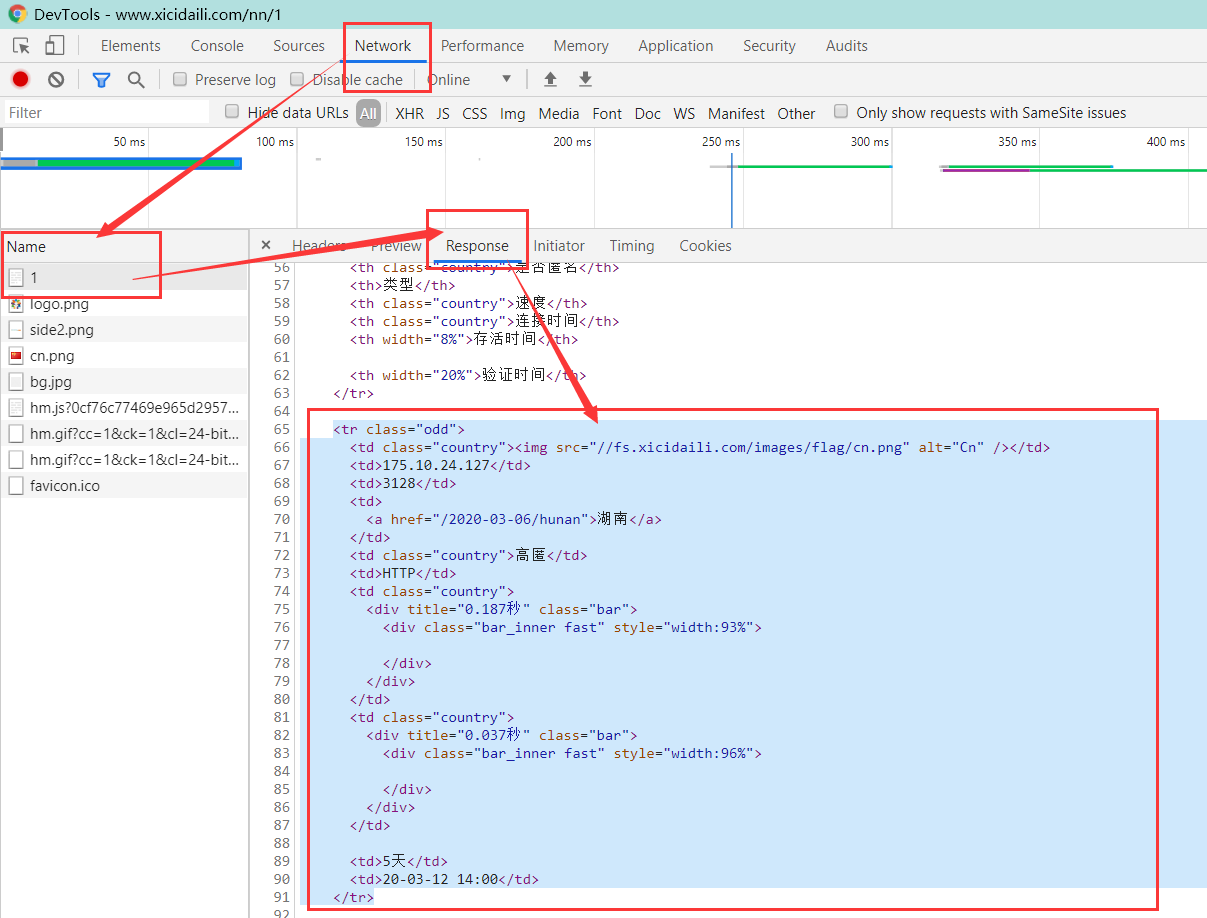
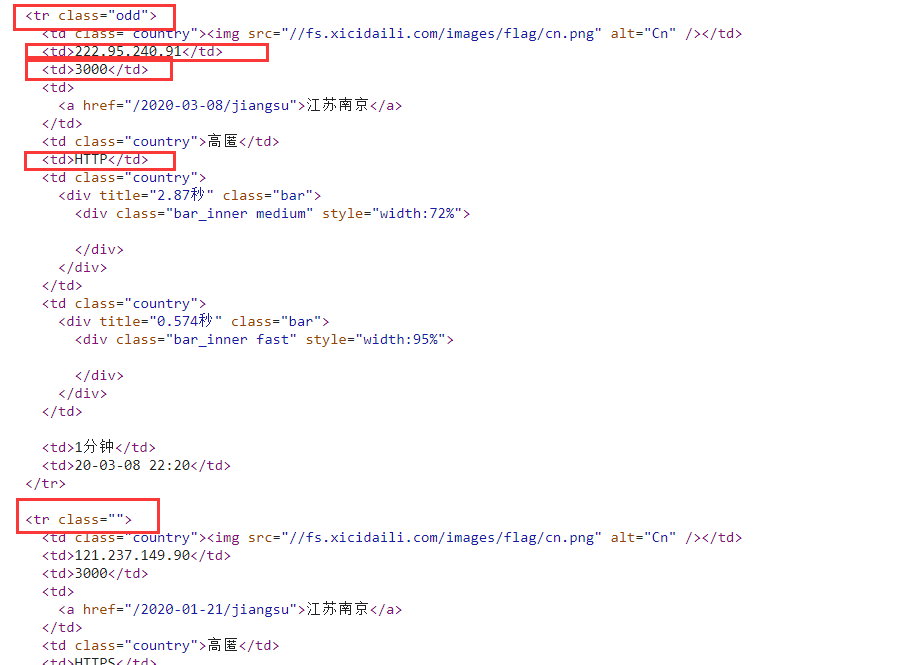
可以发现,我们将要爬取的代理信息都存在于一对`<\tr>`标签中,进一步继续分析,还可以发现这些标签的`class`要么是`"odd"`,要么就是`""`,而我们想要的信息中,`ip`地址位于``tr``标签下的第二个`td`标签,端口位于第三个`td`标签,类型位于第六个`td`标签。
接下来我们就可以开始使用解析库来尝试爬取了,分别用`lxml`、`Beautiful Soup`以及`pyquery`三个常用的解析库来进行解析。
#### 2. 抓取页首
使用`requests`库(后来因为使用代理及测试代理的原因,改用成了异步协程请求库`aiohttp`,详见:[问题:ip地址被封禁](#(一)ip地址被封禁)),先试下直接获取:
```python
import requests
response = requests.get("http://www.xicidaili.com/nn/1")
print(response.text)
```
结果如下:
```
503 Service Temporarily Unavailable
503 Service Temporarily Unavailable
nginx/1.1.19
```
返回了状态码503,表示服务不可用,因此还要做些处理,尝试加入请求头:
```python
import requests
header = {'User-Agent':"Mozilla/5.0 (Windows NT 10.0; Win64; x64) AppleWebKit/537.36 (KHTML, like Gecko) Chrome/80.0.3987.132 Safari/537.36"}
response = requests.get("http://www.xicidaili.com/nn/1", headers = header)
print(response.text)
```
输出结果如下:
```
国内高匿免费HTTP代理IP__第1页国内高匿
......
```
这样就可以正常获取页面信息了。接下来选择使用不同的解析库进行页面解析。
### (二) 使用不同解析库爬取信息
#### 1. 使用`lxml`库进行解析
```python
import requests
def get_page():
try:
header = {'User-Agent':"Mozilla/5.0 (Windows NT 10.0; Win64; x64) AppleWebKit/537.36 (KHTML, like Gecko) Chrome/80.0.3987.132 Safari/537.36"}
response = requests.get("http://www.xicidaili.com/nn/1", headers = header)
get_detail(response.text)
except Exception as e:
print("发生错误: ", e)
# 使用lxml爬取
from lxml import etree
def get_detail(html):
html = etree.HTML(html)
# 爬取ip地址信息
print(html.xpath('//tr[@class="odd" or @class=""]/td[2]/text()'))
if __name__ == "__main__":
get_page()
```
首先尝试获取第一页的所有ip地址信息,使用XPath规则`'//tr[@class="odd"]/td[2]/text()'`进行提取,结果如下:
```
['121.40.66.129', '117.88.177.132', '117.88.176.203', '218.21.230.156', '121.31.101.41', '60.205.188.24', '221.206.100.133', '27.154.34.146', '58.254.220.116', '39.91.8.31', '221.218.102.146', '223.10.21.0', '58.56.149.198', '219.132.205.105', '221.237.37.97', '183.163.24.15', '171.80.196.14', '118.114.96.251', '114.239.91.166', '111.222.141.127', '121.237.148.133', '123.168.67.126', '118.181.226.166', '121.237.148.190', '124.200.36.118', '58.58.213.55', '49.235.253.240', '183.147.11.34', '121.40.162.239', '121.237.148.139', '121.237.148.118', '117.88.5.174', '117.88.5.234', '117.87.180.144', '119.254.94.93', '60.2.44.182', '175.155.239.23', '121.237.148.156', '118.78.196.186', '123.118.108.201', '117.88.4.71', '113.12.202.50', '117.88.177.34', '117.88.4.35', '222.128.9.235', '121.237.148.131', '121.237.149.243', '121.237.148.8', '182.61.179.157', '175.148.68.133']
```
结果没有错误,同理可以得到端口及类型:
```python
from lxml import etree
def get_detail(html):
html = etree.HTML(html)
# 爬取ip地址信息
print(html.xpath('//tr[@class="odd" or @class=""]/td[2]/text()')[:10])
# 爬取端口信息
print(html.xpath('//tr[@class="odd" or @class=""]/td[3]/text()')[:10])
# 爬取类型信息
print(html.xpath('//tr[@class="odd" or @class=""]/td[6]/text()')[:10])
# 统计一页有多少条数据
print(len(html.xpath('//tr[@class="odd" or @class=""]/td[6]/text()')))
```
结果如下,输出结果显示一页一共有100条数据:
```
['121.237.149.117', '121.237.148.87', '59.44.78.30', '124.93.201.59', '1.83.117.56', '117.88.176.132', '121.40.66.129', '222.95.144.201', '117.88.177.132', '121.237.149.132']
['3000', '3000', '42335', '59618', '8118', '3000', '808', '3000', '3000', '3000']
['HTTP', 'HTTP', 'HTTP', 'HTTPS', 'HTTP', 'HTTP', 'HTTP', 'HTTP', 'HTTP', 'HTTP']
100
```
#### 2. 使用`Beautiful Soup`进行解析
页面的表格结构如下:
```
| 国家 |
IP地址 |
端口 |
服务器地址 |
是否匿名 |
类型 |
速度 |
连接时间 |
存活时间 |
验证时间 |
 |
222.128.9.235 |
59593 |
北京
|
高匿 |
HTTPS |
|
|
533天 |
20-03-13 15:21 |
...
```
首先选择`table`下的所有`tr`标签:
```python
from bs4 import BeautifulSoup
def get_detail(html):
soup = BeautifulSoup(html, 'lxml')
c1 = soup.select('#ip_list tr')
print(c1[1])
```
结果如下:
```
|
222.128.9.235 |
59593 |
北京
|
高匿 |
HTTPS |
|
|
533天 |
20-03-13 15:21 |
```
接下来就是将每一个`tr`标签中的第二个(`ip`)、第三个(端口)以及第六个(类型)`td`标签选取出来:
```python
from bs4 import BeautifulSoup
def get_detail(html):
soup = BeautifulSoup(html, 'lxml')
c1 = soup.select('#ip_list tr')
ls = []
for index, tr in enumerate(c1):
if index != 0:
td = tr.select('td')
ls.append({'proxies': td[1].string + ":" + td[2].string,
'types': td[5].string})
print(ls)
print(len(ls))
```
结果如下:
```
[{'proxies': '222.128.9.235:59593', 'types': 'HTTPS'}, {'proxies': '115.219.105.60:8010', 'types': 'HTTP'}, {'proxies': '117.88.177.204:3000', 'types': 'HTTP'}, {'proxies': '222.95.144.235:3000', 'types': 'HTTP'}, {'proxies': '59.42.88.110:8118', 'types': 'HTTPS'}, {'proxies': '118.181.226.166:44640', 'types': 'HTTP'}, {'proxies': '121.237.149.124:3000', 'types': 'HTTP'}, {'proxies': '218.86.200.26:8118', 'types': 'HTTPS'}, {'proxies': '106.6.138.18:8118', 'types': 'HTTP'}......]
100
```
每页100条数据,结果无误。
#### 3.使用`pyquery`进行解析
`pyquery`解析办法和`Beautiful Soup`类似,首先将表格的第一行删除,然后选取表格中的`tr`标签:
```python
from pyquery import PyQuery as pq
def get_detail(html):
doc = pq(html)
doc('tr:first-child').remove() # 删除第一行
items = doc('#ip_list tr')
print(items)
```
从输出结果可以看出`items`中每一项的格式:
```
...
|
124.205.143.210 |
34874 |
北京
|
高匿 |
HTTPS |
|
|
523天 |
20-03-12 02:20 |
...
```
接下来通过生成器将每一项取出来,选取第二个`td`标签(`ip`地址),第三个`td`标签(端口号)以及第六个`td`标签(类型),用列表字典的格式进行存储。
```python
from pyquery import PyQuery as pq
def get_detail(html):
doc = pq(html)
doc('tr:first-child').remove() # 删除第一行
items = doc('#ip_list tr')
ls = []
for i in items.items():
tmp1 = i('td:nth-child(2)') # 选取ip地址
tmp2 = i('td:nth-child(3)') # 选取端口
tmp3 = i('td:nth-child(6)') # 选取类型
ls.append({'proxies': tmp1.text() + ":" + tmp2.text(),
'types': tmp3.text()})
print(ls)
print(len(ls))
```
输出结果如下:
```
[{'proxies': '222.128.9.235:59593', 'types': 'HTTPS'}, {'proxies': '115.219.105.60:8010', 'types': 'HTTP'}, {'proxies': '117.88.177.204:3000', 'types': 'HTTP'}, {'proxies': '222.95.144.235:3000', 'types': 'HTTP'}, {'proxies': '59.42.88.110:8118', 'types': 'HTTPS'}, {'proxies': '118.181.226.166:44640', 'types': 'HTTP'}, {'proxies': '121.237.149.124:3000', 'types': 'HTTP'}, {'proxies': '218.86.200.26:8118', 'types': 'HTTPS'}......
100
```
每页结果100条数据,无误。
### (三)选择[百度网站](http://www.baidu.com)来对抓取得到的代理进行测试
爬取得到的免费代理中有许多都是不好用或不稳定的,还不能直接就进行存储,因此需要先选择一个站点来测试我们抓取到的代理是否能够请求成功,我选择了来作为测试,只有能成功请求的代理才会讲其加入到数据库中去,请求失败次数超过3次就丢弃。
对于检测代理这种一般需要十几秒甚至更长时间的事情来说,使用requests一个个排队检测显然不合理,因此需要选择异步请求库`aiohttp`,关于异步协程的介绍,可以参考[Python中异步协程的使用方法介绍](https://cuiqingcai.com/6160.html),关于`aiohttp`的介绍,可以参考[aiohttp中文文档](https://hubertroy.gitbooks.io/aiohttp-chinese-documentation/content/)。
主要的两个关键字就是`await`和`async`,简单地说就是在线程可能出现等待的地方A加一个`await`修饰,然后线程到这个地方的时候就不会在这干等着了,而是跑去执行其他任务B,等到等待的对象A有反应后,又立刻回来继续A下面的其他任务,这时任务B就暂时搁置了。但`await`后面的对象必须是`coroutine`对象,或者是一个可以返回 `coroutine` 对象的生成器,或者是一个包含 `__await `方法的对象返回的一个迭代器(这就是为什么不能直接在`requests`前面加`await`的原因)。而我们函数加上`async`修饰后,函数返回的对象就变成了`coroutine`对象了,于是就可以“无脑”地来添加`await`与`async`组合,当然,如果添加`await`的地方不是那种需要等待请求响应或等待数据上传下载之类的会让线程进入阻塞状态的地方的话,是不会起到什么效果的,当然也不会有什么错误。
检测代理的函数如下:
```python
# 测试代理
async def test_proxy(self, dic):
## 根据类型构造不同的代理及url
if dic["types"] == "HTTP":
test_url = "http://www.baidu.com/"
prop = "http://" + dic["proxies"]
else:
test_url = "https://www.baidu.com/"
prop = "https://" + dic["proxies"]
ua = UserAgent()
header = {'User-Agent': ua.random}
# 异步协程请求
async with aiohttp.ClientSession() as session:
while True:
try:
async with session.get(test_url, headers = header, proxy = prop, timeout = 15, verify_ssl=False) as resp:
if resp.status == 200:
self.success_test_count += 1
print(prop, "\033[5;36;40m===========>测试成功,写入数据库!=========%d次\033[;;m"%self.success_test_count)
await self.insert_to_mongo(dic) ## 调用写入mongodb数据库的函数
return
except Exception as e:
print(prop, "==测试失败,放弃==", e)
break
```
### (四)选择存储的数据库
考虑到以后还会对代理池进行进一步的维护,因此选择使用MongoDB来进行存储,插入数据时还可以很方便地避免重复,数据库存储函数如下:
```python
# 写入MongoDB数据库
async def insert_to_mongo(self, dic):
db = self.client.Myproxies
collection = db.proxies
collection.update_one(dic,{'$set': dic}, upsert=True) # 设置upsert=True,避免重复插入
print("\033[5;32;40m插入记录:" + json.dumps(dic), "\033[;;m")
```
### (五)完整代码
#### 1.爬取阶段使用代理的版本
最后,完整的代码如下(这是在爬取代理的阶段就使用代理进行请求的版本,因此我本机的`ip`被封了,所以不得不这么做,过程会比较慢,后面继续贴出爬取数据阶段不用代理,测试时在使用代理的版本),在三种解析库中选择了最开始说到的`lxml`进行解析:
```python
import json
import time
import random
from fake_useragent import UserAgent
import asyncio
import aiohttp
# 避免出现RuntimeError错误
import nest_asyncio
nest_asyncio.apply()
from lxml import etree
import pymongo
class Get_prox:
def __init__(self):
# 初始化,连接MongoDB
self.client = pymongo.MongoClient('mongodb://localhost:27017/')
self.success_get_count = 0
self.success_test_count = 0
# 使用代理时,获取页面
async def get_page(self, session, url):
## 一个随机生成请求头的库
ua = UserAgent()
header = {'User-Agent': ua.random}
# 从本地文件获取代理池
proxies_pool = self.get_proxies()
while True:
try:
# 由于我一开始操作不慎ip被封禁了,因此在一开始抓取ip时我不得不使用了自己从
# 其他网站抓来的一批代理(如问题描述中所述),一共有5999条代理,每次随机选取一条
p = 'http://' + random.choice(proxies_pool)
async with session.get(url, headers = header, proxy = p, timeout = 10) as response:
await asyncio.sleep(2)
if response.status == 200:
self.success_get_count += 1
print("\033[5;36;40m----------------------请求成功-------------------%d次\033[;;m"%self.success_get_count)
return await response.text()
else:
print("\033[5;31;m", response.status, "\033[;;m")
continue
except Exception as e:
print("请求失败orz", e)
# 任务
async def get(self, url):
async with aiohttp.ClientSession() as session:
html = await self.get_page(session, url)
await self.get_detail(html)
# 测试代理
async def test_proxy(self, dic):
## 根据类型构造不同的代理及url
if dic["types"] == "HTTP":
test_url = "http://www.baidu.com/"
prop = "http://" + dic["proxies"]
else:
test_url = "https://www.baidu.com/"
prop = "https://" + dic["proxies"]
ua = UserAgent()
header = {'User-Agent': ua.random}
# 异步协程请求
async with aiohttp.ClientSession() as session:
while True:
try:
async with session.get(test_url, headers = header, proxy = prop, timeout = 15, verify_ssl=False) as resp:
if resp.status == 200:
self.success_test_count += 1
print(prop, "\033[5;36;40m===========>测试成功,写入数据库!=========%d次\033[;;m"%self.success_test_count)
await self.insert_to_mongo(dic) ## 调用写入mongodb数据库的函数
return
except Exception as e:
print(prop, "==测试失败,放弃==", e)
break
# 获取代理池
def get_proxies(self):
with open("proxies.txt", "r") as f:
ls = json.loads(f.read())
return ls
# 使用lxml爬取
async def get_detail(self, html):
html = etree.HTML(html)
dic = {}
ip = html.xpath('//tr[@class="odd" or @class=""]/td[2]/text()')
port = html.xpath('//tr[@class="odd" or @class=""]/td[3]/text()')
types = html.xpath('//tr[@class="odd" or @class=""]/td[6]/text()')
for i in range(len(ip)):
dic['proxies'] = ip[i] + ":" + port[i]
dic['types'] = types[i]
await self.test_proxy(dic)
# 写入MongoDB数据库
async def insert_to_mongo(self, dic):
db = self.client.Myproxies
collection = db.proxies
collection.update_one(dic,{'$set': dic}, upsert=True) # 设置upsert=True,避免重复插入
print("\033[5;32;40m插入记录:" + json.dumps(dic), "\033[;;m")
# 主线程
if __name__ == "__main__":
urls = []
start = time.time()
# 抓取前10页数据
for i in range(1, 11):
urls.append("http://www.xicidaili.com/nn/" + str(i))
c = Get_prox()
# 创建10个未来任务对象
tasks = [asyncio.ensure_future(c.get(url)) for url in urls]
loop = asyncio.get_event_loop()
loop.run_until_complete(asyncio.wait(tasks))
end = time.time()
total = (end - start)/60.0
print("完成,总耗时:", total, "分钟!")
```
执行过程会打印许多日志,部分日志如下:
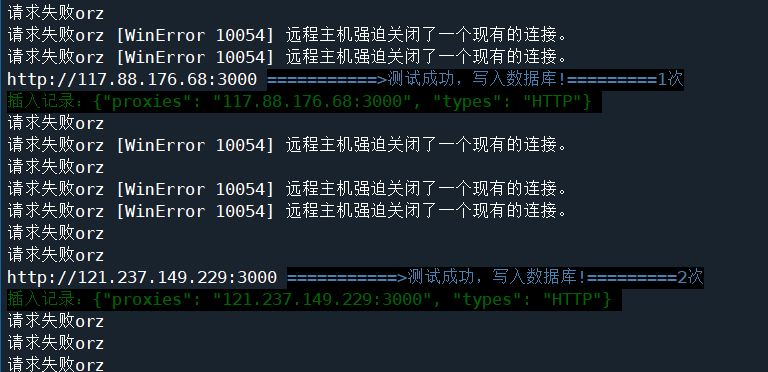
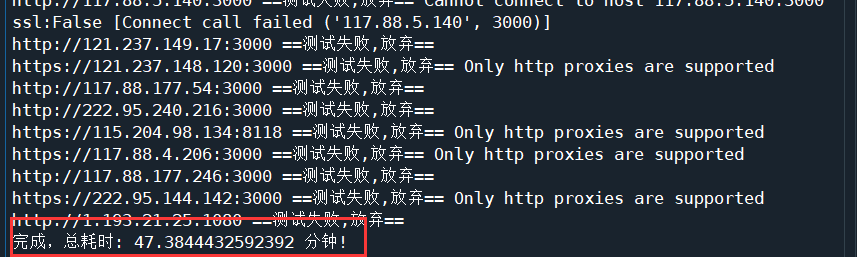
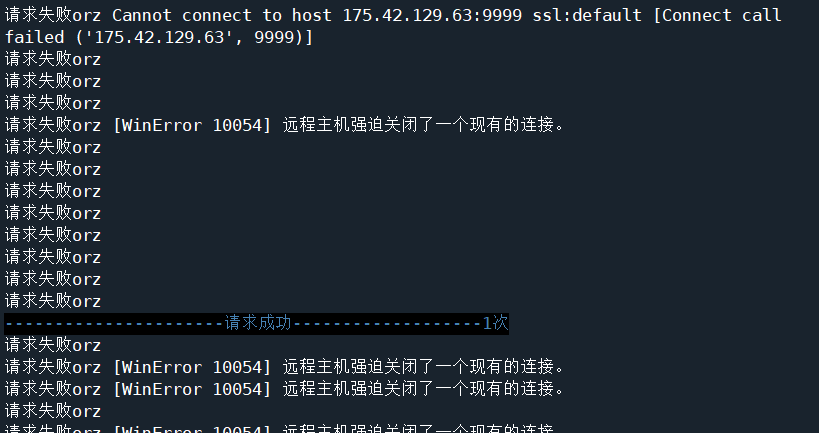
不管是请求过程还是测试过程,代理`ip`的请求成功率都很低,完全执行完需要等一段时间,完成后显示耗时47分钟。
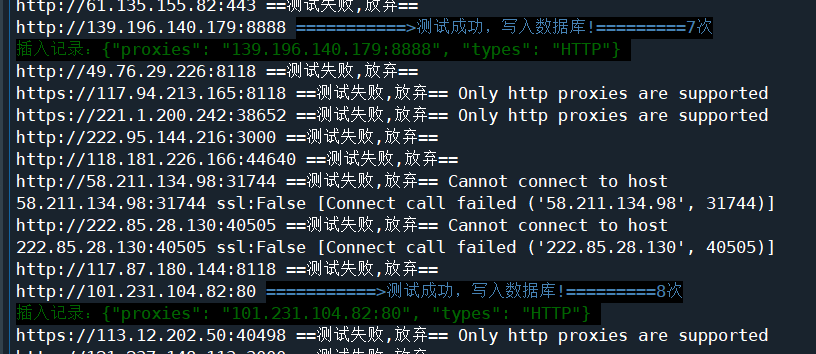
翻一下日志,看到最后一条成功插入的数据显示是第8次。。。。。
到数据库中看一下,这是我重复运行了多次后数据库中的数据,也仅插入了50条:

#### 2.爬取阶段不使用代理的版本
继续贴出爬取数据阶段不使用代理的版本,即使用`requests`爬取,测试时再用`aiohttp`,省去了第一阶段筛选代理过程的等待时间。
```python
import json
import time
import requests
from fake_useragent import UserAgent
import asyncio
import aiohttp
# 避免出现RuntimeError错误
import nest_asyncio
nest_asyncio.apply()
from lxml import etree
import pymongo
class Get_prox:
def __init__(self):
# 初始化,连接MongoDB
self.client = pymongo.MongoClient('mongodb://localhost:27017/')
self.success_get_count = 0
self.success_test_count = 0
# 不使用代理时,获取页面
def get_page(self, url):
## 一个随机生成请求头的库
ua = UserAgent()
header = {'User-Agent': ua.random}
while True:
try:
response = requests.get(url, headers = header, timeout = 10)
time.sleep(1.5)
if response.status_code == 200:
self.success_get_count += 1
print("\033[5;36;40m----------------------请求成功-------------------%d次\033[;;m"%self.success_get_count)
return response.text
else:
print("\033[5;31;m", response.status_code, "\033[;;m")
continue
except Exception as e:
print("请求失败orz", e)
# 任务
def get(self, urls):
htmls = []
# 先将抓取的页面都存入列表中
for url in urls:
htmls.append(self.get_page(url))
# 测试代理使用异步
tasks = [asyncio.ensure_future(self.get_detail(html)) for html in htmls]
loop = asyncio.get_event_loop()
loop.run_until_complete(asyncio.wait(tasks))
# 测试代理
async def test_proxy(self, dic):
## 根据类型构造不同的代理及url
if dic["types"] == "HTTP":
test_url = "http://www.baidu.com/"
prop = "http://" + dic["proxies"]
else:
test_url = "https://www.baidu.com/"
prop = "https://" + dic["proxies"]
ua = UserAgent()
header = {'User-Agent': ua.random}
# 异步协程请求
async with aiohttp.ClientSession() as session:
while True:
try:
async with session.get(test_url, headers = header, proxy = prop, timeout = 15, verify_ssl=False) as resp:
if resp.status == 200:
self.success_test_count += 1
print(prop, "\033[5;36;40m===========>测试成功,写入数据库!=========%d次\033[;;m"%self.success_test_count)
await self.insert_to_mongo(dic) ## 调用写入mongodb数据库的函数
return
except Exception as e:
print(prop, "==测试失败,放弃==", e)
break
# 使用lxml爬取
async def get_detail(self, html):
html = etree.HTML(html)
dic = {}
ip = html.xpath('//tr[@class="odd" or @class=""]/td[2]/text()')
port = html.xpath('//tr[@class="odd" or @class=""]/td[3]/text()')
types = html.xpath('//tr[@class="odd" or @class=""]/td[6]/text()')
for i in range(len(ip)):
dic['proxies'] = ip[i] + ":" + port[i]
dic['types'] = types[i]
await self.test_proxy(dic)
# 写入MongoDB数据库
async def insert_to_mongo(self, dic):
db = self.client.Myproxies
collection = db.proxies
collection.update_one(dic,{'$set': dic}, upsert=True) # 设置upsert=True,避免重复插入
print("\033[5;32;40m插入记录:" + json.dumps(dic) + "\033[;;m")
# 主线程
if __name__ == "__main__":
urls = []
start = time.time()
# 抓取前10页数据
for i in range(1, 11):
urls.append("http://www.xicidaili.com/nn/" + str(i))
c = Get_prox()
c.get(urls)
end = time.time()
total = (end - start)/60.0
print("完成,总耗时:", total, "分钟!")
```
经其他小伙伴测得结果截图如下:
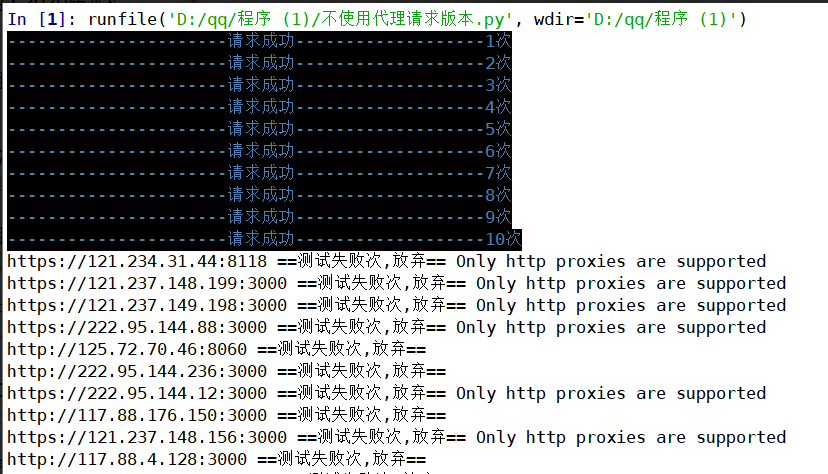
爬取阶段的10次请求都非常顺利。

最后总耗时19分钟,可见前面爬取阶段不去筛选免费代理确实能省下许多时间!
## 四.问题及解决
### (一)`ip`地址被封禁
由于一开始在使用`lxml`解析库探索解析规则时,为了方便没有去设置休眠时间,后来由于疏忽,把抓取页数调大后忘记了设置休眠时间,结果在抓取了几次后,发现日志中的输出内容变成如下信息:
```
{"proxies": "121.237.148.195:3000", "types": "HTTP"}
{"proxies": "121.234.31.44:8118", "types": "HTTPS"}
{"proxies": "117.88.4.63:3000", "types": "HTTP"}
{"proxies": "222.95.144.58:3000", "types": "HTTP"}
发生错误: 'NoneType' object has no attribute 'xpath'
发生错误: 'NoneType' object has no attribute 'xpath'
发生错误: 'NoneType' object has no attribute 'xpath'
发生错误: 'NoneType' object has no attribute 'xpath'
发生错误: 'NoneType' object has no attribute 'xpath'
发生错误: 'NoneType' object has no attribute 'xpath'
......
```
终止程序后将response获取的状态码打印出现,结果如下:
```
503
503
503
503
503
...
```

同时通过浏览器我也无法进入到该网站了,由此可以得出因爬取次数过多,我的IP已经被网页封禁了。
- 解决办法
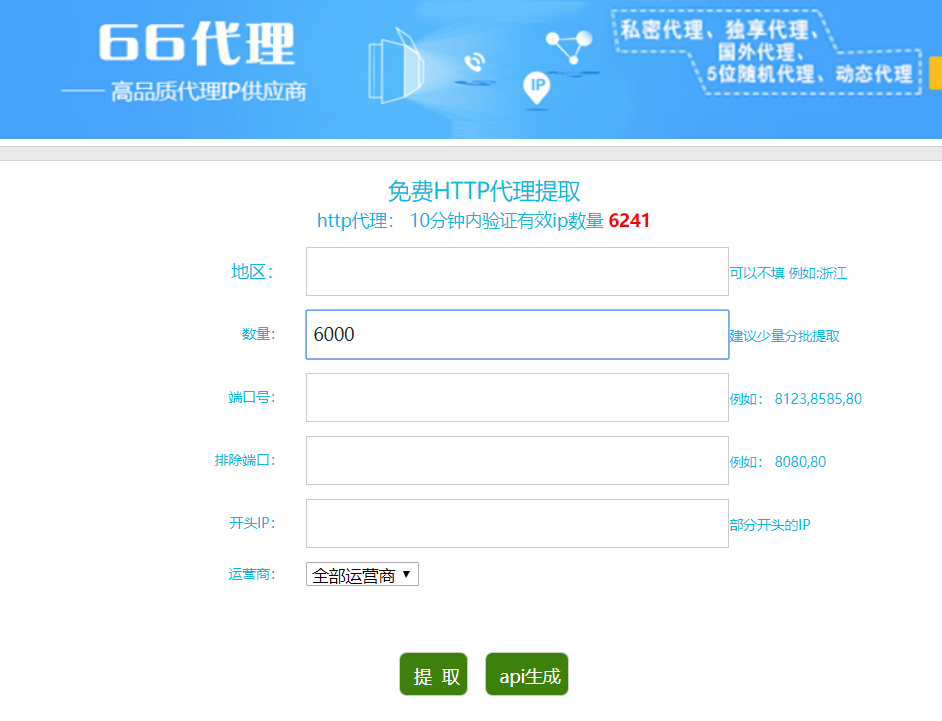
一开始我是选择直接在其他免费的代理ip获取网站选几个ip过来,但发现免费的代理ip中有非常大的比例都是不能用的,使用网上现有项目构建代理ip池在环境和依赖的配置上比较耗时间,所以我直接去了[66免费代理网](http://www.66ip.cn/pt.html),使用了该网站的免费ip提取功能,提取了6000个代理ip:
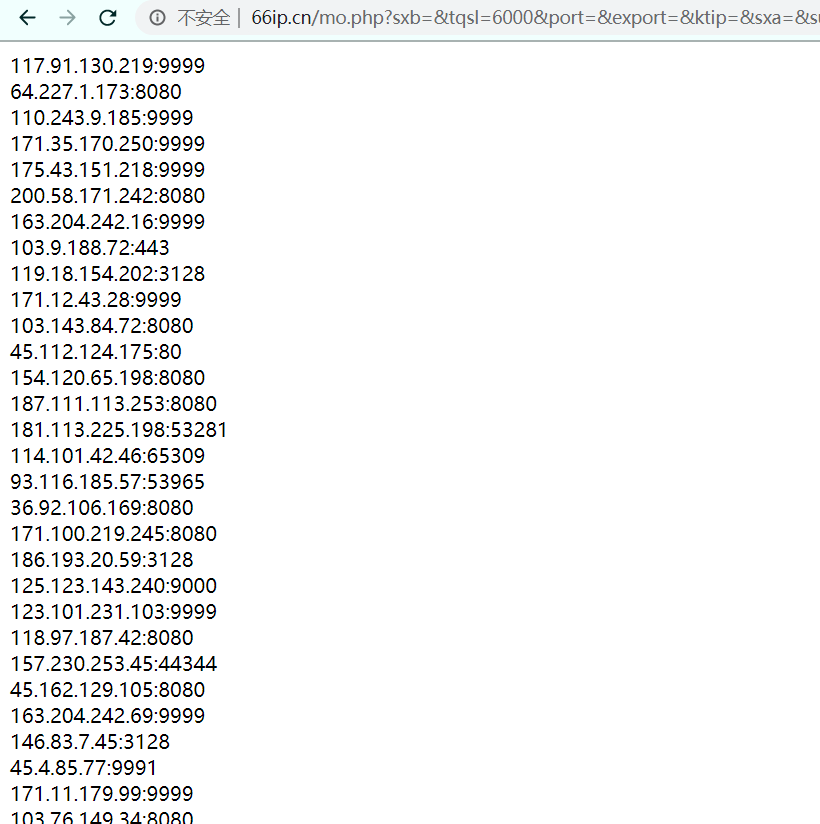
点击提取后直接得到一个包含6000条代理信息的页面,然后就可以写个简单的程序直接将此页面上生成的6000条(实际抓取5999条)代理信息抓取到本地文件中:
```python
response1 = requests.get("http://www.66ip.cn/mo.php?sxb=&tqsl=6000&port=&export=&ktip=&sxa=&submit=%CC%E1++%C8%A1&textarea=")
html = response1.text
print(response1.status_code == 200)
pattern = re.compile("br />(.*?)<", re.S)
items = re.findall(pattern, html)
for i in range(len(items)):
items[i] = items[i].strip()
print(len(items))
with open("proxies.txt", "w") as f:
f.write(json.dumps(items))
```
接着在爬虫程序中读取这个文件作为一个代理池:
```python
# 获取代理池
def get_proxies(self):
with open("proxies.txt", "r") as f:
ls = json.loads(f.read())
return ls
```
然后每次请求都随机从代理池中选择一个代理:
```python
def get_page(ls):
url = []
ua = UserAgent()
with open("proxies.txt", "r") as f:
ls = json.loads(f.read())
for i in range(1, page+1):
url.append("http://www.xicidaili.com/nn/" + str(i))
count = 1
errcount = 1
for u in url:
while True:
try:
header = {'User-Agent': ua.random}
handler = {'http': 'http://' + random.choice(ls)}
response = requests.get(u, headers = header, proxies = handler, timeout = 10)
time.sleep(1)
get_detail(response.text)
if response.status_code == 200:
print("选取ip:", handler, "请求成功---------------------------第%d次"%count)
count += 1
else:
continue
break
except:
print("选取ip:", handler, ", 第%d请求发生错误"%errcount)
errcount += 1
```
但是这样做有一个问题,就是线程在调度任务时每次只能负责一个,而代理中有许多ip都是不好用 的,导致每一次尝试都要花费好几秒的时间,而且大部分情况下请求都有出错。
为了解决这个问题,就不能再选择用单线程单步调度的方式来抓取页面了,因此我选择使用了异步请求库`aiohttp`。
参考了文章[Python中异步协程的使用方法介绍](https://cuiqingcai.com/6160.html)以及[aiohttp中文文档](https://hubertroy.gitbooks.io/aiohttp-chinese-documentation/content/)后,我学着创建一个带有10个任务(抓取10个页面的任务)的协程对象来实现异步协程调度,使得每当线程遇到请求时,无需等待请求任务,而可以调度下一个任务,当10个请求都成功时,就能进入下一个调用的函数了,这样总的时间消耗就可以缩小约10倍了,实现方法如下(未列出所有函数):
```python
# 使用代理时,获取页面
async def get_page(self, session, url):
## 一个随机生成请求头的库
ua = UserAgent()
header = {'User-Agent': ua.random}
# 从本地文件获取代理池
proxies_pool = self.get_proxies()
while True:
try:
# 由于我一开始操作不慎ip被封禁了,因此在一开始抓取ip时我不得不使用了自己从
# 其他网站抓来的一批代理(如问题描述中所述),一共有5999条代理,每次随机选取一条
p = 'http://' + random.choice(proxies_pool)
async with session.get(url, headers = header, proxy = p, timeout = 10) as response:
await asyncio.sleep(2)
if response.status == 200:
self.success_get_count += 1
print("\033[5;36;40m----------------------请求成功-------------------%d次\033[;;m"%self.success_get_count)
return await response.text()
else:
print("\033[5;31;m", response.status, "\033[;;m")
continue
except Exception as e:
print("请求失败orz", e)
# 任务
async def get(self, url):
async with aiohttp.ClientSession() as session:
html = await self.get_page(session, url)
await self.get_detail(html)
# 主线程
if __name__ == "__main__":
urls = []
start = time.time()
# 抓取前10页数据
for i in range(1, 11):
urls.append("http://www.xicidaili.com/nn/" + str(i))
c = Get_prox()
# 创建10个未来任务对象
tasks = [asyncio.ensure_future(c.get(url)) for url in urls]
loop = asyncio.get_event_loop()
loop.run_until_complete(asyncio.wait(tasks))
end = time.time()
total = (end - start)/60.0
print("完成,总耗时:", total, "分钟!")
```
抓取过程部分打印日志如下,可见,代理的请求成功机率是很低的,接下来就是耐心等待了:
### (二)异步操作出现错误`RuntimeError`错误
一开始使用异步协程运行程序时,控制台输出了如下的错误日志:
```
RuntimeError: asyncio.run() cannot be called from a running event loop
```
上网查了解决方案,在程序开头加入:
```python
import nest_asyncio
nest_asyncio.apply()
```
之后就不会报错了,具体原因不明。
## 五.可进一步改善的地方
- 如果不是因为`ip`被封禁,爬取代理阶段直接用requests就好了,注意设置好休眠时间。然后其实爬取代理的时候可以同时对多个不同的代理网站进行爬取,这样就可以把异步请求的机制也结合进来了。比如创建多个任务,每个任务分别针对不同的网站使用requests进行请求,然后将这些任务加入到异步协程的事件循环中去。
- 我的做法仅是将代理存入本地的数据库,是静态的,网络上还有许多的代理池项目都是可以动态维护的,有`web`界面、`api`接口等,但实现方法也更加复杂,后续可进一步深入学习。

