# ansible
##一、常用的自动化运维工具
###1、puppet
基于ruby开发,采用c/s架构,扩展性强,基于ssl,远程命令执行相对较弱,
###2、saltstack
基于python开发,采用C/S架构,相对puppet更轻量级,配置语法使用YMAL,使得配置脚本更简单
###3、ansible
基于python paramiko开发,无需客户端,轻量级,配置语法使用YMAL及jinjia2模板语言,更强的远程命令执行操作
`https:/https://img.qb5200.com/download-x/docs.ansible.com/ansible/latest/index.html`
##二、ansible能做什么
###1、ansible能做什么
完成一些批量任务,或者是重复性工作。
>例子1
>在100台服务器上部署nginx服务并且安装后启动。
>例子2
>在100台服务器上创建账户,拷贝文件
###2、脚本vs ansible
有些脚本也可以满足例子1、2,但是ansible还支持一些优秀的特性,如**幂等性**(例子,拷贝文件到某主机目录上,但是不确定存不存在)ansible会自定判断是否存在此文件,所以ansible是**以结果为导向**判断当前状态是不是目标状态一致,如果不一致就改为目标状态,一致就不进行操作,这个就是ansible的幂等性。
###3、ansible依赖ssh即可工作
用过puppet的一定知道,puppet客户端需要装agent才可以配合master工作,而ansible只需要依赖ssh即可
##三、ansible工作机制
ansible在管理节点将ansible模块通过SSH协议(或者kerberos、LDAP)推送到被管理端执行,执行之后自动删除,可以使用SVN等来管理自定义模块及编排
###1、架构图示
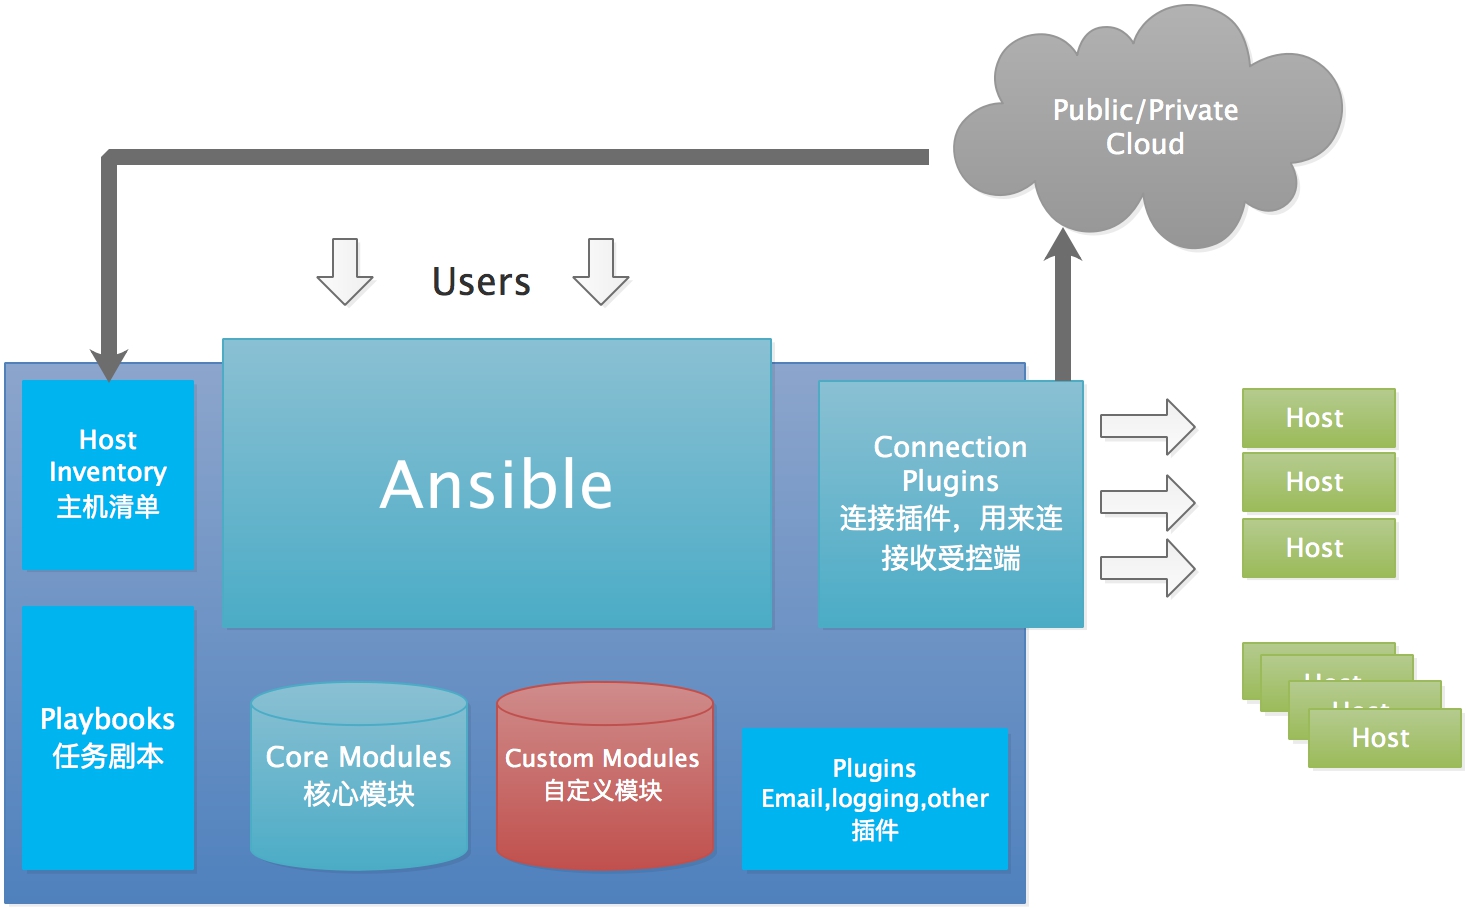
###2、组成
**ansible**:核心
**modules**:包括ansible自带的核心模块及自定义模块
**plugins**:完成模块功能的补充,包括连接插件、邮件插件等
**playbooks**:一般翻译为剧本,可以理解为编排,是定义ansible多任务配置文件,由ansible自行执行
**inventory**:定义ansible管理主机的清单
##四、ansible安装
###1、环境
| 主机名 | IP | 系统版本 | 备注 |
| --- | --- | --- | --- |
| ansible | 10.211.55.5 | centos-7.6 | ansible-2.9.3 |
| test1 | 10.211.55.6 | centos-7.6 | |
| Test2 | 10.211.55.7 | centos-7.6 | |
###2、安装软件
```
yum install epel-release
yum install ansible
```
安装了如下依赖:
```
Dependencies Resolved
===============================================================================
Package Arch Version Repository
Size
===============================================================================
Installing:
ansible noarch 2.9.3-1.el7 epel 17 M
Installing for dependencies:
PyYAML x86_64 3.10-11.el7 base 153 k
libyaml x86_64 0.1.4-11.el7_0 base 55 k
python-babel noarch 0.9.6-8.el7 base 1.4 M
python-backports x86_64 1.0-8.el7 base 5.8 k
python-backports-ssl_match_hostname noarch 3.5.0.1-1.el7 base 13 k
python-cffi x86_64 1.6.0-5.el7 base 218 k
python-enum34 noarch 1.0.4-1.el7 base 52 k
python-httplib2 noarch 0.9.2-1.el7 extras 115 k
python-idna noarch 2.4-1.el7 base 94 k
python-ipaddress noarch 1.0.16-2.el7 base 34 k
python-jinja2 noarch 2.7.2-4.el7 base 519 k
python-markupsafe x86_64 0.11-10.el7 base 25 k
python-paramiko noarch 2.1.1-9.el7 base 269 k
python-ply noarch 3.4-11.el7 base 123 k
python-pycparser noarch 2.14-1.el7 base 104 k
python-setuptools noarch 0.9.8-7.el7 base 397 k
python-six noarch 1.9.0-2.el7 base 29 k
python2-cryptography x86_64 1.7.2-2.el7 base 502 k
python2-jmespath noarch 0.9.0-3.el7 extras 39 k
python2-pyasn1 noarch 0.1.9-7.el7 base 100 k
sshpass x86_64 1.06-2.el7 extras 21 k
Transaction Summary
===============================================================================
Install 1 Package (+21 Dependent packages)
```
###3、配置主机清单-添加ssh信息的方式
ansible 通过读取默认的主机清单配置/etc/ansible/hosts,可以同时连接到多个远程主机上执行任务默认路径可以通过修改ansible.cfg的hostfile参数指定的路径。
####1)添加主机
配置文件/etc/ansible/hosts
`cat /etc/ansible/hosts |grep 10.211*`
`vim /etc/ansible/hosts`
```
......
10.211.55.6 ansible_port=22 ansible_user=root ansible_ssh_pass=111111
......
```
注意:这里还可以添加别名的方法:test1 ansible_host=10.211.55.6 ansible_port=22 ansible_user=root ansible_ssh_pass=111111
####2)执行查看返回结果
`ansible 10.211.55.6 -m ping `
```
10.211.55.6 | SUCCESS => {
"ansible_facts": {
"discovered_interpreter_python": "/usr/bin/python"
},
"changed": false,
"ping": "pong"
}
```
####3)如ssh不同则是
`ansible 10.211.55.6 -m ping`
```
The authenticity of host '10.211.55.6 (10.211.55.6)' can't be established.
ECDSA key fingerprint is SHA256:m1VnZbagJ8pJphMISxwjZSwJ7YhdEwA1nC7awJXJ6t0.
ECDSA key fingerprint is MD5:27:b6:32:8b:fd:d7:e7:af:a6:75:c3:bc:4c:0b:68:b2.
Are you sure you want to continue connecting (yes/no)? yes
10.211.55.6 | UNREACHABLE! => {
"changed": false,
"msg": "Failed to connect to the host via ssh: Warning: Permanently added '10.211.55.6' (ECDSA) to the list of known hosts.\r\nPermission denied (publickey,gssapi-keyex,gssapi-with-mic,password).",
"unreachable": true
}
```
###4、配置主机清单-ssh免密登录方式
ssh认证方式可以是密码认证和秘钥认证,为了提高安全性,通常使用秘钥认证,可以在管理机中生成秘钥,然后通过公钥认证的方式连接到对应的受管主机。
####1)、执行ssh-keygen命令
`ssh-keygen -t rsa ` //生成秘钥对,也就是私钥与公钥
例子:
```
ssh-keygen -t rsa
Generating public/private rsa key pair.
Enter file in which to save the key (/root/.ssh/id_rsa):
Enter passphrase (empty for no passphrase):
Enter same passphrase again:
Your identification has been saved in /root/.ssh/id_rsa.
Your public key has been saved in /root/.ssh/id_rsa.pub.
The key fingerprint is:
SHA256:hwxorgSBRIj3a0zOdXUJWnhjY8f7ZzQT4hMVHjfUIRE root@ansible
The key's randomart image is:
+---[RSA 2048]----+
|Bo .oo E=B=|
|+.. . .oB =oo.=|
|.. .o . .= =..o..|
| . oo .o.. .o o.|
| .=.o .S . ...o|
| . .* . . o|
| .. o |
| |
| |
+----[SHA256]-----+
```
####2)、拷贝文件
`scp /root/.ssh/id_rsa.pub root@10.211.55.6:/root/.ssh/authorized_keys`
###5、还可以将生成公钥加入55.6的认证列表里
`ssh-copy-id -i /root/.ssh/id_rsa.pub root@10.211.55.6`
###6、修改配置文件并进行测试
配置文件
`vim /etc/ansible/hosts`
`10.211.55.6 ansible_port=22` //因为已经进行免密登录,这里指定主机ip及端口即可
`cat /etc/ansible/hosts |grep 10.211`
测试
`ansible 10.211.55.6 -m ping`
```
10.211.55.6 | SUCCESS => {
"ansible_facts": {
"discovered_interpreter_python": "/usr/bin/python"
},
"changed": false,
"ping": "pong"
}
```
###7、清单分组功能
还可以为一个组指定变量,组内每个主机都可以使用,相同主机可以分配到不同的组,可以按照功能、系统、等进行分类,便于对某些主机货者某一组功能相同的主机进行操作
`vim /etc/ansible/hosts`
```
[test-a]
10.211.55.6 ansible_port=22
[test-b]
10.211.55.7 ansible_port=22
[test]
10.211.55.6
10.211.55.7
```
测试
`ansible test -m ping`
```
[DEPRECATION WARNING]: The TRANSFORM_INVALID_GROUP_CHARS settings is set to allow bad characters in group names by default, this will change, but still be user
configurable on deprecation. This feature will be removed in version 2.10. Deprecation warnings can be disabled by setting deprecation_warnings=False in ansible.cfg.
[WARNING]: Invalid characters were found in group names but not replaced, use -vvvv to see details
10.211.55.6 | SUCCESS => {
"ansible_facts": {
"discovered_interpreter_python": "/usr/bin/python"
},
"changed": false,
"ping": "pong"
}
10.211.55.7 | SUCCESS => {
"ansible_facts": {
"discovered_interpreter_python": "/usr/bin/python"
},
"changed": false,
"ping": "pong"
}
```
###8、使用YAML语言的配置语法书写hosts
什么是YAML语言那,就是"YAML Ain't a Markup Language",他不是一种标记语言但是如果掌握XML这用标记语言也是可以很快学会YAML
####1)使用YAML语言书写hosts
```
vim hosts
all:
children:
test:
children:
testA:
hosts:
10.211.55.6:
testB:
hosts:
10.211.55.7:
```
####2)拆分主机和组专用数据
当host和group定义一些比较复杂的变量时,可以用单独文件保存host和group变量,以YAML格式书写变量,避免都写在hosts文件比较混乱
##二、ansible模块使用
###1、查看使用方法
比如刚才的ping就需要使用ping模块,ansible还提供很多模块,可以通过命令查看有哪些?
`ansible-doc -l` //查看ansible都有哪些模块
`ansible-doc -s ping` //获取ping模块的详细使用方法
`ansible-doc -s fetch` //获取fetch拉取模块的详细使用方法
```
- name: Fetch files from remote nodes
fetch:
dest: # (required) A directory to save the file into.
For example, if
the `dest'
directory is
`/backup' a `src'
file named
`/etc/profile' on
host `host.exampl
e.com', would be
saved into `/back
up/host.example.c
om/etc/profile'.
The host name is
based on the
inventory name.
fail_on_missing: # When set to `yes', the task will fail if the
remote file
cannot be read
for any reason.
Prior to Ansible
2.5, setting this
would only fail
if the source
file was missing.
The default was
changed to `yes'
in Ansible 2.5.
flat: # Allows you to override the default behavior of
appending hostnam
e/path/to/file to
the destination.
If `dest' ends
with '/', it will
use the basename
of the source
file, similar to
the copy module.
This can be
```
###2、Files modules-fetch
`ansible testA -m fetch -a "src=/etc/fstab dest=/testdir/ansible/"`
_注意:运行两次就可以看到ansible幂等性,**第一遍为黄色-修改后**,**第二遍为绿色-成功**changed字段有变化,**如果是红色-代表失败**_
```
10.211.55.6 | CHANGED => {
"changed": true,
"checksum": "1e4b62ac91bdadeb0d07b8b2f7d8dc184f807fd6",
"dest": "/testdir/ansible/10.211.55.6/etc/fstab",
"md5sum": "19a888135cfae98fa7fc0d21ea8ef848",
"remote_checksum": "1e4b62ac91bdadeb0d07b8b2f7d8dc184f807fd6",
"remote_md5sum": null
}
```
```
10.211.55.6 | SUCCESS => {
"changed": false,
"checksum": "1e4b62ac91bdadeb0d07b8b2f7d8dc184f807fd6",
"dest": "/testdir/ansible/10.211.55.6/etc/fstab",
"file": "/etc/fstab",
"md5sum": "19a888135cfae98fa7fc0d21ea8ef848"
```
#####检查文件的目录
`tree /testdir/ansible`
```
/testdir/ansible
└── 10.211.55.6
└── etc
└── fstab
2 directories, 1 file
```
###3、Files modules-copy
使用方法:
```
- name: Copy files to remote locations
copy:
attributes:
backup:创建一个包含时间戳的备份文件,这样,如果某种方式错误地处理了原始文件,就可以重新获得原始文件
checksum:传输的文件校验和,用于验证文件的副本是否成功
content:当不适用src时,将文件内容直接设置为指定的值,只有当’dest‘是一个文件时才能工作,如果文件不存在,就创建改文件
decrypt:使用vault控制源文件的自动解密
dest:文件复制到远程绝对路径
directory_mode:进行递归复制时,设置目录的模式,如果没有则使用默认
follow:如果目标文件系统链接存在就遵循他们
force:影响远程文件是否必须总是被替换。如果是,当内容与源文件不同时,远程文件将被替换。如果是“否”,则只有在目的地不存在的情况下才会传输文件。
group:指定文件属组,远程主机上必须有对应的组
local_follow:遵循源文件系统链接
mode:指定文件拷贝到远程主机后的权限,如果想讲权限设置为“rw-rw--r--”,就可以使用mode=0664,也可以使用mode=u+x表示
owner:指定文件拷贝到远程主机的属主,远程主机上必须有对应的用户
remote_src:
selevel:
serole:
setype:
seuser:
src:用于指定需要copy的文件或目录
unsafe_writes:
validate:
```
`ansible testA -m copy -a 'content="aaa\nbbb\n" dest=/opt/test'`
```
10.211.55.6 | CHANGED => {
"ansible_facts": {
"discovered_interpreter_python": "/usr/bin/python"
},
"changed": true,
"checksum": "90c206af0bfefa95541d3e724efe1dbc1ed3877f",
"dest": "/opt/test",
"gid": 0,
"group": "root",
"md5sum": "8b652b8c79f357694a04bd793f533c96",
"mode": "0644",
"owner": "root",
"size": 8,
"src": "/root/.ansible/tmp/ansible-tmp-1581719905.88-143348935084249/source",
"state": "file",
"uid": 0
}
```

