在上一篇文章中,我们介绍了如何使用源码对TensorBoard进行编译教程,没有定制需求的可以直接使用pip进行安装。
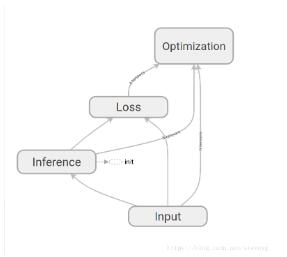
TensorBoard中的graph是一种计算图,里面的点用于表示Tensor本身或者运算符,图中的边则代表Tensor的流动或者控制关系。
本文主要从代码的层面,分析graph的数据来源与结构。
一般来说,我们在启动TensorBoard的时候会使用--logdir参数配置文件路径(或者设置数据库位置),这些日志文件为TensorBoard提供了数据。于是我们打开一个日志文件,查看里面的内容
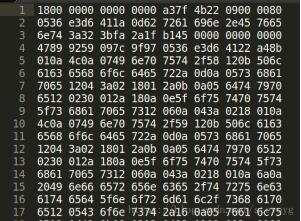
我们看到,文件是通过二进制展示的,因此无法直接读取文件的内容。
回到浏览器中,进入graph页面,通过开发者工具发现,构造图的时候调用了一个接口
http://localhost:6006/data/plugin/graphs/graph?large_attrs_key=_too_large_attrs&limit_attr_size=1024&run=task1
用浏览器打开这个地址,看到以下内容
node {
 name: "Input/X"
 op: "Placeholder"
 attr {
 key: "_output_shapes"
 value {
  list {
  shape {
   unknown_rank: true
  }
  }
 }
 }
 attr {
 key: "dtype"
 value {
  type: DT_FLOAT
 }
 }
 attr {
 key: "shape"
 value {
  shape {
  unknown_rank: true
  }
 }
 }
}
...
每个node都能够与图中的一个节点相对应,因此我们可以确定,这个接口里返回的node,就是构成图所需要的数据结构。
那么,TensorBoard是如何将日志文件转化为图的呢?
TesnorBoard中的每个模块都是以plugin存在的,我们进入tensorboard/plugin/graph/graphs_plungin.py,在这个文件中定义了graph相关的接口
def get_plugin_apps(self):
 return {
  '/graph': self.graph_route,
  '/runs': self.runs_route,
  '/run_metadata': self.run_metadata_route,
  '/run_metadata_tags': self.run_metadata_tags_route,
 }
我们可以看到,‘/graph'这个接口返回值为self.graph_route,在这个文件中搜索graph_route方法
 @wrappers.Request.application
 def graph_route(self, request):
 """Given a single run, return the graph definition in protobuf format."""
 run = request.args.get('run')
 if run is None:
  return http_util.Respond(
   request, 'query parameter "run" is required', 'text/plain', 400)

 limit_attr_size = request.args.get('limit_attr_size', None)
 if limit_attr_size is not None:
  try:
  limit_attr_size = int(limit_attr_size)
  except ValueError:
  return http_util.Respond(
   request, 'query parameter `limit_attr_size` must be an integer',
   'text/plain', 400)

 large_attrs_key = request.args.get('large_attrs_key', None)

 try:
  result = self.graph_impl(run, limit_attr_size, large_attrs_key)
 except ValueError as e:
  return http_util.Respond(request, e.message, 'text/plain', code=400)
 else:
  if result is not None:
  (body, mime_type) = result # pylint: disable=unpacking-non-sequence
  return http_util.Respond(request, body, mime_type)
  else:
  return http_util.Respond(request, '404 Not Found', 'text/plain',
         code=404)
在这个方法中,分别取了“run”,”limit_attr_size“和“large_attrs_key”三个参数,和前面url所调用的参数一致,说明这个是我们要找的方法。在方法的最后,调用了self.graph_impl生成了图,我们继续查看这个方法
def graph_impl(self, run, limit_attr_size=None, large_attrs_key=None):
 """Result of the form `(body, mime_type)`, or `None` if no graph exists."""
 try:
  graph = self._multiplexer.Graph(run)
 except ValueError:
  return None
 # This next line might raise a ValueError if the limit parameters
 # are invalid (size is negative, size present but key absent, etc.).
 process_graph.prepare_graph_for_ui(graph, limit_attr_size, large_attrs_key)
 return (str(graph), 'text/x-protobuf') # pbtxt
这个方法调用了self._multiplexer.Graph(run)生成图。_multiplexer是一个event_multiplexer实例,在graph_plugln初始化时通过base_plaugin.TBContext获得。
 def __init__(self, context):
 """Instantiates GraphsPlugin via TensorBoard core.
 Args:
  context: A base_plugin.TBContext instance.
 """
 self._multiplexer = context.multiplexer
进入tensorboard/backend/event_processing/event_multiplexer,找到Graph方法
def Graph(self, run):
 """Retrieve the graph associated with the provided run.
 Args:
  run: A string name of a run to load the graph for.
 Raises:
  KeyError: If the run is not found.
  ValueError: If the run does not have an associated graph.
 Returns:
  The `GraphDef` protobuf data structure.
 """
 accumulator = self.GetAccumulator(run)
 return accumulator.Graph()

 def GetAccumulator(self, run):
 """Returns EventAccumulator for a given run.
 Args:
  run: String name of run.
 Returns:
  An EventAccumulator object.
 Raises:
  KeyError: If run does not exist.
 """
 with self._accumulators_mutex:
  return self._accumulators[run]
Graph方法获取了run对应的accumulator实例,并返回了这个实例的Graph方法的返回值。我们进入tensorboard/backend/event_processing/event_accumulator,找到Graph()方法
 def Graph(self):
 """Return the graph definition, if there is one.
 If the graph is stored directly, return that. If no graph is stored
 directly but a metagraph is stored containing a graph, return that.
 Raises:
  ValueError: If there is no graph for this run.
 Returns:
  The `graph_def` proto.
 """
 graph = tf.GraphDef()
 if self._graph is not None:
  graph.ParseFromString(self._graph)
  return graph
 raise ValueError('There is no graph in this EventAccumulator')
事实上,它返回了一个GraphDef图,因此我们也可以通过将日志转换为GraphDef的方式读取日志。
# 导入要用到的基本模块。为了在python2、python3 中可以使用E侣兼容的 print 函数
from __future__ import print_function
import numpy as np
import tensorflow as tf

# 创建图和Session
graph = tf.Graph()
sess = tf.InteractiveSession(graph=graph)

#日志路径
model_fn = '/log/events.out.tfevents.1535957014.ubuntu'

for e in tf.train.summary_iterator(model_fn):
 if e.HasField('graph_def'):
  graph = e.graph_def;
  graph_def = tf.GraphDef()
  graph_def.ParseFromString(graph)
  print(graph_def)
我们新建一个python文件,修改日志路径为自己的日志位置,便可以得到与TensorBoard相同的内容。
以上这篇基于TensorBoard中graph模块图结构分析就是小编分享给大家的全部内容了,希望能给大家一个参考,也希望大家多多支持。

