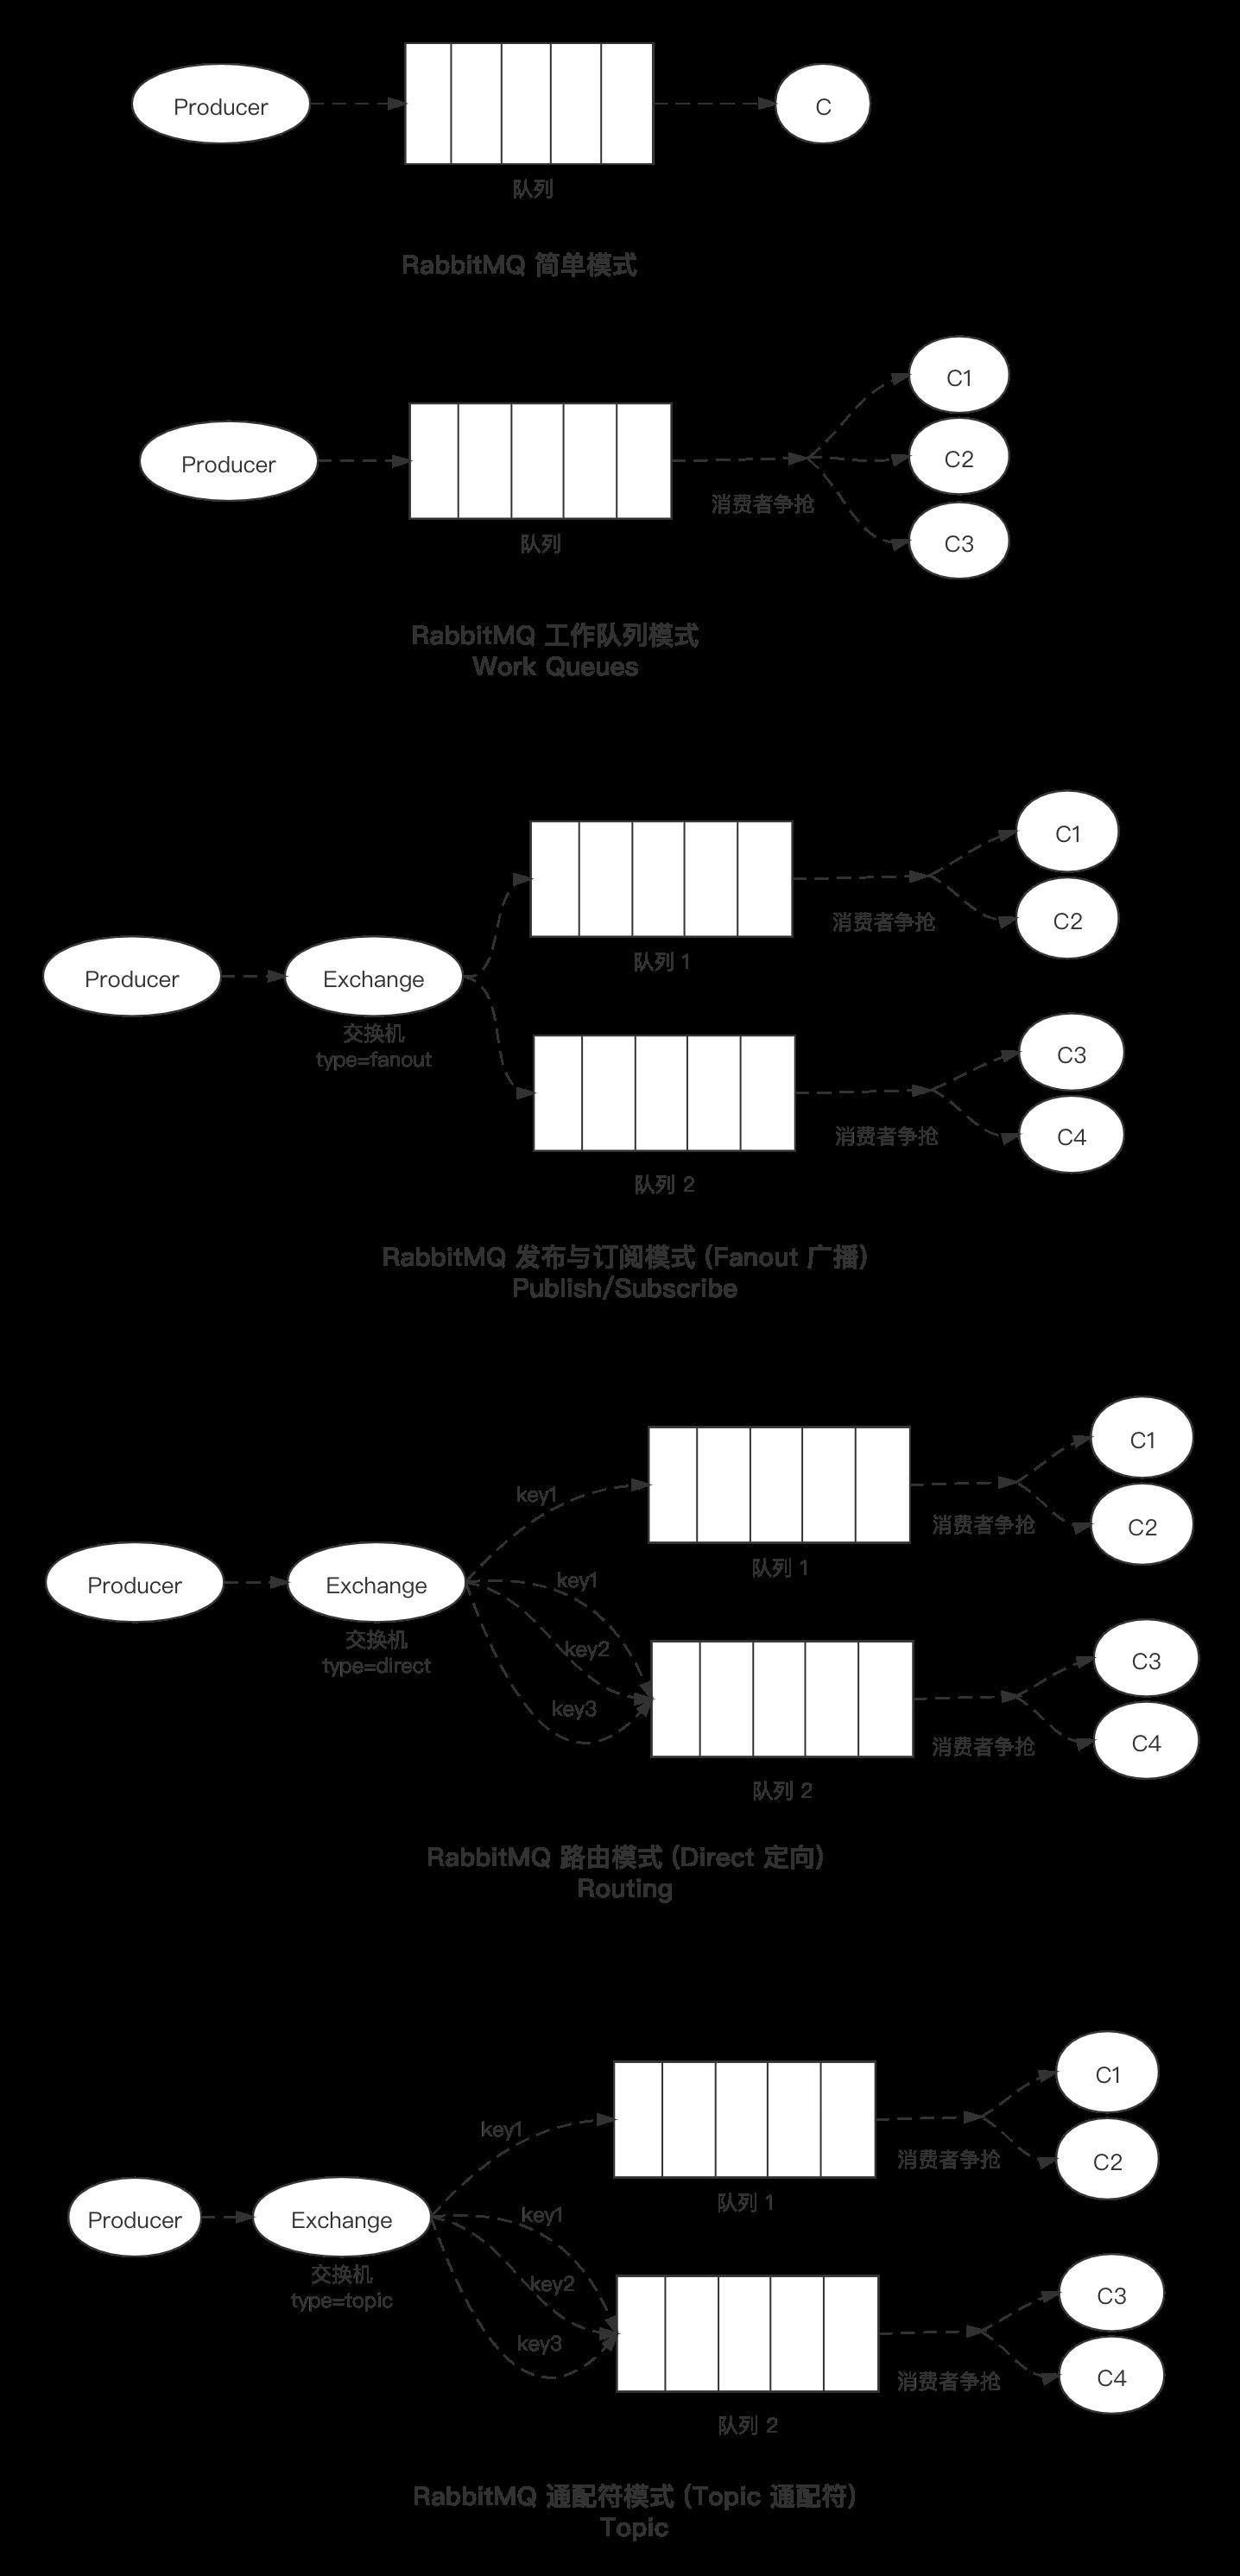
当生产端发送消息到交换机,交换机根据消息属性发送到队列,消费者监听绑定队列实现消息的接收和消费逻辑编写.简单模式下,强调的一个队列queue只被一个消费者监听消费.
1.1 结构

生产者:生成消息,发送到交换机交换机:根据消息属性,将消息发送给队列消费者:监听这个队列,发现消息后,获取消息执行消费逻辑
1.2应用场景
常见的应用场景就是一发,一接的结构
例如:
手机短信邮件单发
强调的也是后端队列与消费者绑定的结构
2.1结构
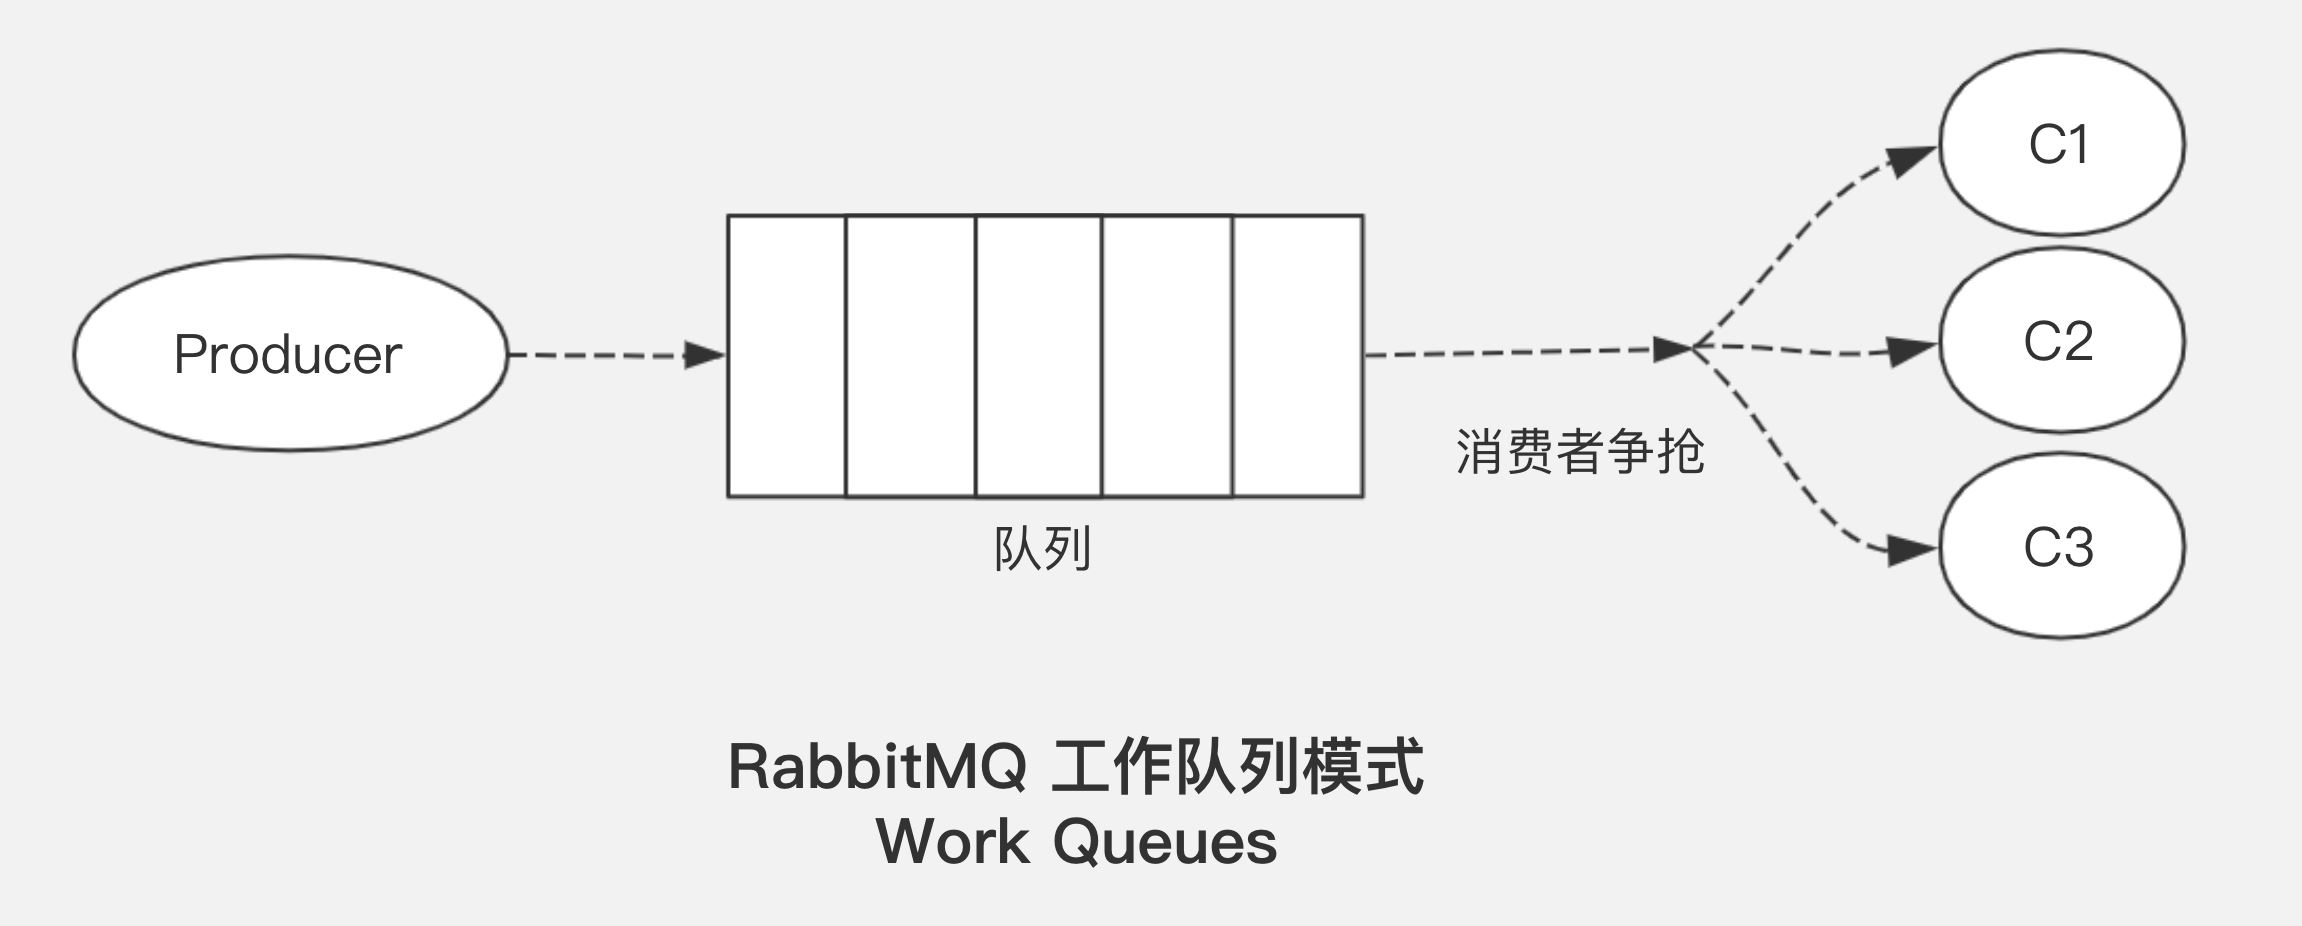
生产者:发送消息到交换机交换机:根据消息属性将消息发送给队列消费者:多个消费者,同时绑定监听一个队列,之间形成了争抢消息的效果
2.2应用场景
从路由模式开始,关心的就是消息如何到达的队列,路由模式需要使用的交换机类型就是路由交换机(direct)
3.1 结构
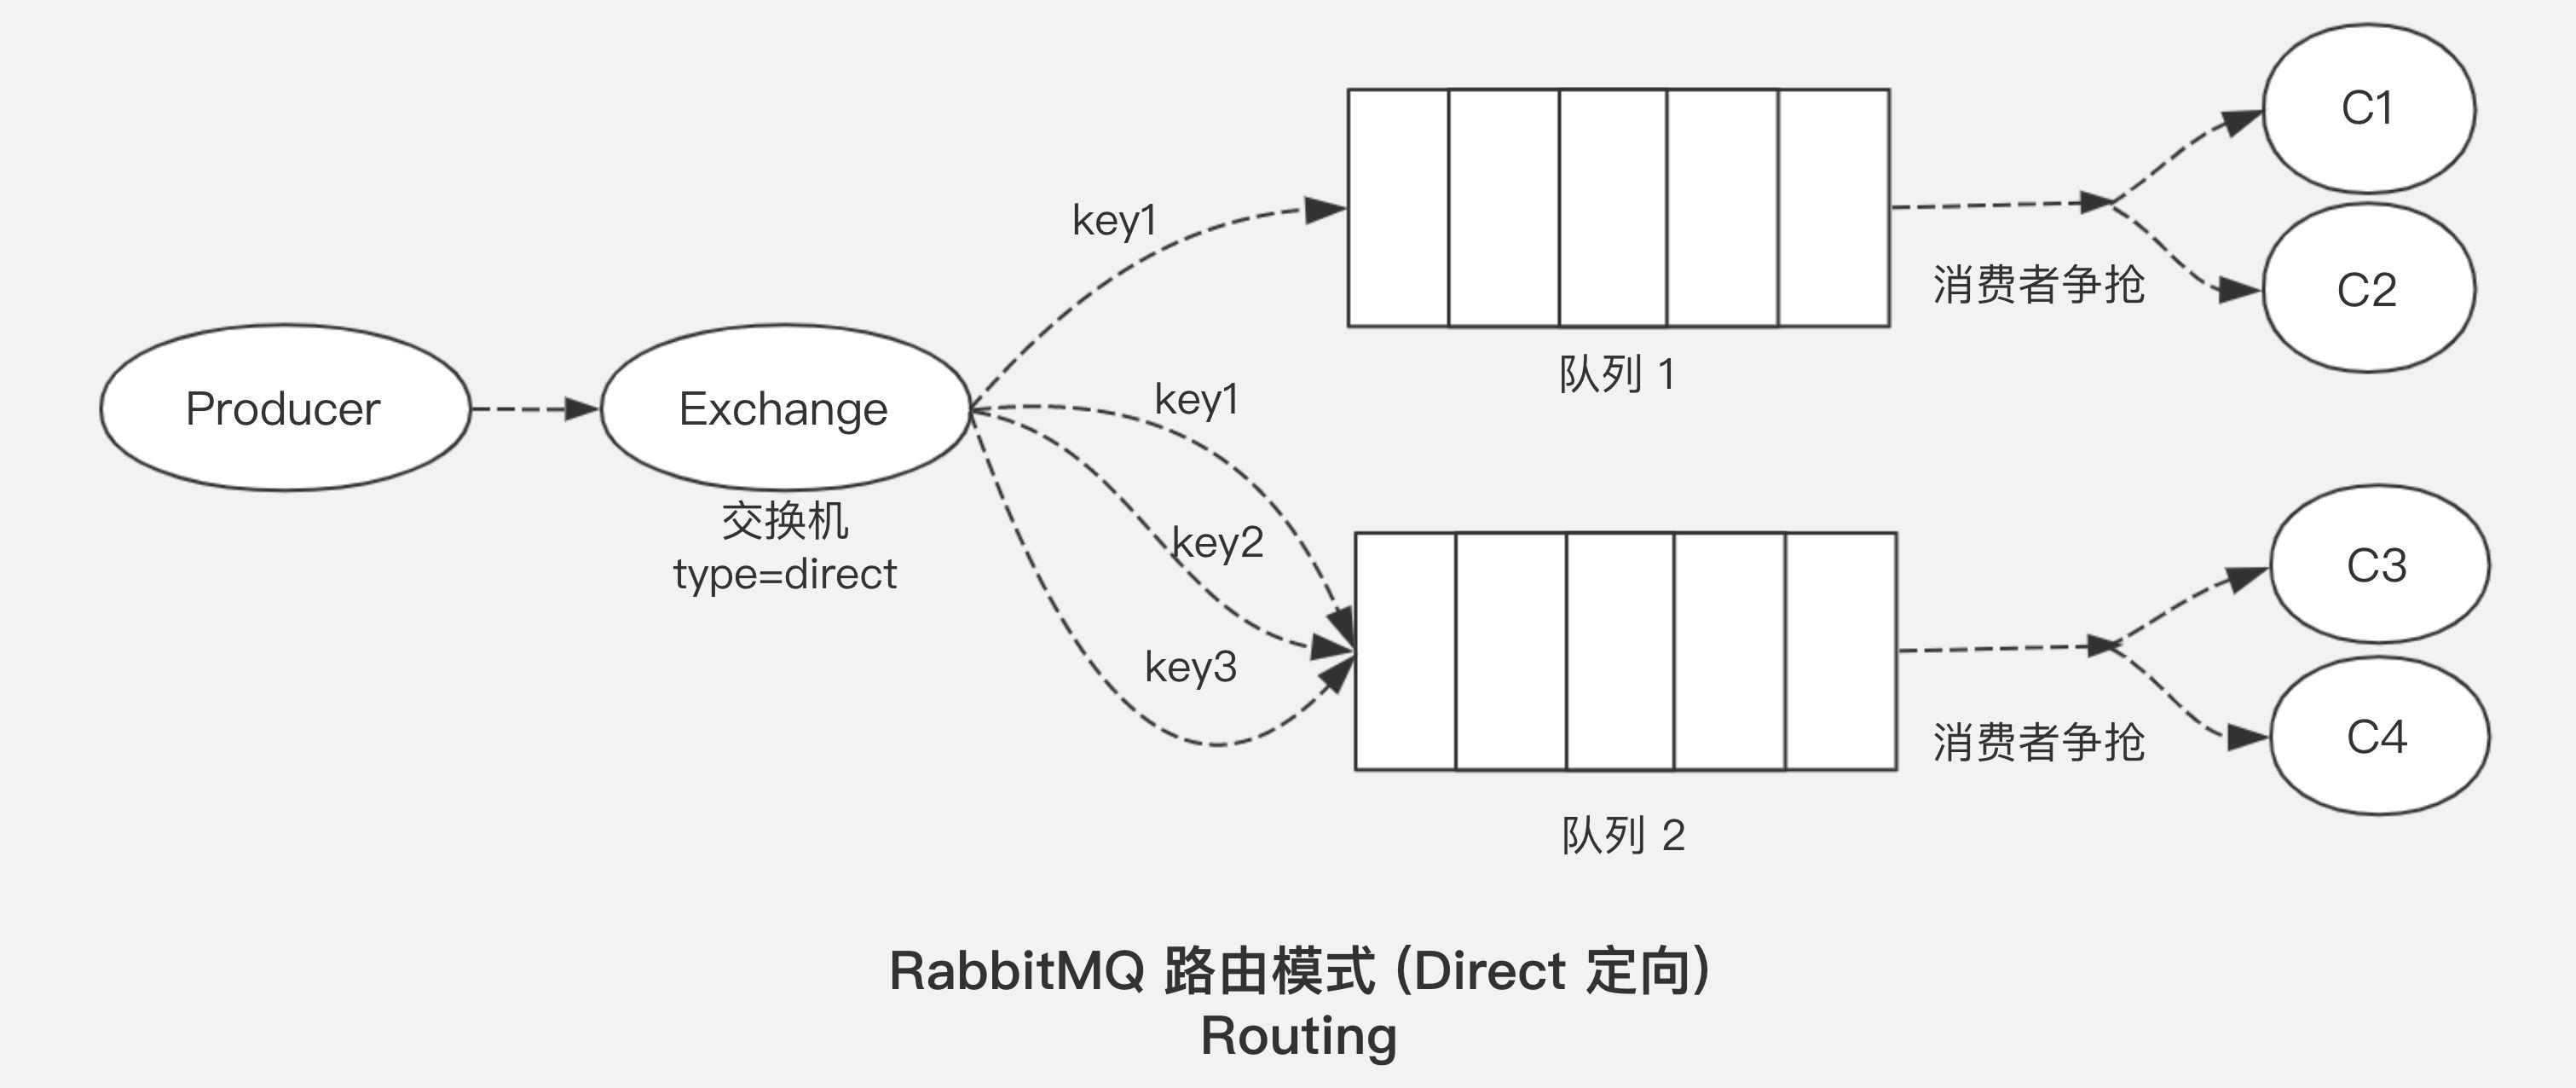
3.2应用场景
手机号/邮箱地址,都可以是路由key
不计算路由的一种特殊交换机
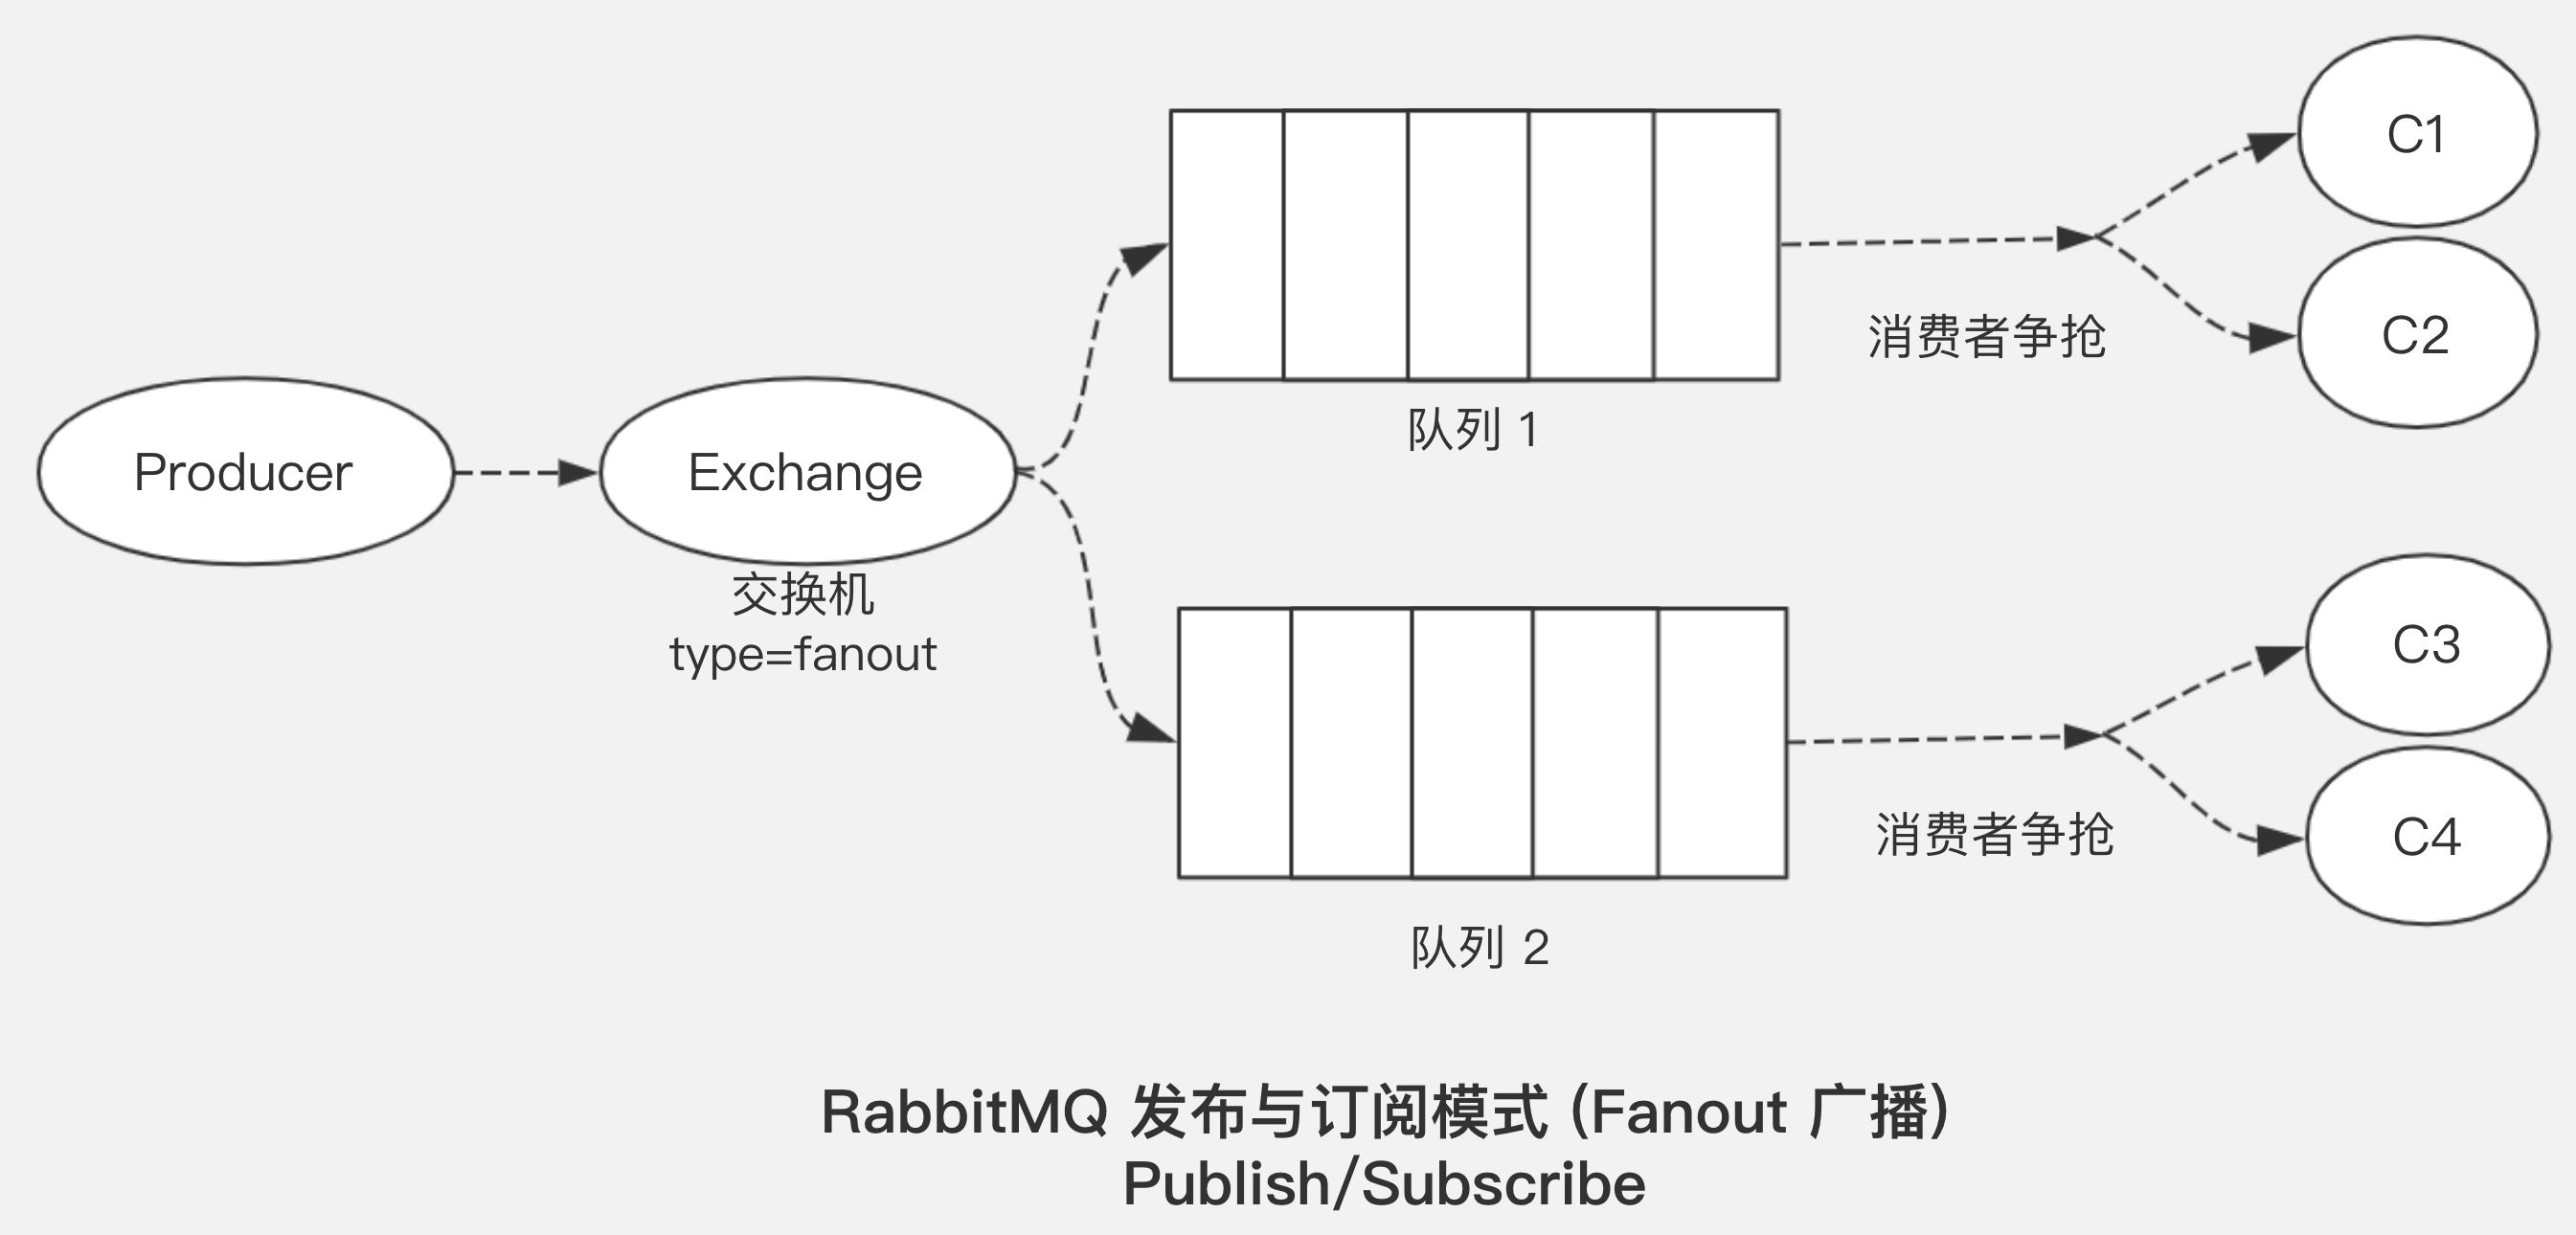
4.1结构
4.2应用场景
路由key值是一种多级路径。中国.四川.成都.武侯区
5.1结构
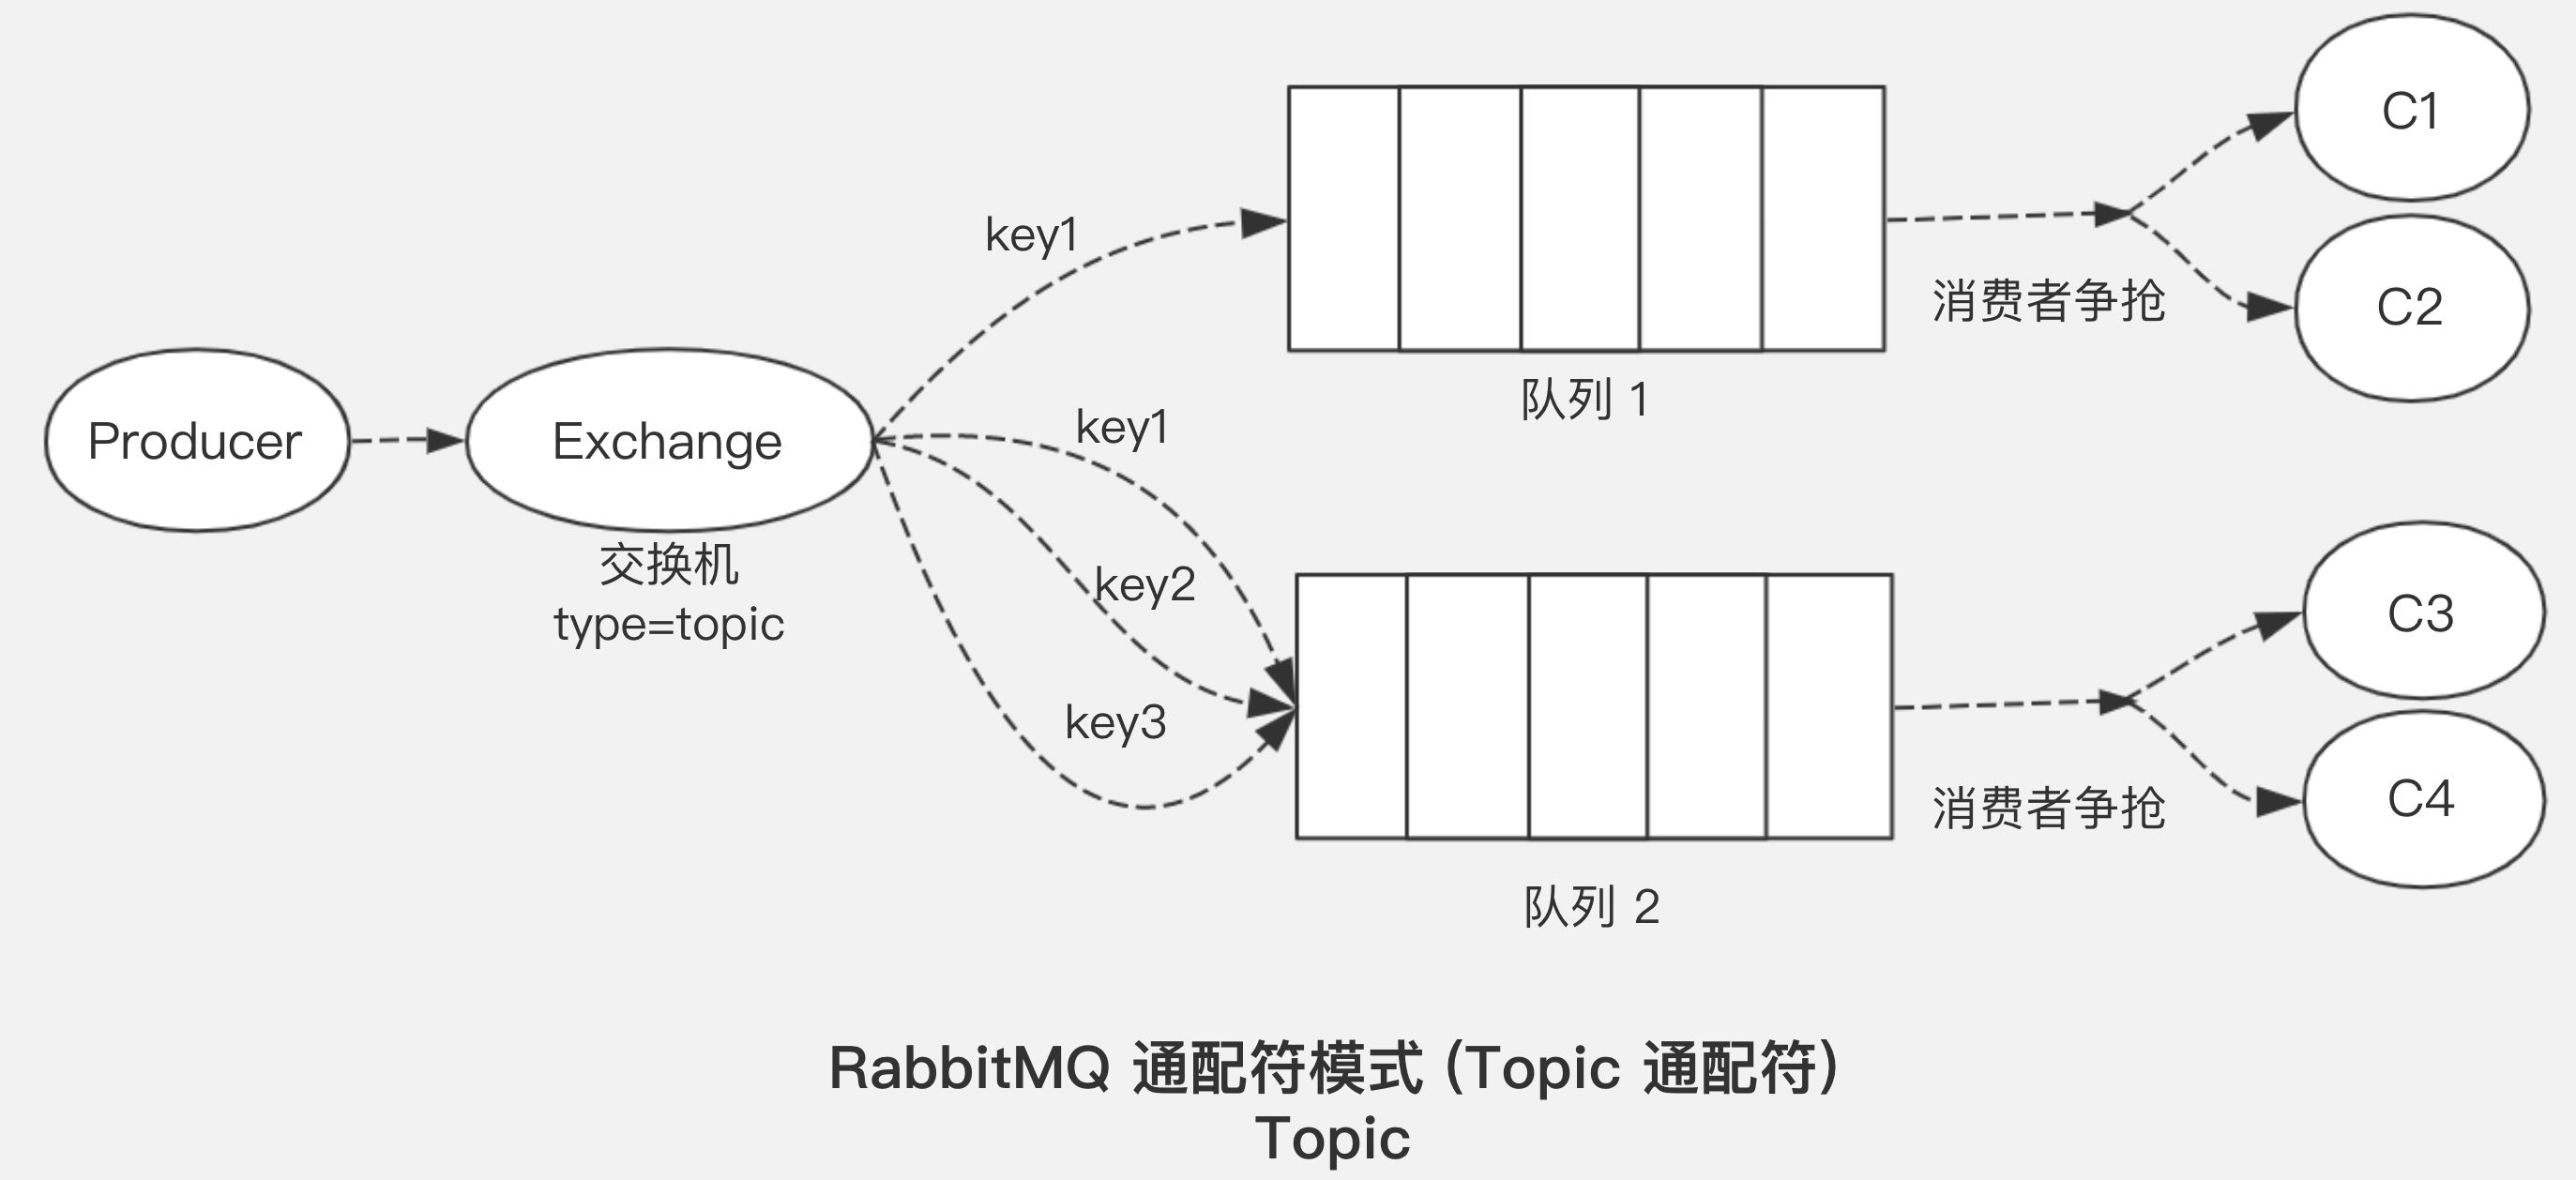
生产端:携带路由key,发送消息到交换机
队列:绑定交换机和路由不一样,不是一个具体的路由key,而可以使用*和#代替一个范围
| * | 字符串,只能表示一级 |
| --- | --- |
| # | 多级字符串 |
交换机:根据匹配规则,将路由key对应发送到队列
消息路由key:
5.2 应用场景
做物流分拣的多级传递.
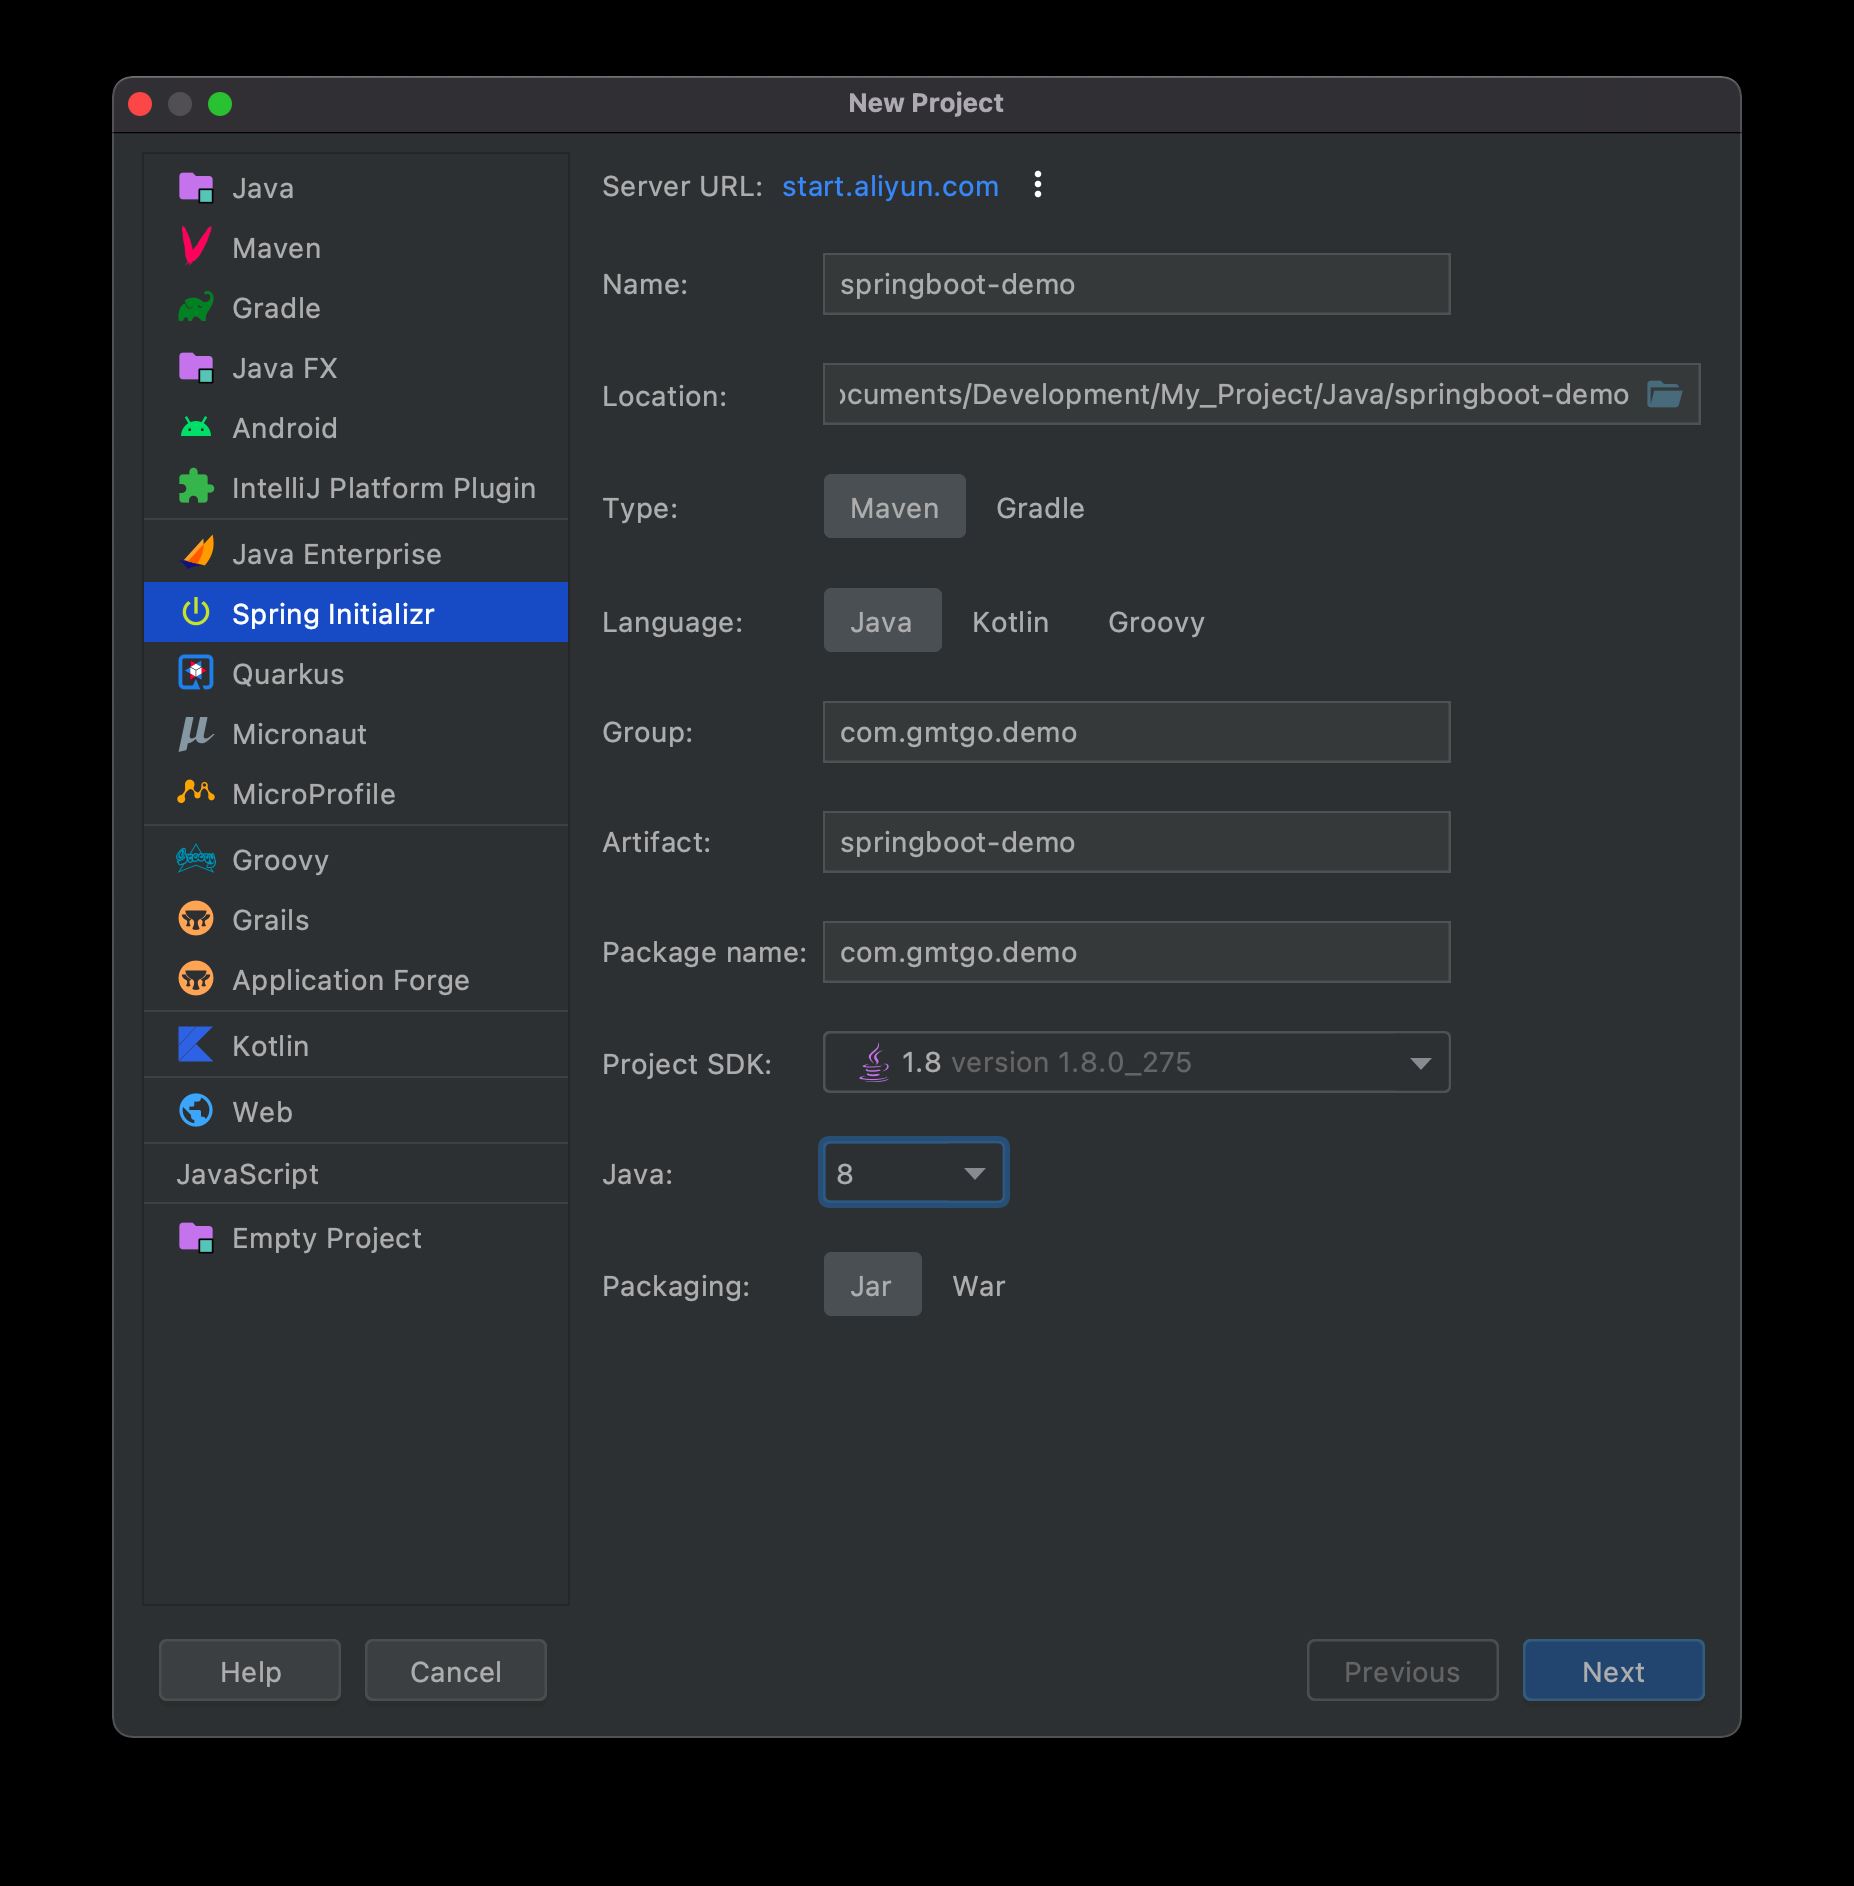
1.1 工程基本信息
1.2 依赖信息

1.3 配置文件applicasion.properties
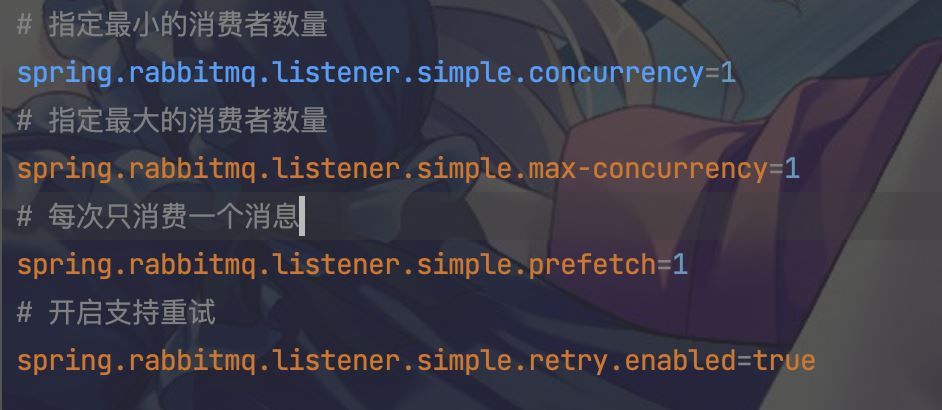
# 应用名称
spring.application.name=springboot-demo
# Actuator Web 访问端口
management.server.port=8801
management.endpoints.jmx.exposure.include=*
management.endpoints.web.exposure.include=*
management.endpoint.health.show-details=always
# 应用服务 WEB 访问端口
server.port=8801

######################### RabbitMQ配置 ########################
# RabbitMQ主机
spring.rabbitmq.host=127.0.0.1
# RabbitMQ虚拟主机
spring.rabbitmq.virtual-host=demo
# RabbitMQ服务端口
spring.rabbitmq.port=5672
# RabbitMQ服务用户名
spring.rabbitmq.username=admin
# RabbitMQ服务密码
spring.rabbitmq.password=admin
# RabbitMQ服务发布确认属性配置
## NONE值是禁用发布确认模式,是默认值
## CORRELATED值是发布消息成功到交换器后会触发回调方法
## SIMPLE值经测试有两种效果,其一效果和CORRELATED值一样会触发回调方法,其二在发布消息成功后使用rabbitTemplate调用waitForConfirms或waitForConfirmsOrDie方法等待broker节点返回发送结果,根据返回结果来判定下一步的逻辑,要注意的点是waitForConfirmsOrDie方法如果返回false则会关闭channel,则接下来无法发送消息到broker;
spring.rabbitmq.publisher-confirm-type=simple
# RabbitMQ服务开启消息发送确认
spring.rabbitmq.publisher-returns=true
######################### simple模式配置 ########################
# RabbitMQ服务 消息接收确认模式
## NONE:不确认
## AUTO:自动确认
## MANUAL:手动确认
spring.rabbitmq.listener.simple.acknowledge-mode=manual
# 指定最小的消费者数量
spring.rabbitmq.listener.simple.concurrency=1
# 指定最大的消费者数量
spring.rabbitmq.listener.simple.max-concurrency=1
# 开启支持重试
spring.rabbitmq.listener.simple.retry.enabled=true
2.1 创建SimpleQueueConfig 简单队列配置类
package com.gmtgo.demo.simple;

import org.springframework.amqp.core.Queue;
import org.springframework.context.annotation.Bean;
import org.springframework.context.annotation.Configuration;

/**
 * @author 大帅
 */
@Configuration
public class SimpleQueueConfig {
    /**
     * 定义简单队列名.
     */
    private final String simpleQueue = "queue_simple";
    @Bean
    public Queue simpleQueue() {
        return new Queue(simpleQueue);
    }
}
2.2 编写生产者
package com.gmtgo.demo.simple;

import lombok.extern.slf4j.Slf4j;
import org.springframework.amqp.rabbit.core.RabbitTemplate;
import org.springframework.beans.factory.annotation.Autowired;
import org.springframework.stereotype.Component;

/**
 * @author 大帅
 */
@Slf4j
@Component
public class SimpleProducer {
    @Autowired
    private RabbitTemplate rabbitTemplate;

    public void sendMessage() {
        for (int i = 0; i < 5; i++) {
            String message = "简单消息" + i;
            log.info("我是生产信息:{}", message);
            rabbitTemplate.convertAndSend( "queue_simple", message);
        }
    }
}
2.3 编写消费者
package com.gmtgo.demo.simple;

import com.rabbitmq.client.Channel;
import lombok.extern.slf4j.Slf4j;
import org.springframework.amqp.core.Message;
import org.springframework.amqp.rabbit.annotation.RabbitListener;
import org.springframework.stereotype.Component;

import java.io.IOException;

/**
 * @author 大帅
 */
@Slf4j
@Component
public class SimpleConsumers {

    @RabbitListener(queues = "queue_simple")
    public void readMessage(Message message, Channel channel) throws IOException {
        channel.basicAck(message.getMessageProperties().getDeliveryTag(), false);
        log.info("我是消费信息:{}", new String(message.getBody()));
    }
}
2.4 编写访问类
package com.gmtgo.demo.simple;

import org.springframework.beans.factory.annotation.Autowired;
import org.springframework.web.bind.annotation.RequestMapping;
import org.springframework.web.bind.annotation.RestController;

/**
 * @author 大帅
 */
@RestController
@RequestMapping(value = "/rabbitMq")
public class SimpleRabbitMqController {

    @Autowired
    private SimpleProducer simpleProducer;

    @RequestMapping(value = "/simpleQueueTest")
    public String simpleQueueTest() {
        simpleProducer.sendMessage();
        return "success";
    }
}
2.5 测试启动项目访问 simpleQueueTest
访问地址:http://127.0.0.1:8801/rabbitMq/simpleQueueTest
结果:

3.1 编写工作配置
package com.gmtgo.demo.work;

import org.springframework.amqp.core.Queue;
import org.springframework.context.annotation.Bean;
import org.springframework.context.annotation.Configuration;

/**
 * @author 大帅
 */
@Configuration
public class WorkQueueConfig {

    /**
     * 队列名.
     */
    private final String work = "work_queue";

    @Bean
    public Queue workQueue() {
        return new Queue(work);
    }
}
3.2 编写生产者
package com.gmtgo.demo.work;

import lombok.extern.slf4j.Slf4j;
import org.springframework.amqp.rabbit.core.RabbitTemplate;
import org.springframework.beans.factory.annotation.Autowired;
import org.springframework.stereotype.Component;

/**
 * @author 大帅
 */
@Slf4j
@Component
public class WorkProducer {

    @Autowired
    private RabbitTemplate rabbitTemplate;

    public void sendMessage() {
        for (int i = 0; i < 10; i++) {
            String message = "工作消息" + i;
            log.info("我是生产信息:{}", message);
            rabbitTemplate.convertAndSend("work_queue", message);
        }
    }
}
3.3 编写消费者1
package com.gmtgo.demo.work;

import com.rabbitmq.client.Channel;
import lombok.extern.slf4j.Slf4j;
import org.springframework.amqp.core.Message;
import org.springframework.amqp.rabbit.annotation.RabbitListener;
import org.springframework.stereotype.Component;

import java.io.IOException;

/**
 * @author 大帅
 */
@Slf4j
@Component
public class WorkConsumers1 {

    @RabbitListener(queues = "work_queue")
    public void readMessage(Message message, Channel channel) throws IOException {
        channel.basicAck(message.getMessageProperties().getDeliveryTag(), false);
        log.info("我是消费信息1:{}", new String(message.getBody()));
    }
}
3.4 编写消费者2
package com.gmtgo.demo.work;

import com.rabbitmq.client.Channel;
import lombok.extern.slf4j.Slf4j;
import org.springframework.amqp.core.Message;
import org.springframework.amqp.rabbit.annotation.RabbitListener;
import org.springframework.stereotype.Component;

import java.io.IOException;

/**
 * @author 大帅
 */
@Slf4j
@Component
public class WorkConsumers2 {

    @RabbitListener(queues = "work_queue")
    public void readMessage(Message message, Channel channel) throws IOException {
        channel.basicAck(message.getMessageProperties().getDeliveryTag(), false);
        log.info("我是消费信息2:{}", new String(message.getBody()));
    }
}
3.5 编写测试方法
package com.gmtgo.demo.work;

import org.springframework.beans.factory.annotation.Autowired;
import org.springframework.web.bind.annotation.RequestMapping;
import org.springframework.web.bind.annotation.RestController;

/**
 * @author 大帅
 */
@RestController
@RequestMapping(value = "rabbitMq")
public class WorkRabbitMqController {
    @Autowired
    private WorkProducer workProducer;

    @RequestMapping(value = "workQueueTest")
    public String workQueueTest() {
        workProducer.sendMessage();
        return "success";
    }
}
3.6 测试启动项目访问 workQueueTest
访问地址http://127.0.0.1:8801/rabbitMq/workQueueTest
结果:
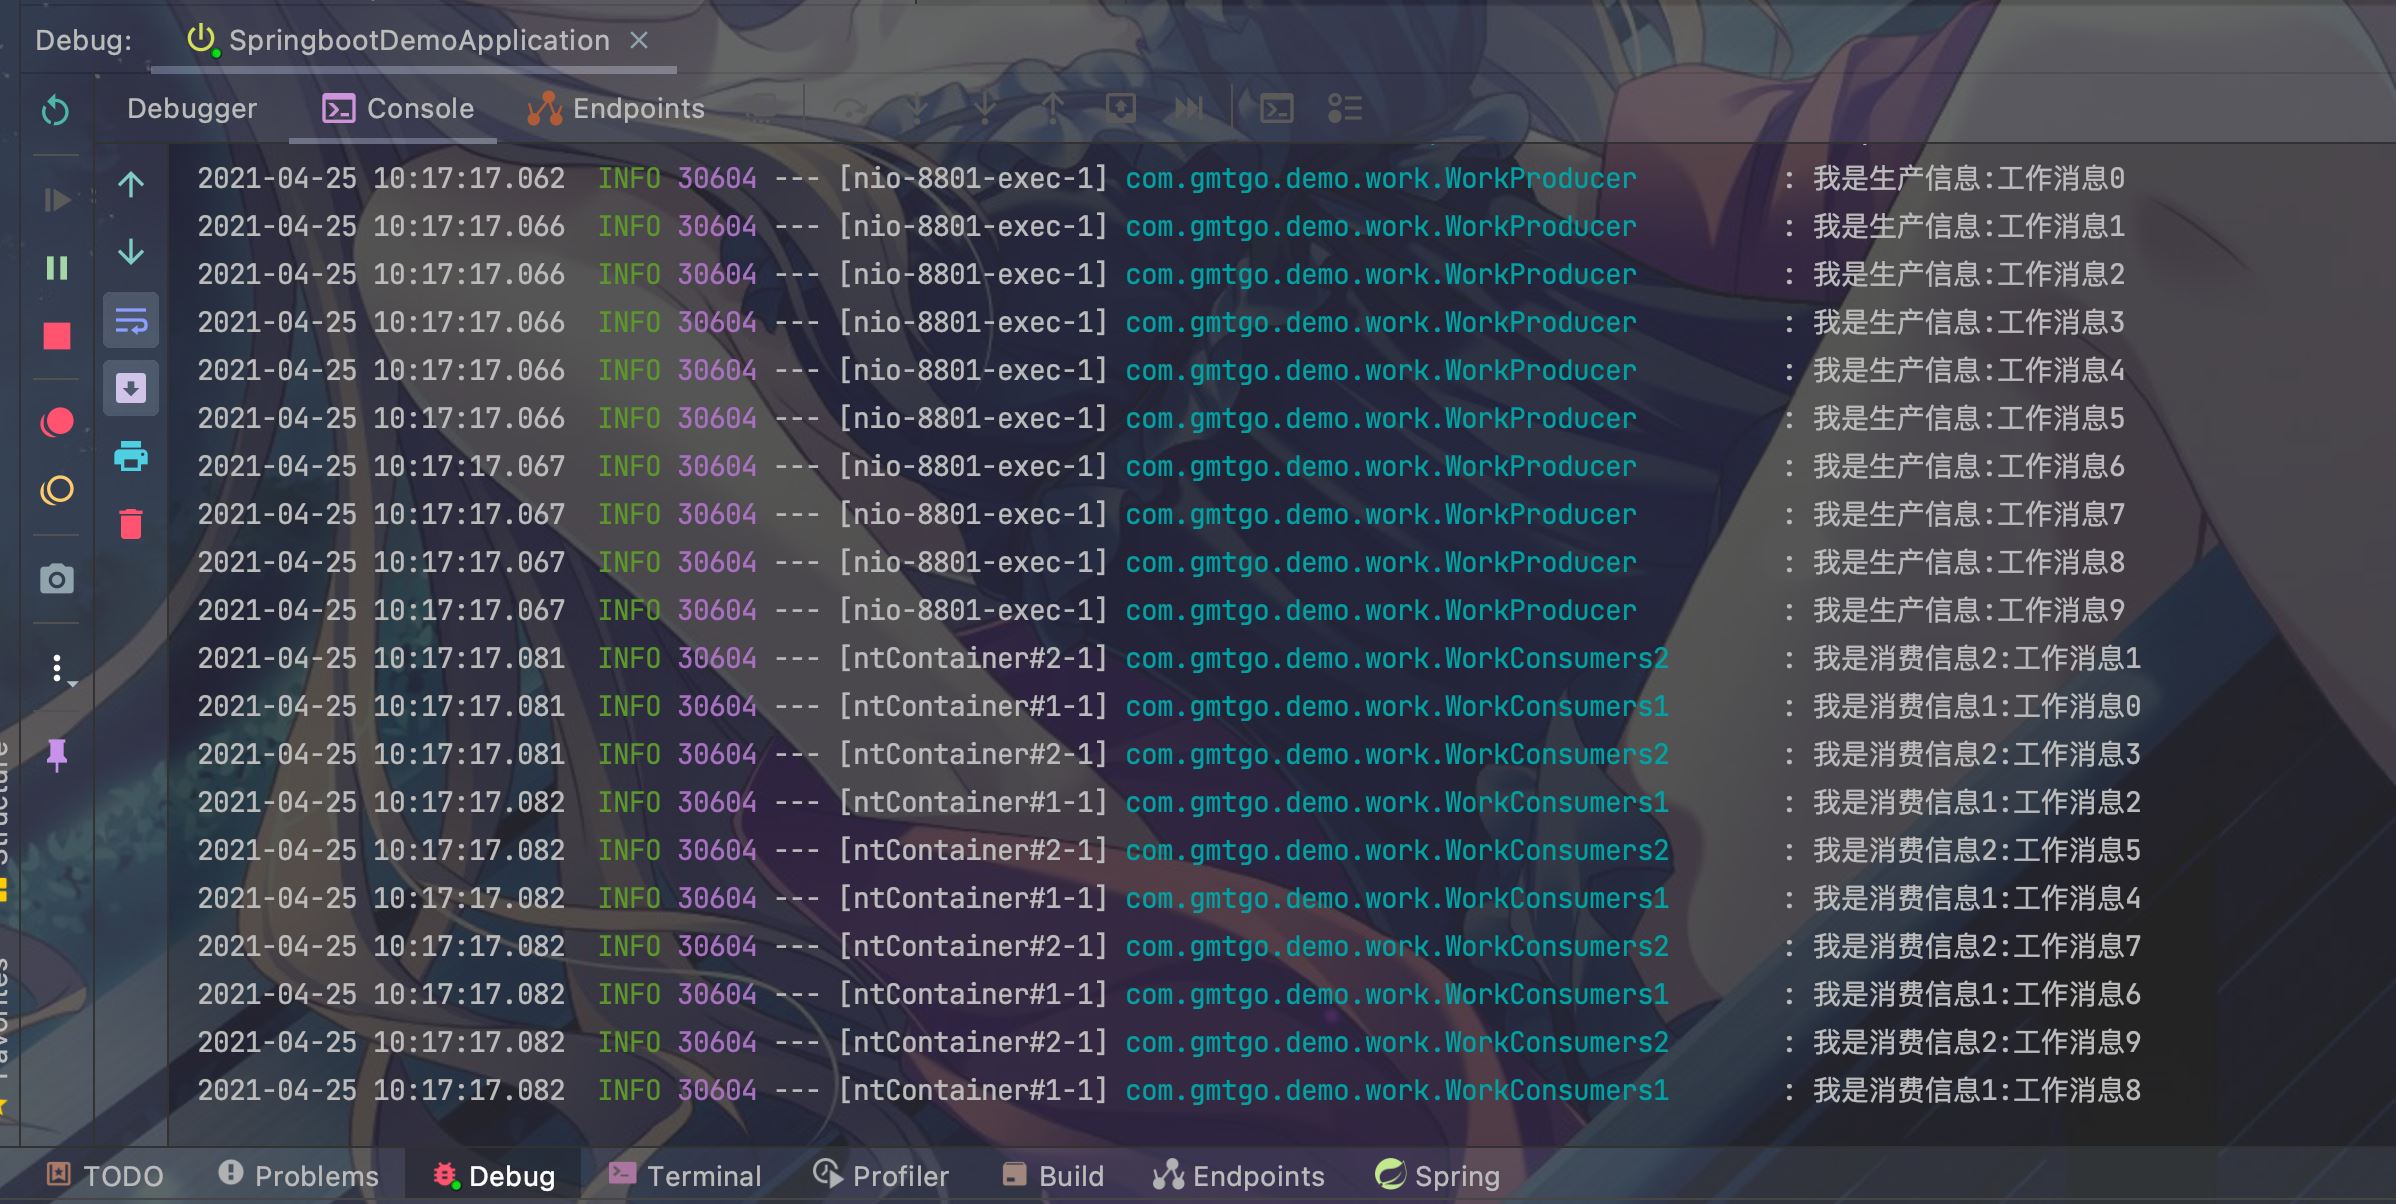
控制台打印,发现10条消息 偶数条消费者1获取,奇数条消费者2获取,并且平均分配。
当然通过代码实现按需分配,即谁的性能强,谁优先原则,实现负载均衡。
配置可控分配数
订阅模式–多个消费者监听不同的队列,但队列都绑定同一个交换机
4.1 编写订阅配置类
package com.gmtgo.demo.fanout;

import org.springframework.amqp.core.Binding;
import org.springframework.amqp.core.BindingBuilder;
import org.springframework.amqp.core.FanoutExchange;
import org.springframework.amqp.core.Queue;
import org.springframework.context.annotation.Bean;
import org.springframework.context.annotation.Configuration;

/**
 * @author 大帅
 */
@Configuration
public class FanoutQueueConfig {

    /**
     * 声明队列名.
     */
    private final String fanout1 = "fanout_queue_1";

    private final String fanout2 = "fanout_queue_2";

    /**
     * 声明交换机的名字.
     */
    private final String fanoutExchange = "fanoutExchange";

    /**
     * 声明队列.
     *
     * @return
     */
    @Bean
    public Queue fanoutQueue1() {
        return new Queue(fanout1);
    }

    @Bean
    public Queue fanoutQueue2() {
        return new Queue(fanout2);
    }

    /**
     * 声明交换机.
     */
    @Bean
    public FanoutExchange exchange() {
        return new FanoutExchange(fanoutExchange);
    }

    /**
     * 队列绑定交换机,也可在可视化工具中进行绑定.
     *
     * @return
     */
    @Bean
    public Binding bindingFanoutQueue1(Queue fanoutQueue1, FanoutExchange exchange) {
        return BindingBuilder.bind(fanoutQueue1).to(exchange);
    }

    @Bean
    public Binding bindingFanoutQueue2(Queue fanoutQueue2, FanoutExchange exchange) {
        return BindingBuilder.bind(fanoutQueue2).to(exchange);
    }
}
4.2 编写订阅生产者
package com.gmtgo.demo.fanout;

import lombok.extern.slf4j.Slf4j;
import org.springframework.amqp.rabbit.core.RabbitTemplate;
import org.springframework.beans.factory.annotation.Autowired;
import org.springframework.stereotype.Component;

/**
 * @author 大帅
 */
@Slf4j
@Component
public class FanoutProducer {

    @Autowired
    private RabbitTemplate rabbitTemplate;

    public void sendMessage() {
        for (int i = 0; i < 5; i++) {
            String message = "订阅模式消息" + i;
            log.info("我是生产信息:{}", message);
            rabbitTemplate.convertAndSend("fanoutExchange", "", message);
        }
    }
}
4.3 编写订阅消费者1
package com.gmtgo.demo.fanout;

import com.rabbitmq.client.Channel;
import lombok.extern.slf4j.Slf4j;
import org.springframework.amqp.core.Message;
import org.springframework.amqp.rabbit.annotation.RabbitListener;
import org.springframework.stereotype.Component;

import java.io.IOException;


/**
 * @author 大帅
 */
@Slf4j
@Component
public class FanoutConsumers1 {

    @RabbitListener(queues = "fanout_queue_1")
    public void readMessage(Message message, Channel channel) throws IOException {
        channel.basicAck(message.getMessageProperties().getDeliveryTag(), false);
        log.info("我是消费信息1:{}", new String(message.getBody()));
    }
}
4.4 编写订阅消费者2
package com.gmtgo.demo.fanout;

import com.rabbitmq.client.Channel;
import lombok.extern.slf4j.Slf4j;
import org.springframework.amqp.core.Message;
import org.springframework.amqp.rabbit.annotation.RabbitListener;
import org.springframework.stereotype.Component;

import java.io.IOException;

/**
 * @author 大帅
 */
@Slf4j
@Component
public class FanoutConsumers2 {

    @RabbitListener(queues = "fanout_queue_2")
    public void readMessage(Message message, Channel channel) throws IOException {
        channel.basicAck(message.getMessageProperties().getDeliveryTag(), false);
        log.info("我是消费信息2:{}", new String(message.getBody()));
    }
}
4.5 编写测试方法
package com.gmtgo.demo.fanout;

import org.springframework.beans.factory.annotation.Autowired;
import org.springframework.web.bind.annotation.RequestMapping;
import org.springframework.web.bind.annotation.RestController;

/**
 * @author 大帅
 */
@RestController
@RequestMapping(value = "rabbitMq")
public class FanoutRabbitMqController {
    @Autowired
    private FanoutProducer fanoutProducer;

    @RequestMapping(value = "fanoutQueueTest")
    public String fanoutQueueTest() {
        fanoutProducer.sendMessage();
        return "success";
    }
}
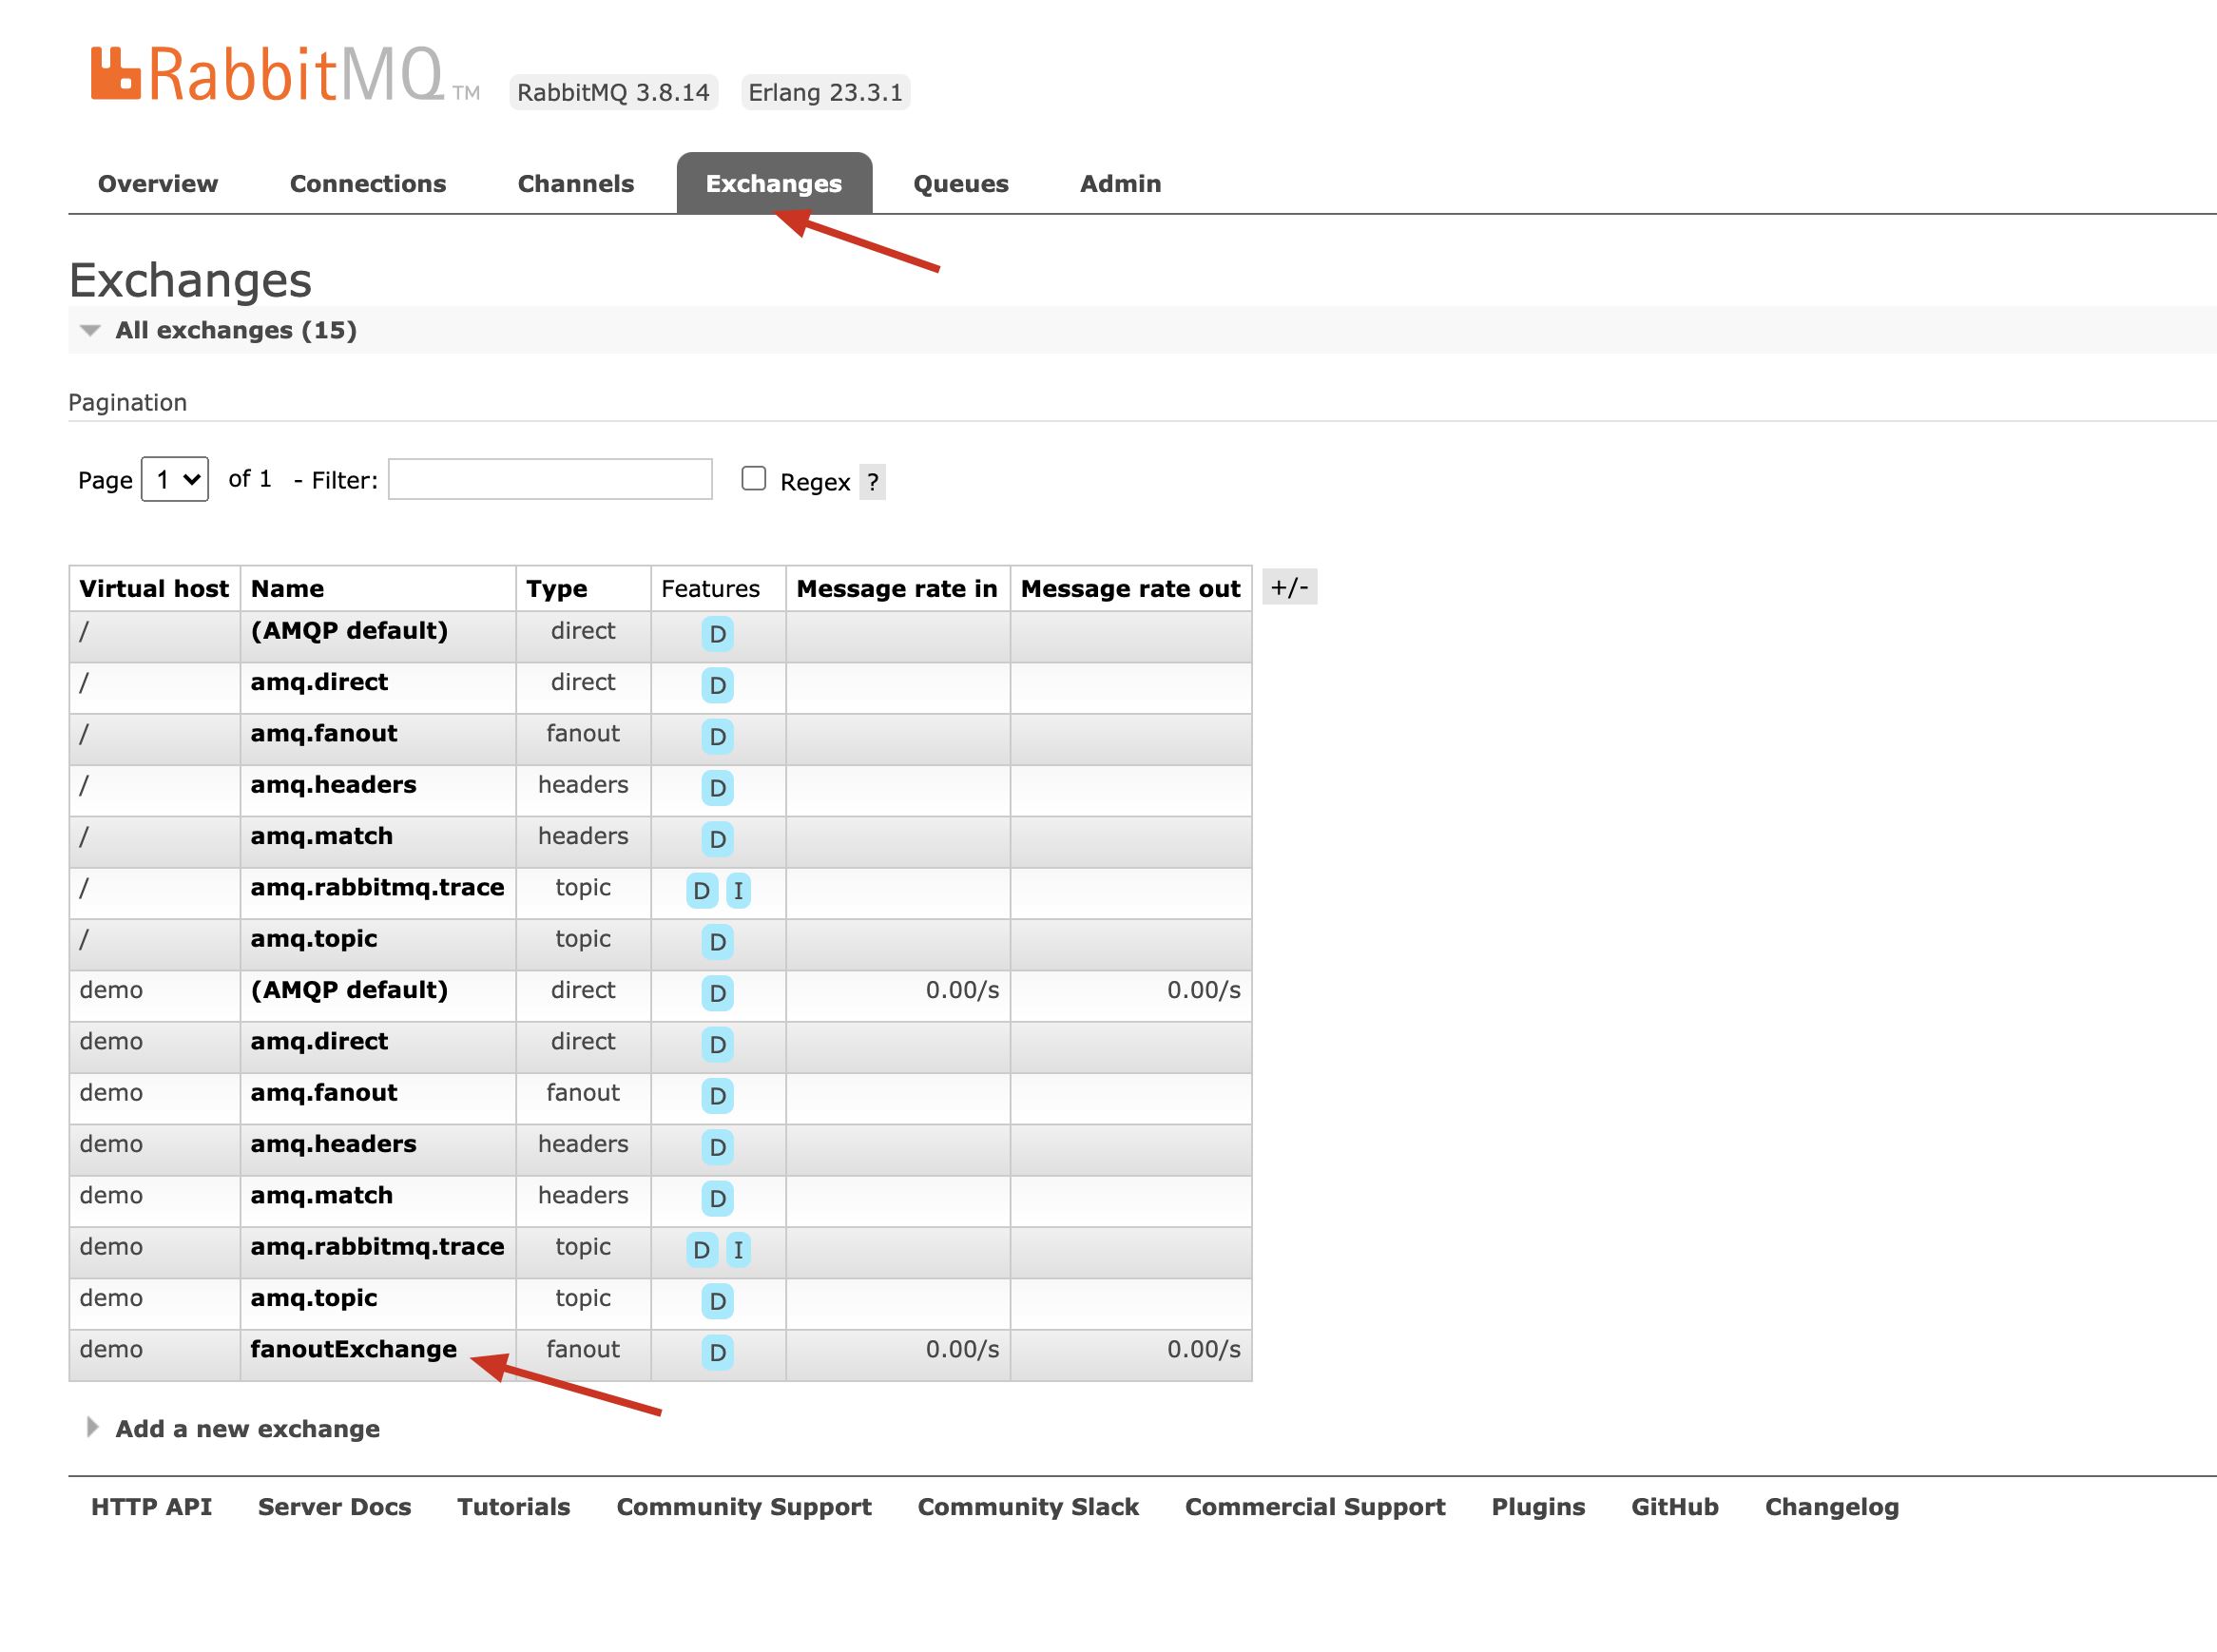
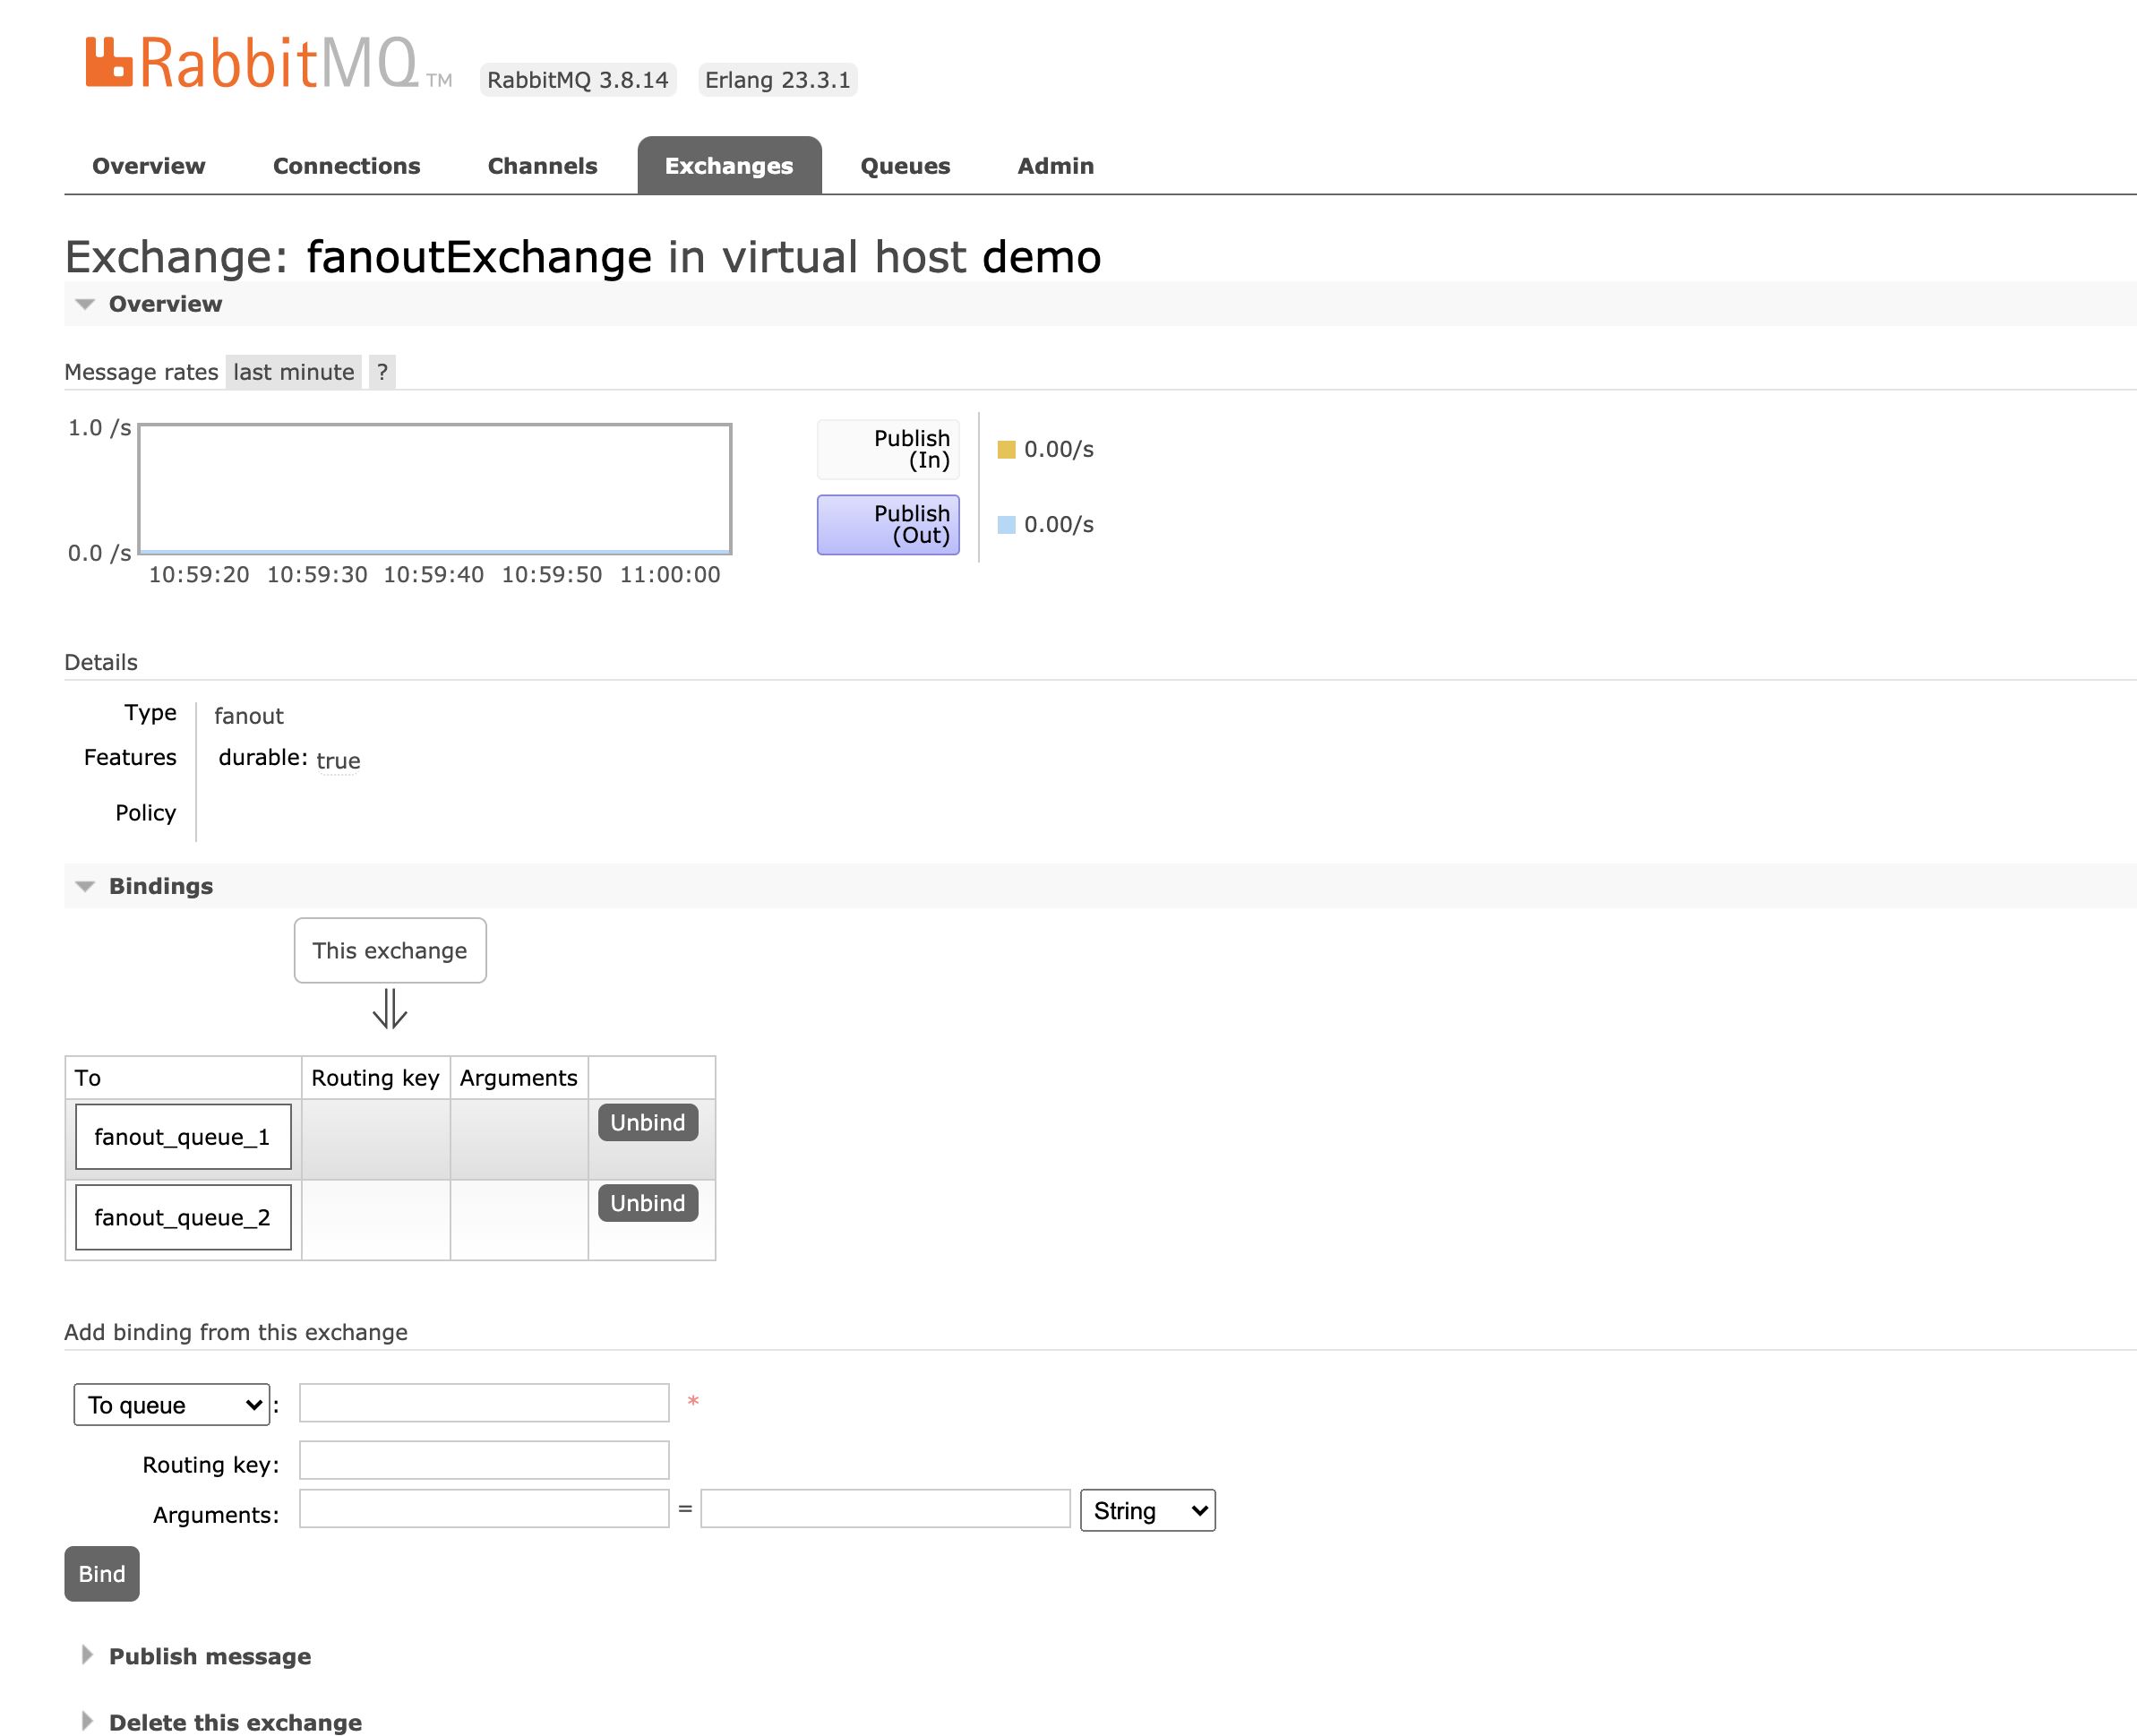
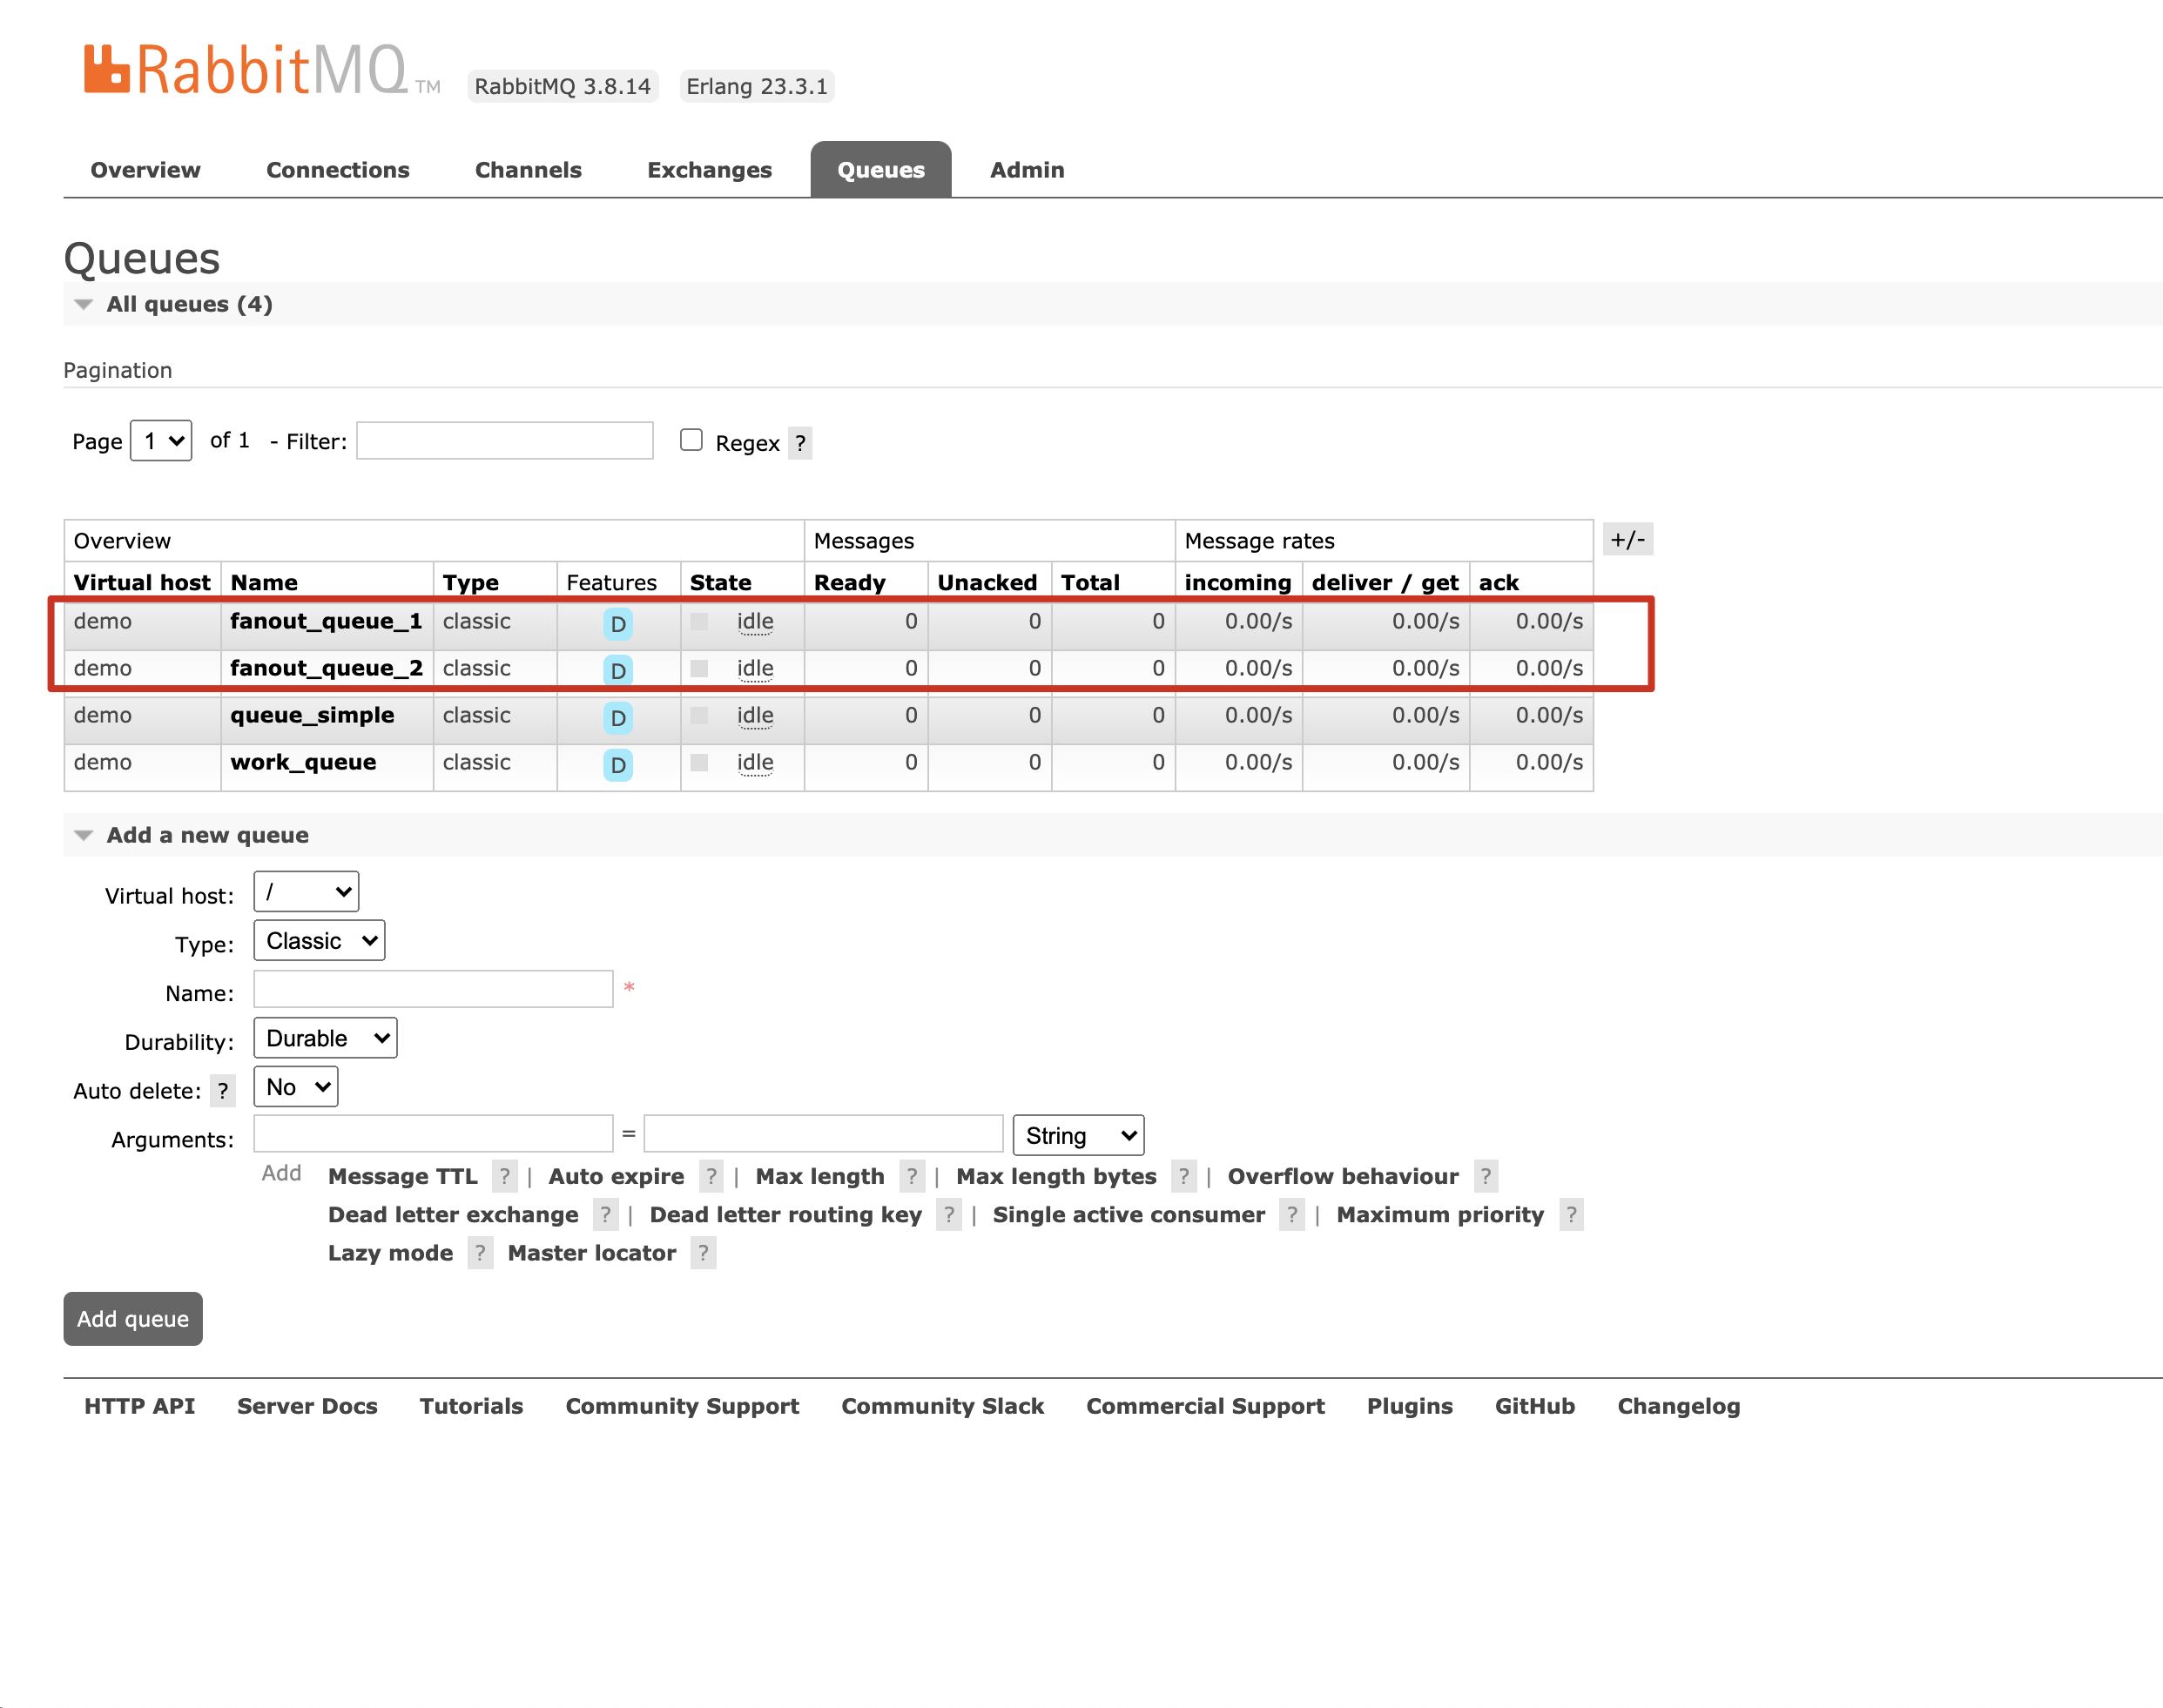
3.6 测试启动项目访问 fanoutQueueTest
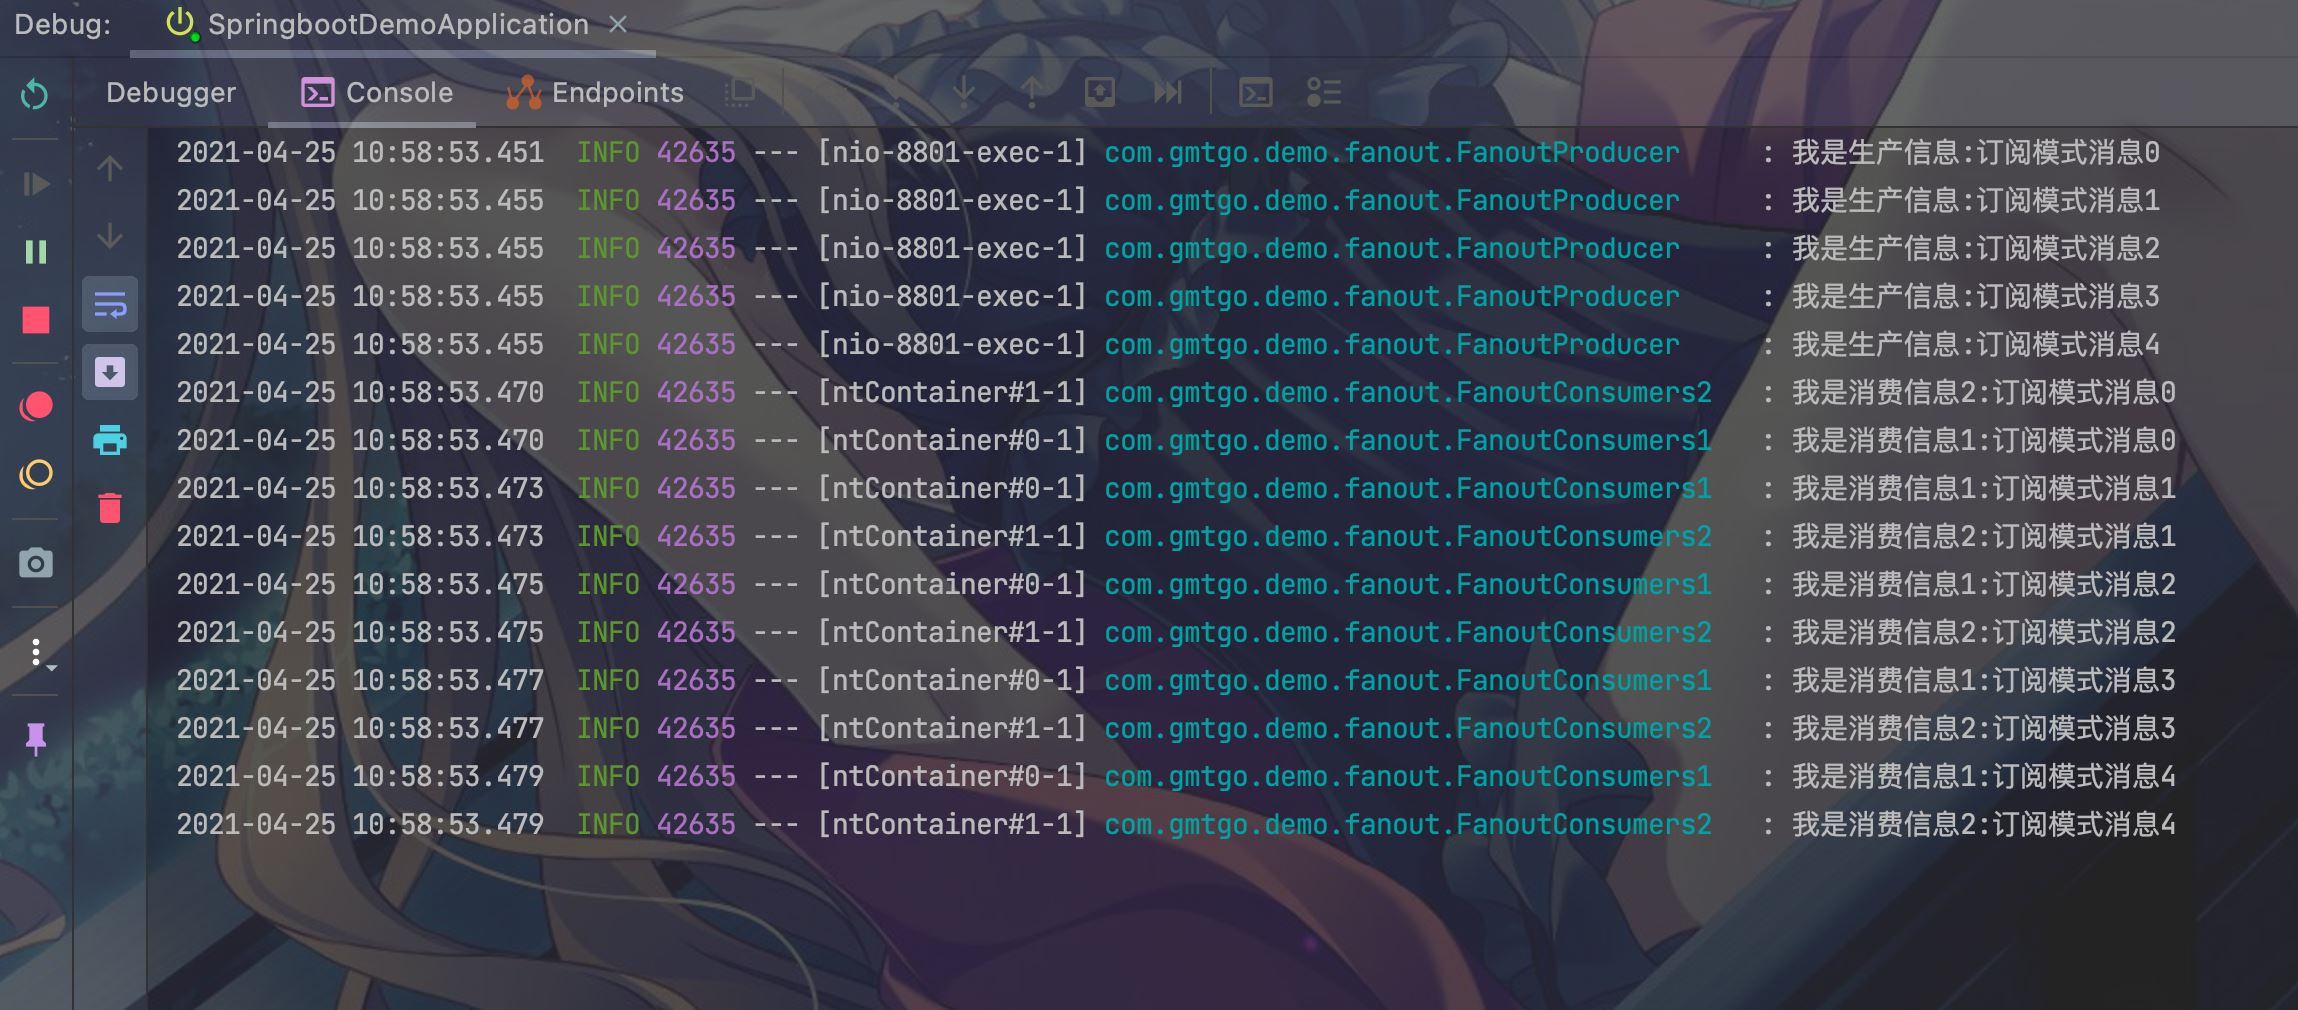
控制台打印 ,发现两个绑定了不同队列的消费者都接受到了同一条消息查看RabbitMq 服务器:
5.1 编写路由配置类
package com.gmtgo.demo.direct;

import org.springframework.amqp.core.Binding;
import org.springframework.amqp.core.BindingBuilder;
import org.springframework.amqp.core.DirectExchange;
import org.springframework.amqp.core.Queue;
import org.springframework.context.annotation.Bean;
import org.springframework.context.annotation.Configuration;

/**
 * @author 大帅
 */
@Configuration
public class DirectQueueConfig {

    /**
     * 声明队列名.
     */
    private final String direct1 = "direct_queue_1";

    private final String direct2 = "direct_queue_2";

    /**
     * 声明交换机的名字.
     */
    private final String directExchange = "directExchange";

    /**
     * 声明队列.
     *
     * @return
     */
    @Bean
    public Queue directQueue1() {
        return new Queue(direct1);
    }

    @Bean
    public Queue directQueue2() {
        return new Queue(direct2);
    }

    /**
     * 声明路由交换机.
     *
     * @return
     */
    @Bean
    public DirectExchange directExchange() {
        return new DirectExchange(directExchange);
    }

    /**
     * 队列绑定交换机,指定routingKey,也可在可视化工具中进行绑定.
     *
     * @return
     */
    @Bean
    Binding bindingDirectExchange1(Queue directQueue1, DirectExchange exchange) {
        return BindingBuilder.bind(directQueue1).to(exchange).with("update");
    }

    /**
     * 队列绑定交换机,指定routingKey,也可在可视化工具中进行绑定.
     *
     * @return
     */
    @Bean
    Binding bindingDirectExchange2(Queue directQueue2, DirectExchange exchange) {
        return BindingBuilder.bind(directQueue2).to(exchange).with("add");
    }

}
5.2 编写生产者
package com.gmtgo.demo.direct;

import lombok.extern.slf4j.Slf4j;
import org.springframework.amqp.rabbit.core.RabbitTemplate;
import org.springframework.beans.factory.annotation.Autowired;
import org.springframework.stereotype.Component;

/**
 * @author 大帅
 */
@Slf4j
@Component
public class DirectProducer {

    @Autowired
    private RabbitTemplate rabbitTemplate;

    public void sendMessageA() {
        for (int i = 0; i < 5; i++) {
            String message = "路由模式--routingKey=update消息" + i;
            log.info("我是生产信息:{}", message);
            rabbitTemplate.convertAndSend("directExchange", "update", message);
        }
    }

    public void sendMessageB() {
        for (int i = 0; i < 5; i++) {
            String message = "路由模式--routingKey=add消息" + i;
            log.info("我是生产信息:{}", message);
            rabbitTemplate.convertAndSend("directExchange", "add", message);
        }
    }
}
5.3 编写消费者1
package com.gmtgo.demo.direct;

import com.rabbitmq.client.Channel;
import lombok.extern.slf4j.Slf4j;
import org.springframework.amqp.core.Message;
import org.springframework.amqp.rabbit.annotation.RabbitListener;
import org.springframework.stereotype.Component;

import java.io.IOException;

/**
 * @author 大帅
 */
@Slf4j
@Component
public class DirectConsumers1 {

    @RabbitListener(queues = "direct_queue_1")
    public void readMessage(Message message, Channel channel) throws IOException {
        channel.basicAck(message.getMessageProperties().getDeliveryTag(), false);
        log.info("我是消费信息1:{}", new String(message.getBody()));
    }
}
5.4 编写消费者2
package com.gmtgo.demo.direct;

import com.rabbitmq.client.Channel;
import lombok.extern.slf4j.Slf4j;
import org.springframework.amqp.core.Message;
import org.springframework.amqp.rabbit.annotation.RabbitListener;
import org.springframework.stereotype.Component;

import java.io.IOException;

/**
 * @author 大帅
 */
@Slf4j
@Component
public class DirectConsumers2 {

    @RabbitListener(queues = "direct_queue_2")
    public void readMessage(Message message, Channel channel) throws IOException {
        channel.basicAck(message.getMessageProperties().getDeliveryTag(), false);
        log.info("我是消费信息2:{}", new String(message.getBody()));
    }
}
5.5 编写访问类
package com.gmtgo.demo.direct;

import org.springframework.beans.factory.annotation.Autowired;
import org.springframework.web.bind.annotation.RequestMapping;
import org.springframework.web.bind.annotation.RestController;

/**
 * @author 大帅
 */
@RestController
@RequestMapping(value = "rabbitMq")
public class DirectRabbitMqController {
    @Autowired
    private DirectProducer directProducer;

    @RequestMapping(value = "directQueueTest1")
    public String directQueueTest1() {
        directProducer.sendMessageA();
        return "success";
    }

    @RequestMapping(value = "directQueueTest2")
    public String directQueueTest2() {
        directProducer.sendMessageB();
        return "success";
    }
}
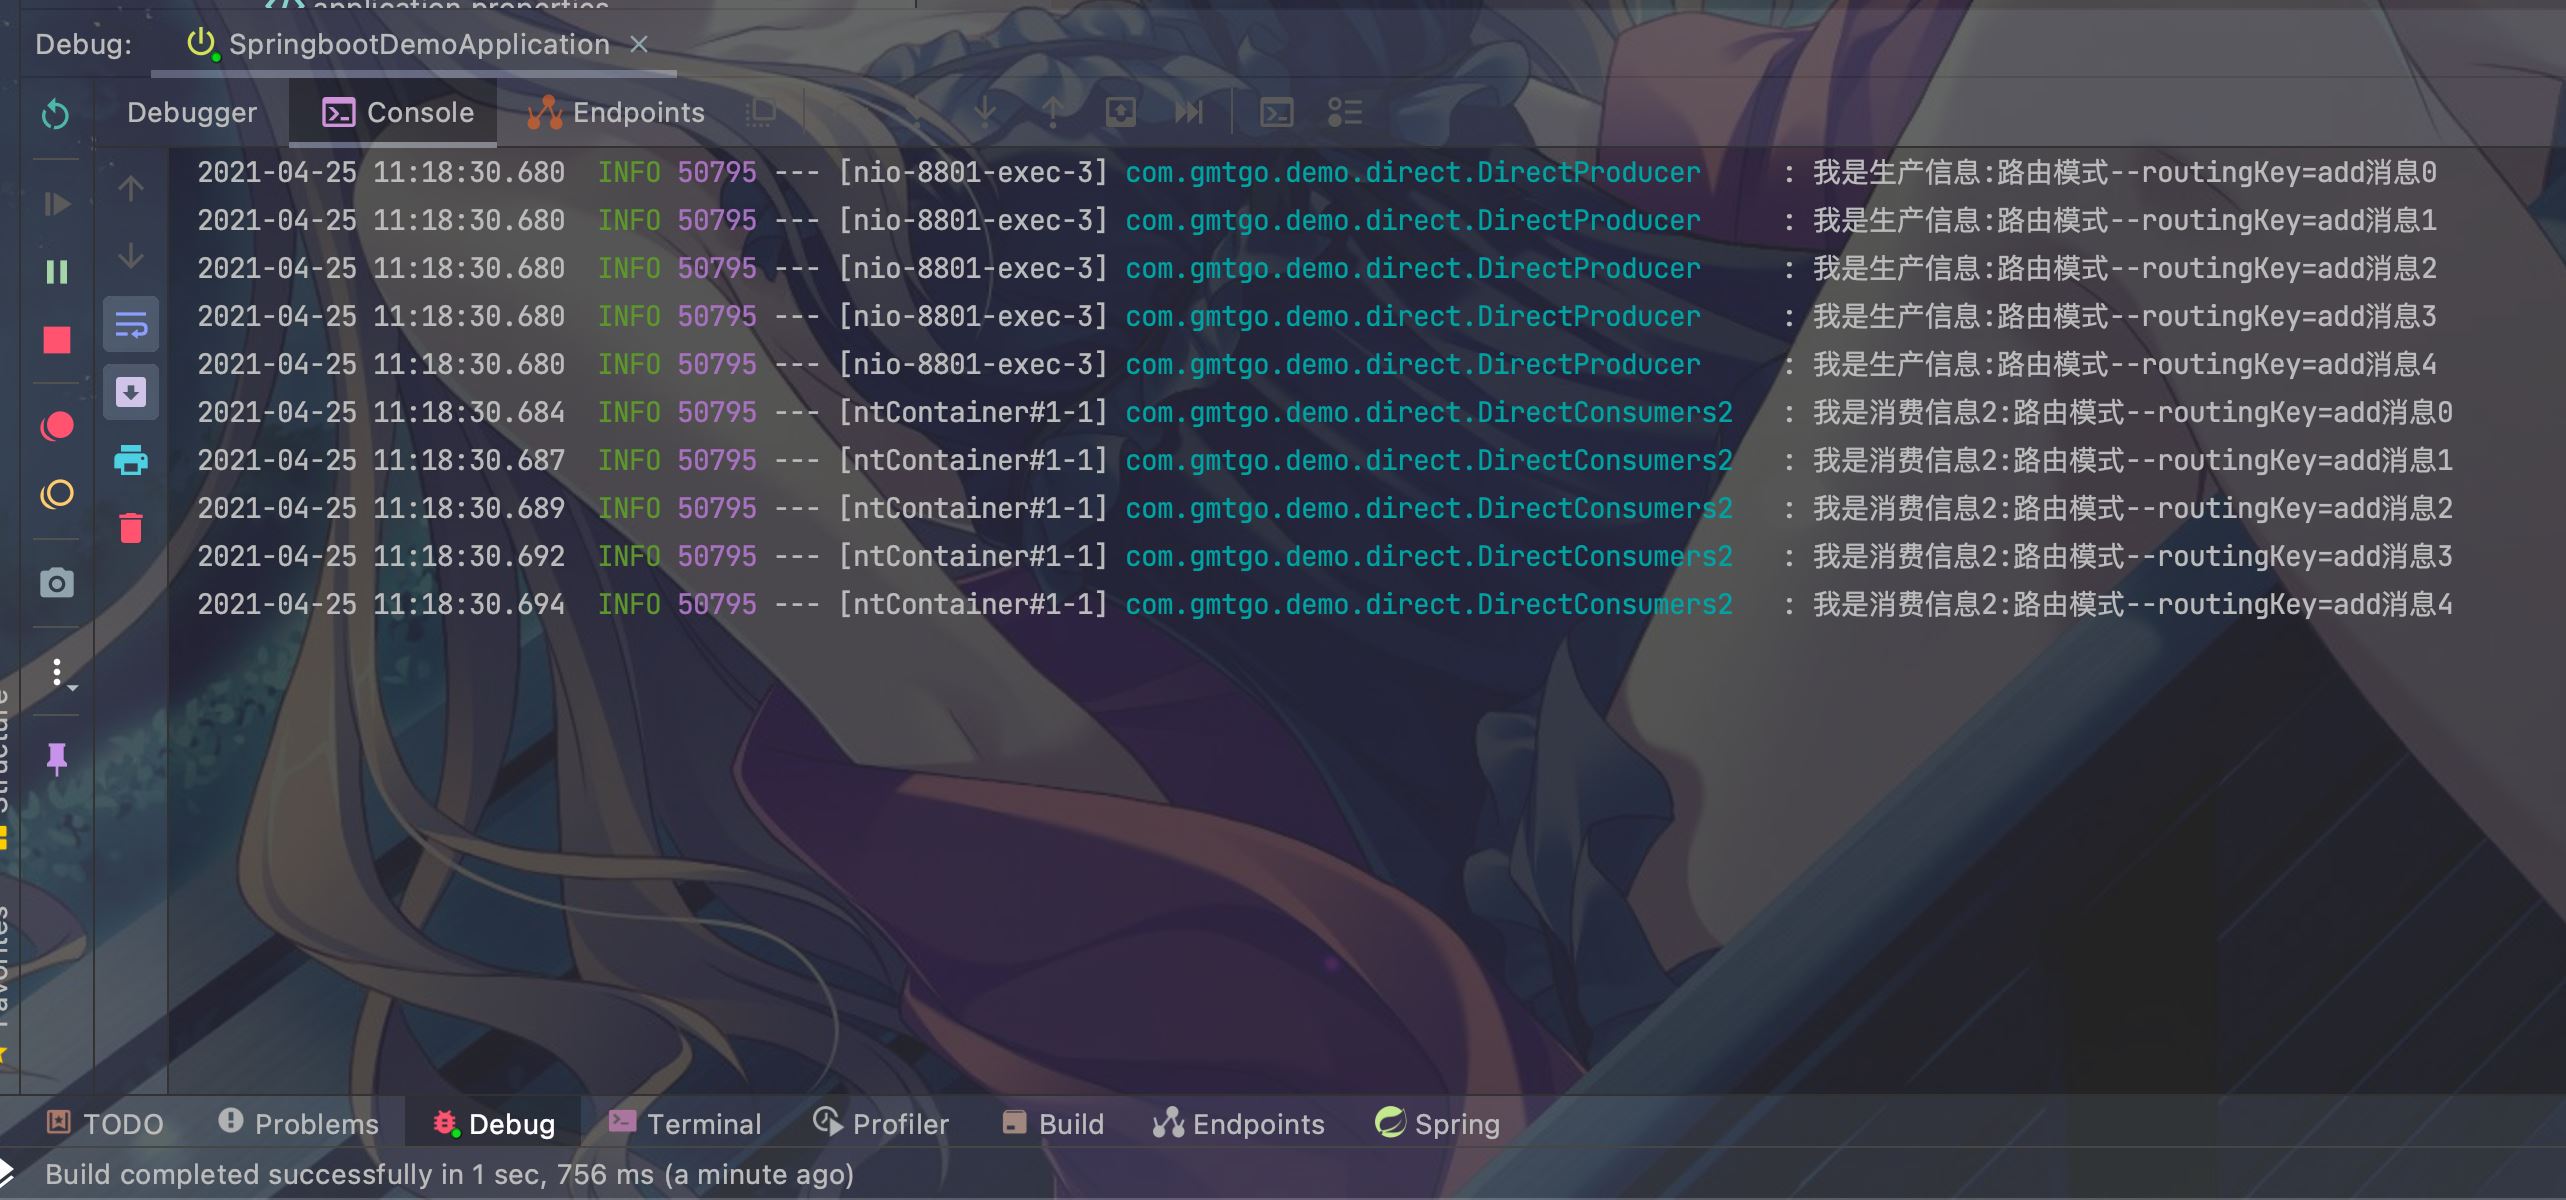
5.6 测试启动项目访问directQueueTest1 , directQueueTest2
访问地址http://127.0.0.1:8801/rabbitMq/directQueueTest1
访问地址http://127.0.0.1:8801/rabbitMq/directQueueTest2
结果:directQueueTest1:
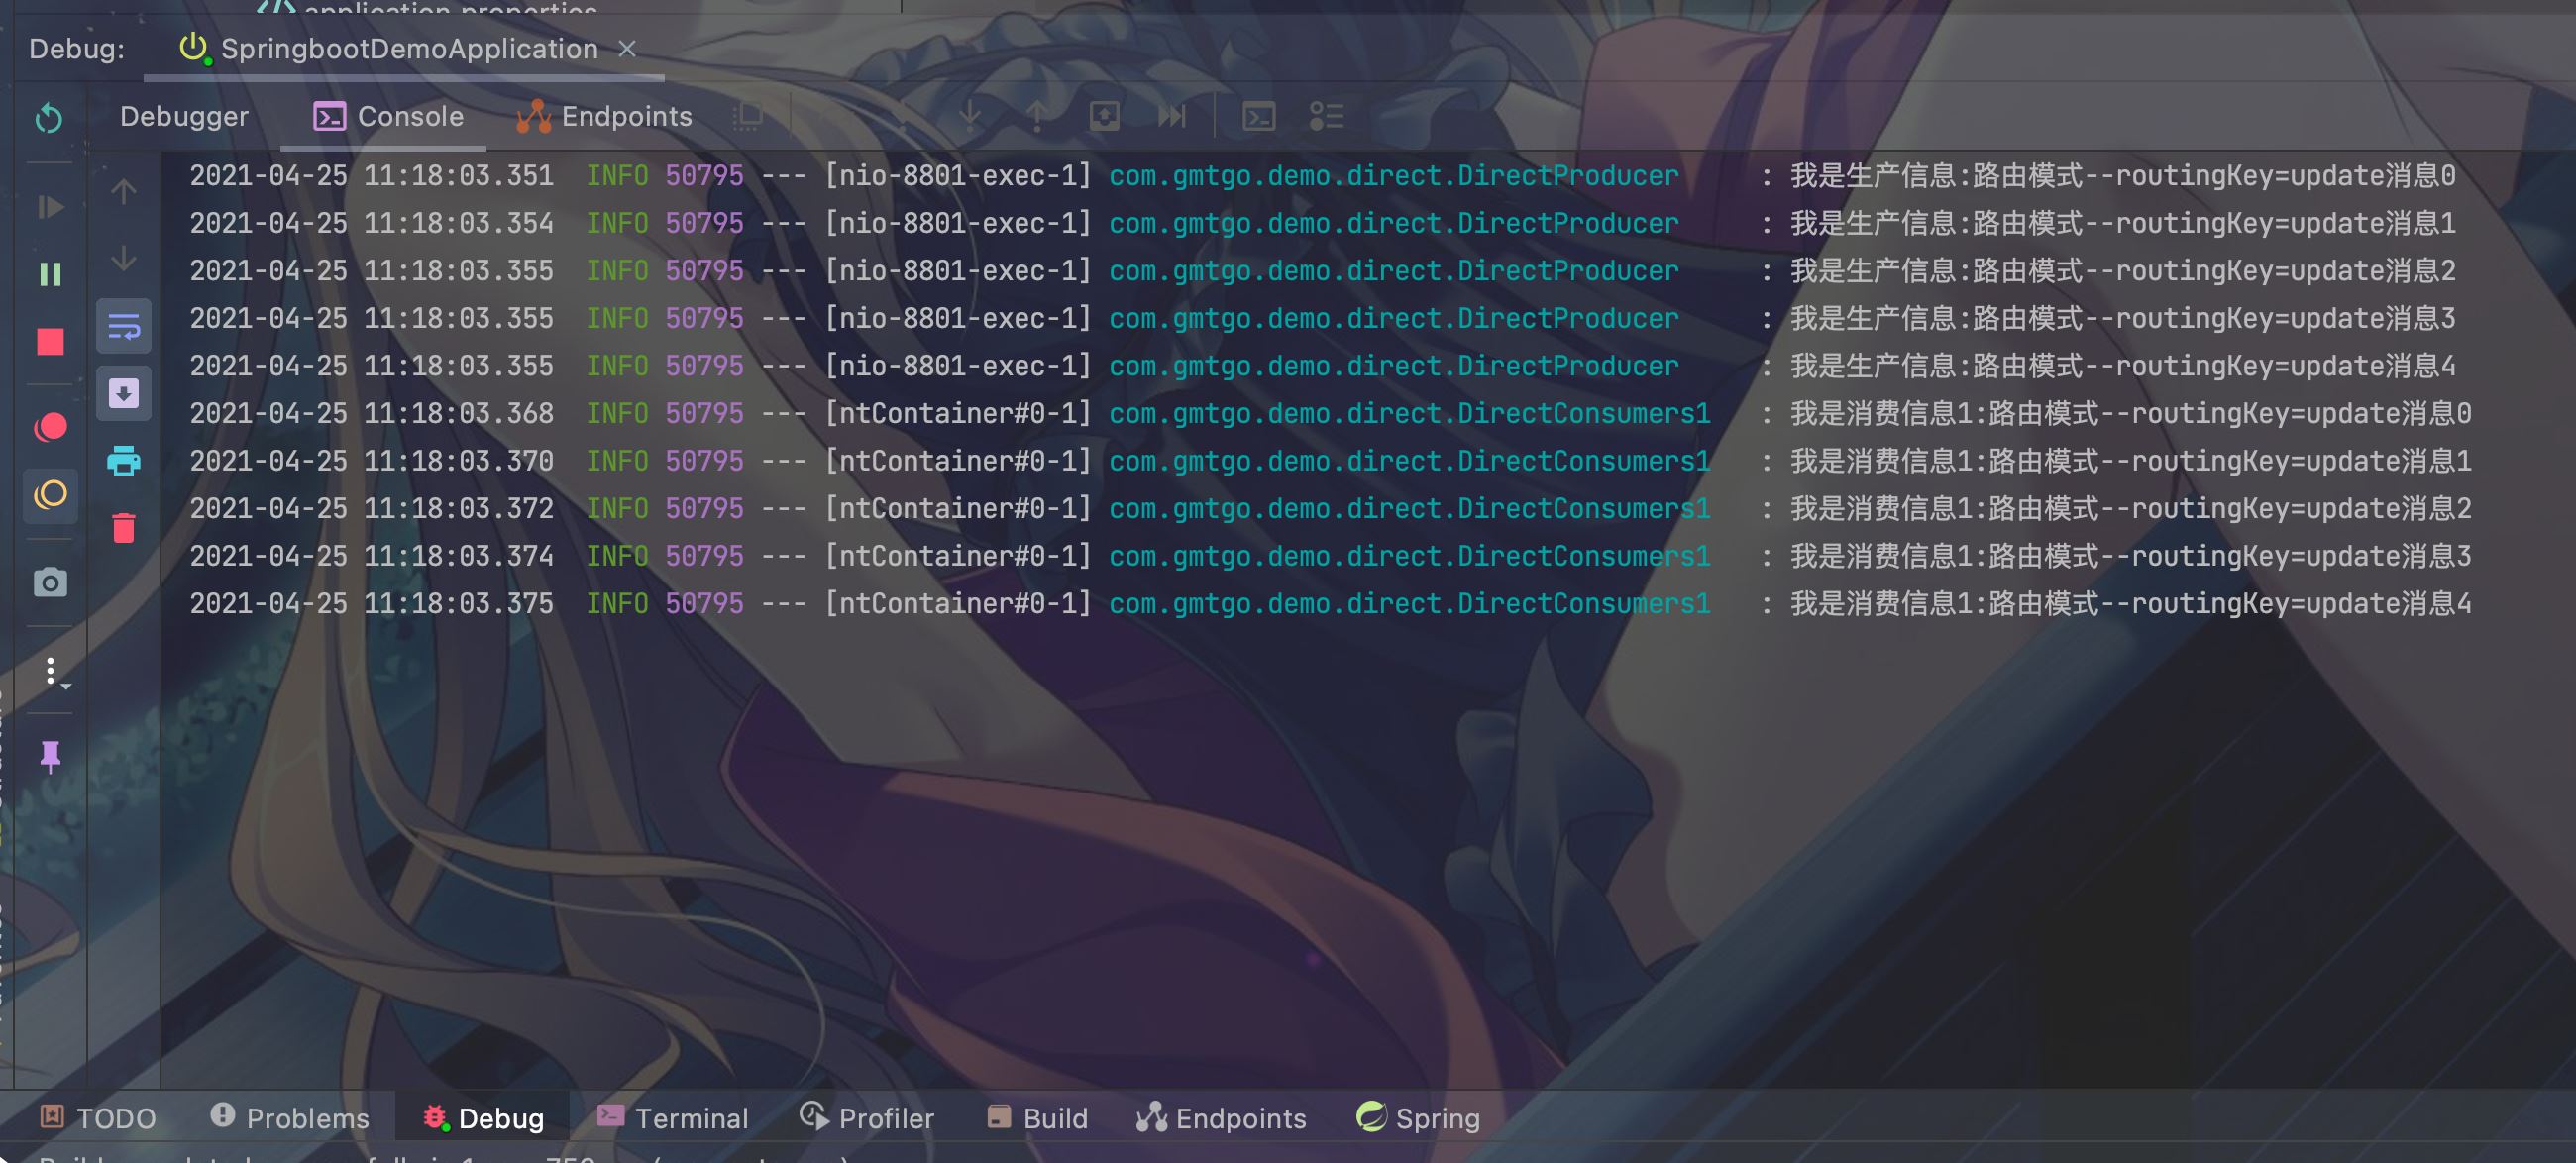
directQueueTest2:
6.1 编写路由配置类
package com.gmtgo.demo.topic;

import org.springframework.amqp.core.*;
import org.springframework.context.annotation.Bean;
import org.springframework.context.annotation.Configuration;

/**
 * @author 大帅
 */
@Configuration
public class TopicQueueConfig {
    /**
     * 声明队列名.
     */
    private final String topic1 = "topic_queue_1";

    private final String topic2 = "topic_queue_2";

    /**
     * 声明交换机的名字.
     */
    private final String topicExchange = "topicExchange";

    /**
     * 声明队列.
     *
     * @return
     */
    @Bean
    public Queue topicQueue1() {
        return new Queue(topic1);
    }

    @Bean
    public Queue topicQueue2() {
        return new Queue(topic2);
    }

    /**
     * 声明路由交换机.
     *
     * @return
     */
    @Bean
    public TopicExchange topicExchange() {
        return new TopicExchange(topicExchange);
    }

    /**
     * 队列绑定交换机,指定routingKey,也可在可视化工具中进行绑定.
     *
     * @return
     */
    @Bean
    Binding bindingTopicExchange1(Queue topicQueue1, TopicExchange exchange) {
        return BindingBuilder.bind(topicQueue1).to(exchange).with("topic.keyA");
    }

    /**
     * 队列绑定交换机,指定routingKey,也可在可视化工具中进行绑定.
     * 绑定的routing key 也可以使用通配符:
     * *:匹配不多不少一个词
     * #:匹配一个或多个词
     *
     * @return
     */
    @Bean
    Binding bindingTopicExchange2(Queue topicQueue2, TopicExchange exchange) {
        return BindingBuilder.bind(topicQueue2).to(exchange).with("topic.#");
    }
}
6.2 编写生产者
package com.gmtgo.demo.topic;

import lombok.extern.slf4j.Slf4j;
import org.springframework.amqp.rabbit.core.RabbitTemplate;
import org.springframework.beans.factory.annotation.Autowired;
import org.springframework.stereotype.Component;
/**
 * @author 大帅
 */
@Slf4j
@Component
public class TopicProducer {

    @Autowired
    private RabbitTemplate rabbitTemplate;

    public void sendMessageA() {
        for (int i = 0; i < 5; i++) {
            String message = "通配符模式--routingKey=topic.keyA消息" + i;
            log.info("我是生产信息:{}", message);
            rabbitTemplate.convertAndSend("topicExchange", "topic.keyA", message);
        }
    }

    public void sendMessageB() {
        for (int i = 0; i < 5; i++) {
            String message = "通配符模式--routingKey=topic.#消息" + i;
            log.info("我是生产信息:{}", message);
            rabbitTemplate.convertAndSend("topicExchange", "topic.keyD.keyE", message);
        }
    }
}
6.3 编写消费者1
package com.gmtgo.demo.topic;
import com.rabbitmq.client.Channel;
import lombok.extern.slf4j.Slf4j;
import org.springframework.amqp.core.Message;
import org.springframework.amqp.rabbit.annotation.RabbitListener;
import org.springframework.stereotype.Component;

import java.io.IOException;
/**
 * @author 大帅
 */
@Slf4j
@Component
public class TopicConsumers1 {

    @RabbitListener(queues = "topic_queue_1")
    public void readMessage(Message message, Channel channel) throws IOException {
        channel.basicAck(message.getMessageProperties().getDeliveryTag(), false);
        log.info("我是消费信息1:{}",new String(message.getBody()));
    }
}
6.4 编写消费者2
package com.gmtgo.demo.topic;
import com.rabbitmq.client.Channel;
import lombok.extern.slf4j.Slf4j;
import org.springframework.amqp.core.Message;
import org.springframework.amqp.rabbit.annotation.RabbitListener;
import org.springframework.stereotype.Component;

import java.io.IOException;
/**
 * @author 大帅
 */
@Slf4j
@Component
public class TopicConsumers2 {

    @RabbitListener(queues = "topic_queue_2")
    public void readMessage(Message message, Channel channel) throws IOException {
        channel.basicAck(message.getMessageProperties().getDeliveryTag(), false);
        log.info("我是消费信息2:{}",new String(message.getBody()));
    }
}
6.5 编写访问类
package com.gmtgo.demo.topic;

import org.springframework.beans.factory.annotation.Autowired;
import org.springframework.web.bind.annotation.RequestMapping;
import org.springframework.web.bind.annotation.RestController;

/**
 * @author 大帅
 */
@RestController
@RequestMapping(value = "rabbitMq")
public class TopicRabbitMqController {
    @Autowired
    private TopicProducer topicProducer;

    @RequestMapping(value = "topicQueueTest1")
    public String topicQueueTest1() {
        topicProducer.sendMessageA();
        return "success";
    }

    @RequestMapping(value = "topicQueueTest2")
    public String topicQueueTest2() {
        topicProducer.sendMessageB();
        return "success";
    }
}
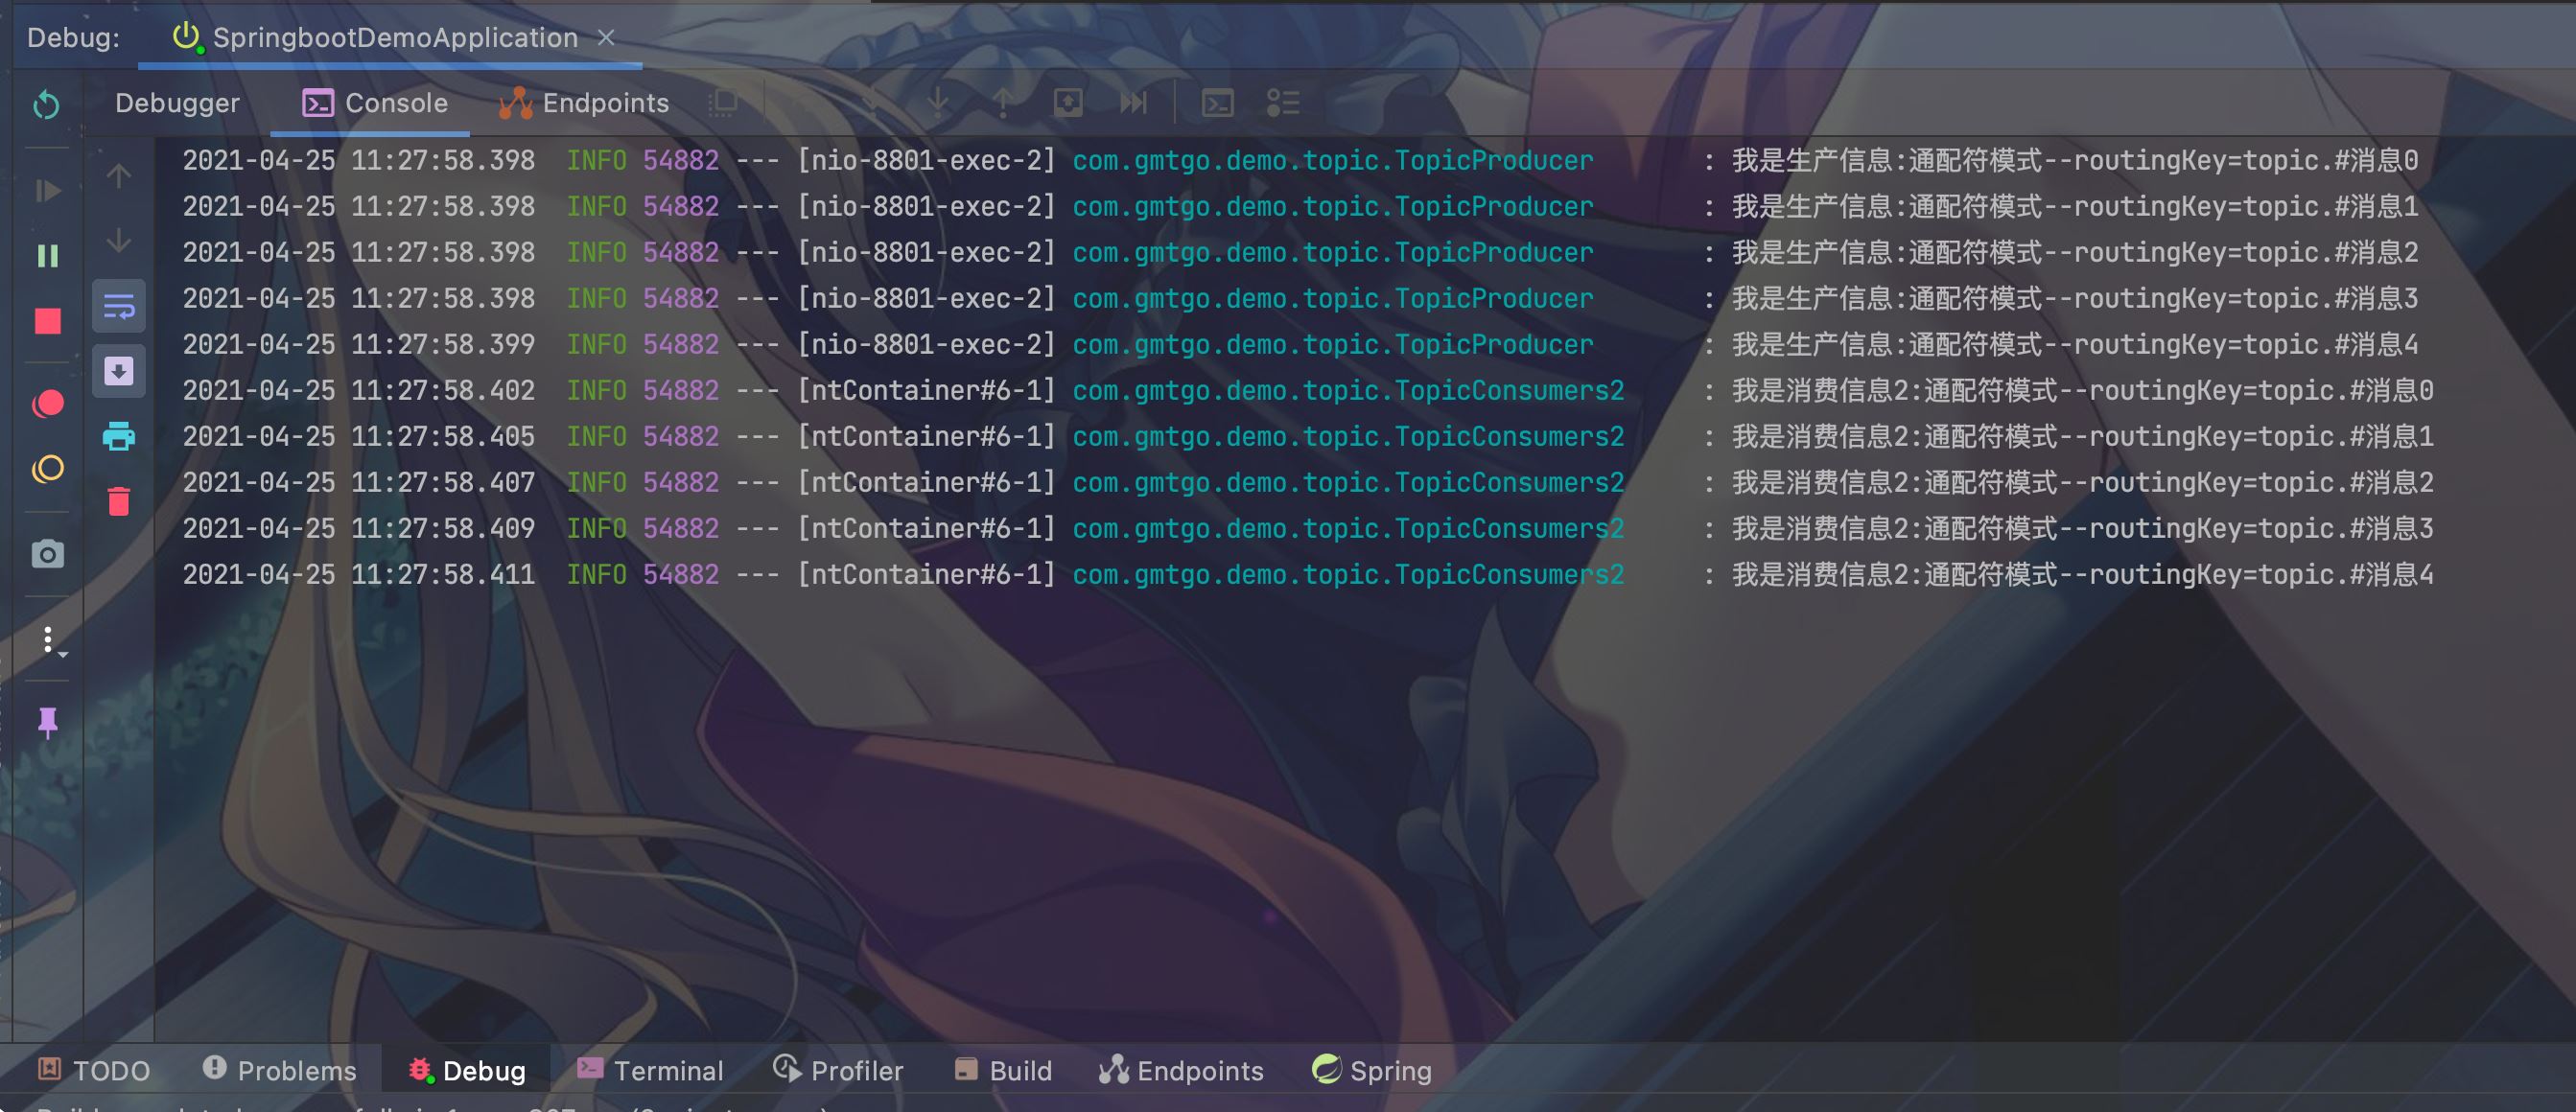
6.6 测试启动项目访问topicQueueTest1 , topicQueueTest2
topicQueueTest1,两个消费者都能消费
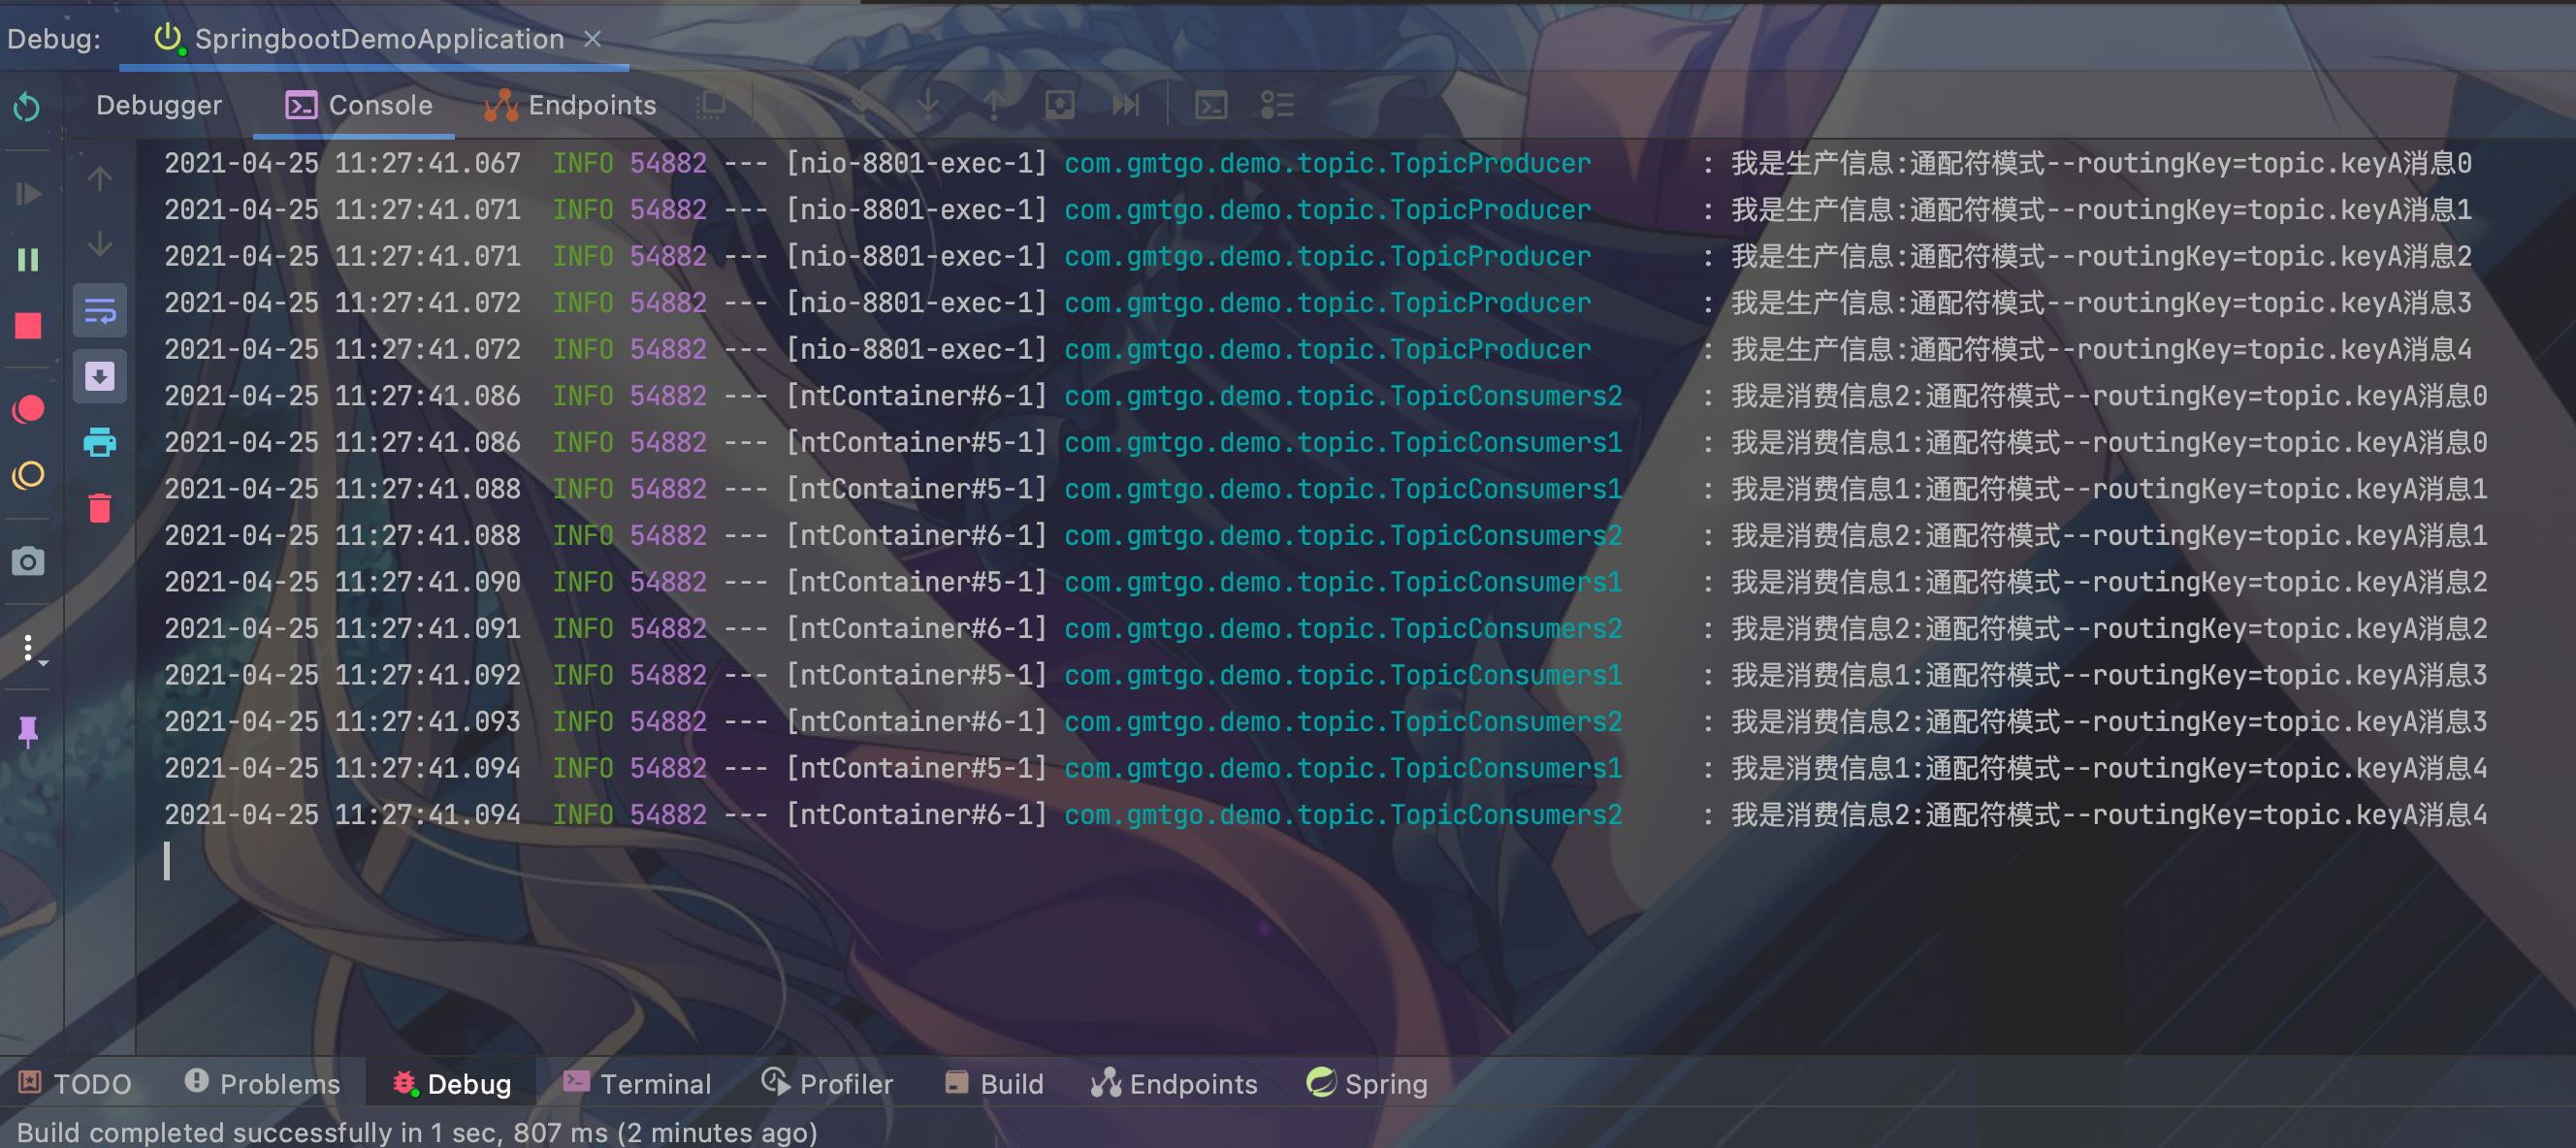
topicQueueTest2,只有消费者2 可以消费
至此,五种队列的实现已结束!
7.1 配置文件
######################### RabbitMQ配置 ########################
# RabbitMQ主机
spring.rabbitmq.host=127.0.0.1
# RabbitMQ虚拟主机
spring.rabbitmq.virtual-host=demo
# RabbitMQ服务端口
spring.rabbitmq.port=5672
# RabbitMQ服务用户名
spring.rabbitmq.username=admin
# RabbitMQ服务密码
spring.rabbitmq.password=admin
# RabbitMQ服务发布确认属性配置
## NONE值是禁用发布确认模式,是默认值
## CORRELATED值是发布消息成功到交换器后会触发回调方法
## SIMPLE值经测试有两种效果,其一效果和CORRELATED值一样会触发回调方法,其二在发布消息成功后使用rabbitTemplate调用waitForConfirms或waitForConfirmsOrDie方法等待broker节点返回发送结果,根据返回结果来判定下一步的逻辑,要注意的点是waitForConfirmsOrDie方法如果返回false则会关闭channel,则接下来无法发送消息到broker;
spring.rabbitmq.publisher-confirm-type=simple
# 连接超时时间
spring.rabbitmq.connection-timeout=20000
# RabbitMQ服务开启消息发送确认
spring.rabbitmq.publisher-returns=true
######################### simple模式配置 ########################
# RabbitMQ服务 消息接收确认模式
## NONE:不确认
## AUTO:自动确认
## MANUAL:手动确认
spring.rabbitmq.listener.simple.acknowledge-mode=manual
# 指定最小的消费者数量
spring.rabbitmq.listener.simple.concurrency=1
# 指定最大的消费者数量
spring.rabbitmq.listener.simple.max-concurrency=1
# 每次只消费一个消息
spring.rabbitmq.listener.simple.prefetch=1
# 开启支持重试
spring.rabbitmq.listener.simple.retry.enabled=true
# 启用强制信息,默认为false
spring.rabbitmq.template.mandatory=true
7.2 编写消息发送确认类 RabbitConfirmCallback
package com.gmtgo.demo.config;

import lombok.extern.slf4j.Slf4j;
import org.springframework.amqp.rabbit.connection.CorrelationData;
import org.springframework.amqp.rabbit.core.RabbitTemplate;
/**
 * @author 大帅
 */
@Slf4j
public class RabbitConfirmCallback implements RabbitTemplate.ConfirmCallback {
    @Override
    public void confirm(CorrelationData correlationData, boolean ack, String cause) {
        log.info("=======ConfirmCallback=========");
        log.info("correlationData {} " , correlationData);
        log.info("ack = {}" , ack);
        log.info("cause = {}" , cause);
        log.info("=======ConfirmCallback=========");
    }
}
7.3 编写消息发送交换机返回机制RabbitConfirmReturnCallBack
package com.gmtgo.demo.config;

import lombok.extern.slf4j.Slf4j;
import org.springframework.amqp.core.Message;
import org.springframework.amqp.rabbit.core.RabbitTemplate;

/**
 * @author 大帅
 */
@Slf4j
public class RabbitConfirmReturnCallBack implements RabbitTemplate.ReturnCallback {
    @Override
    public void returnedMessage(Message message, int replyCode, String replyText, String exchange, String routingKey) {
        log.info("--------------ReturnCallback----------------");
        log.info("message = " + message);
        log.info("replyCode = {}", replyCode);
        log.info("replyText = {}", replyText);
        log.info("exchange = {}", exchange);
        log.info("routingKey = {}", routingKey);
        log.info("--------------ReturnCallback----------------");
    }
}
7.4 RabbitMQ配置
在我们的rabbit队列配置类里设置RabbitTemplate
举例:
package com.gmtgo.demo.topic;

import com.gmtgo.demo.config.RabbitConfirmCallback;
import com.gmtgo.demo.config.RabbitConfirmReturnCallBack;
import org.springframework.amqp.core.Binding;
import org.springframework.amqp.core.BindingBuilder;
import org.springframework.amqp.core.Queue;
import org.springframework.amqp.core.TopicExchange;
import org.springframework.amqp.rabbit.core.RabbitTemplate;
import org.springframework.beans.factory.annotation.Autowired;
import org.springframework.context.annotation.Bean;
import org.springframework.context.annotation.Configuration;

import javax.annotation.PostConstruct;

/**
 * @author 大帅
 */
@Configuration
public class TopicQueueConfig {
    @Autowired
    private RabbitTemplate rabbitTemplate;

    @PostConstruct
    public void initRabbitTemplate() {
        // 设置生产者消息确认
        rabbitTemplate.setConfirmCallback(new RabbitConfirmCallback());
        rabbitTemplate.setReturnCallback(new RabbitConfirmReturnCallBack());
    }

    /**
     * 声明队列名.
     */
    private final String topic1 = "topic_queue_1";

    private final String topic2 = "topic_queue_2";

    /**
     * 声明交换机的名字.
     */
    private final String topicExchange = "topicExchange";

    /**
     * 声明队列.
     *
     * @return
     */
    @Bean
    public Queue topicQueue1() {
        return new Queue(topic1);
    }

    @Bean
    public Queue topicQueue2() {
        return new Queue(topic2);
    }

    /**
     * 声明路由交换机.
     *
     * @return
     */
    @Bean
    public TopicExchange topicExchange() {
        return new TopicExchange(topicExchange);
    }

    /**
     * 队列绑定交换机,指定routingKey,也可在可视化工具中进行绑定.
     *
     * @return
     */
    @Bean
    Binding bindingTopicExchange1(Queue topicQueue1, TopicExchange exchange) {
        return BindingBuilder.bind(topicQueue1).to(exchange).with("topic.keyA");
    }

    /**
     * 队列绑定交换机,指定routingKey,也可在可视化工具中进行绑定.
     * 绑定的routing key 也可以使用通配符:
     * *:匹配不多不少一个词
     * #:匹配一个或多个词
     *
     * @return
     */
    @Bean
    Binding bindingTopicExchange2(Queue topicQueue2, TopicExchange exchange) {
        return BindingBuilder.bind(topicQueue2).to(exchange).with("topic.#");
    }
}
启动项目发送消息,消息被正常消费,confim回调返回ack=true如果我们将exchange修改,发送到一个不存在的exchange中,会怎么样呢?
会发现confirm回调为false,打印出结果为不存在topicExchange1111的交换机
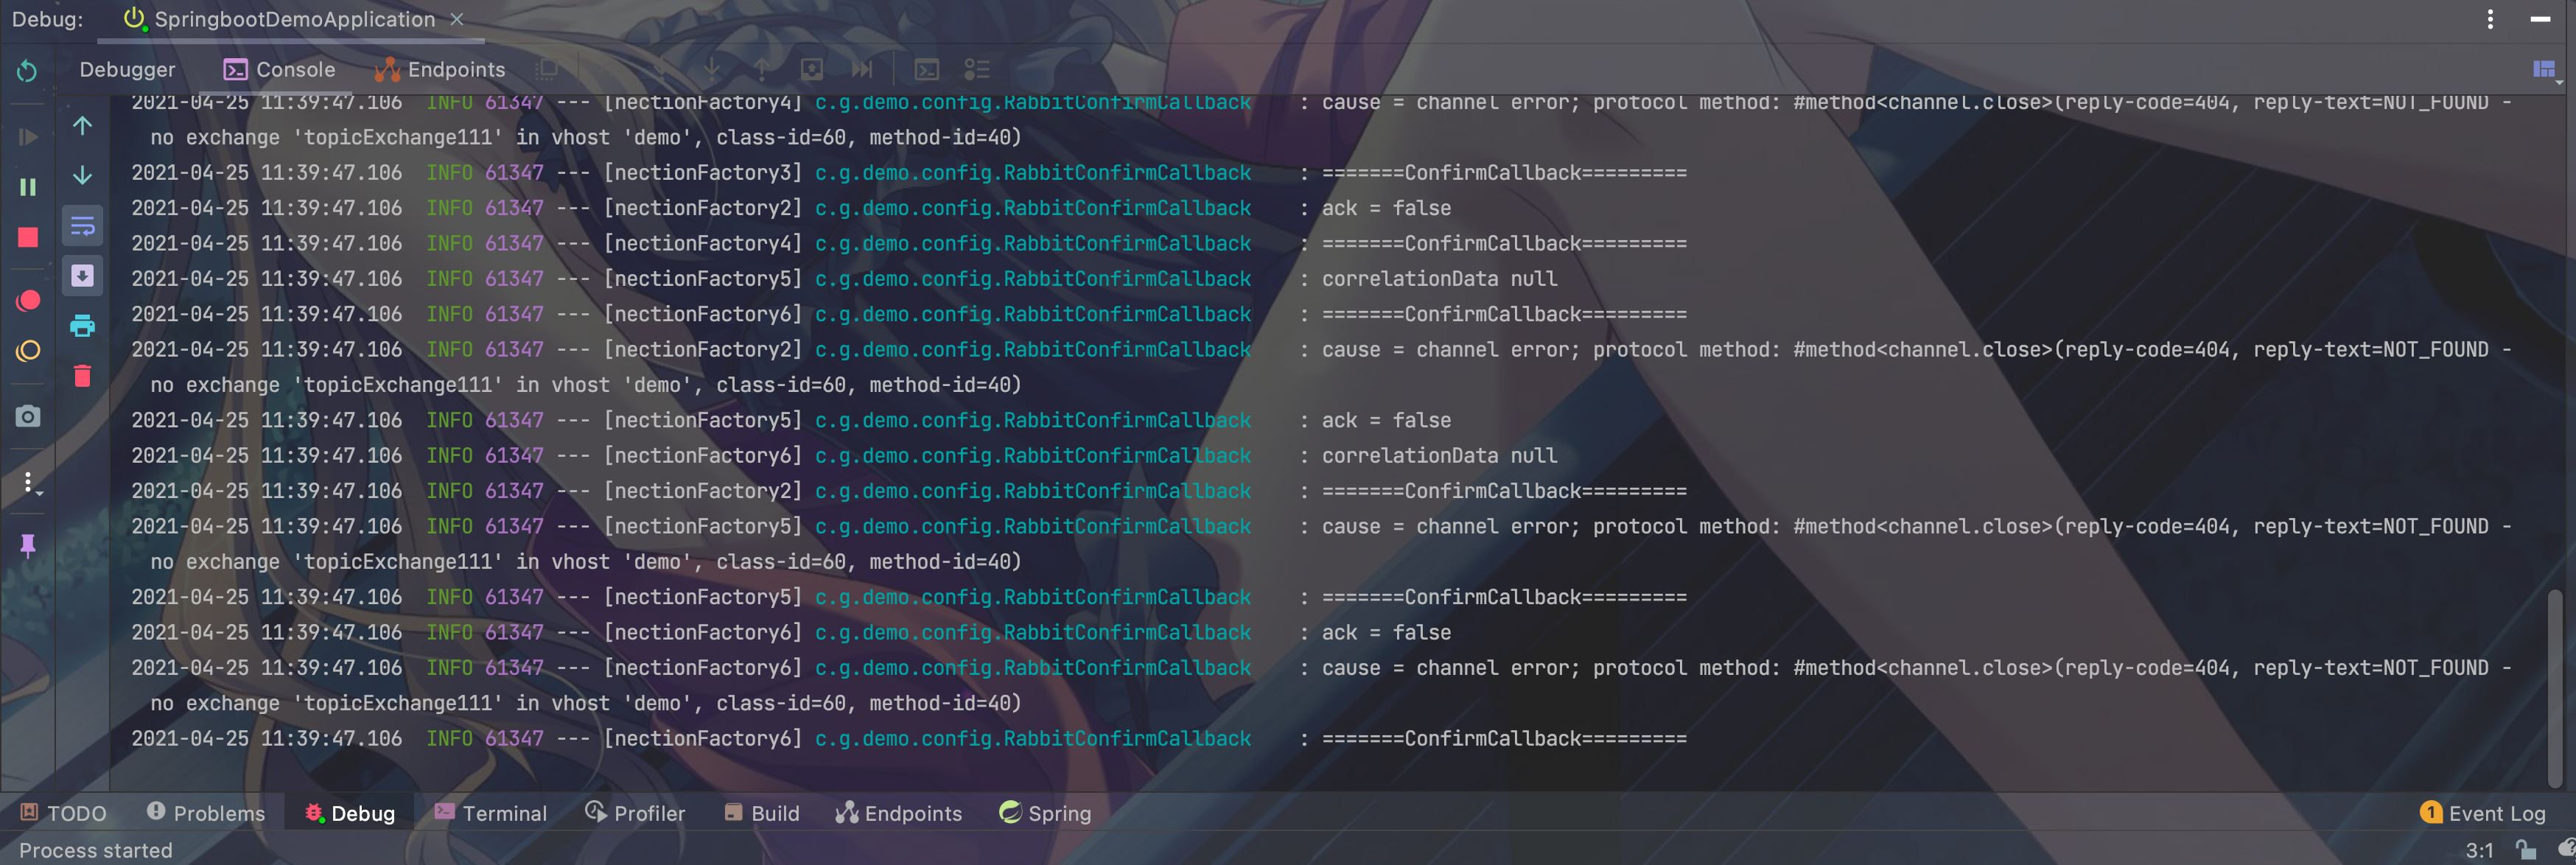
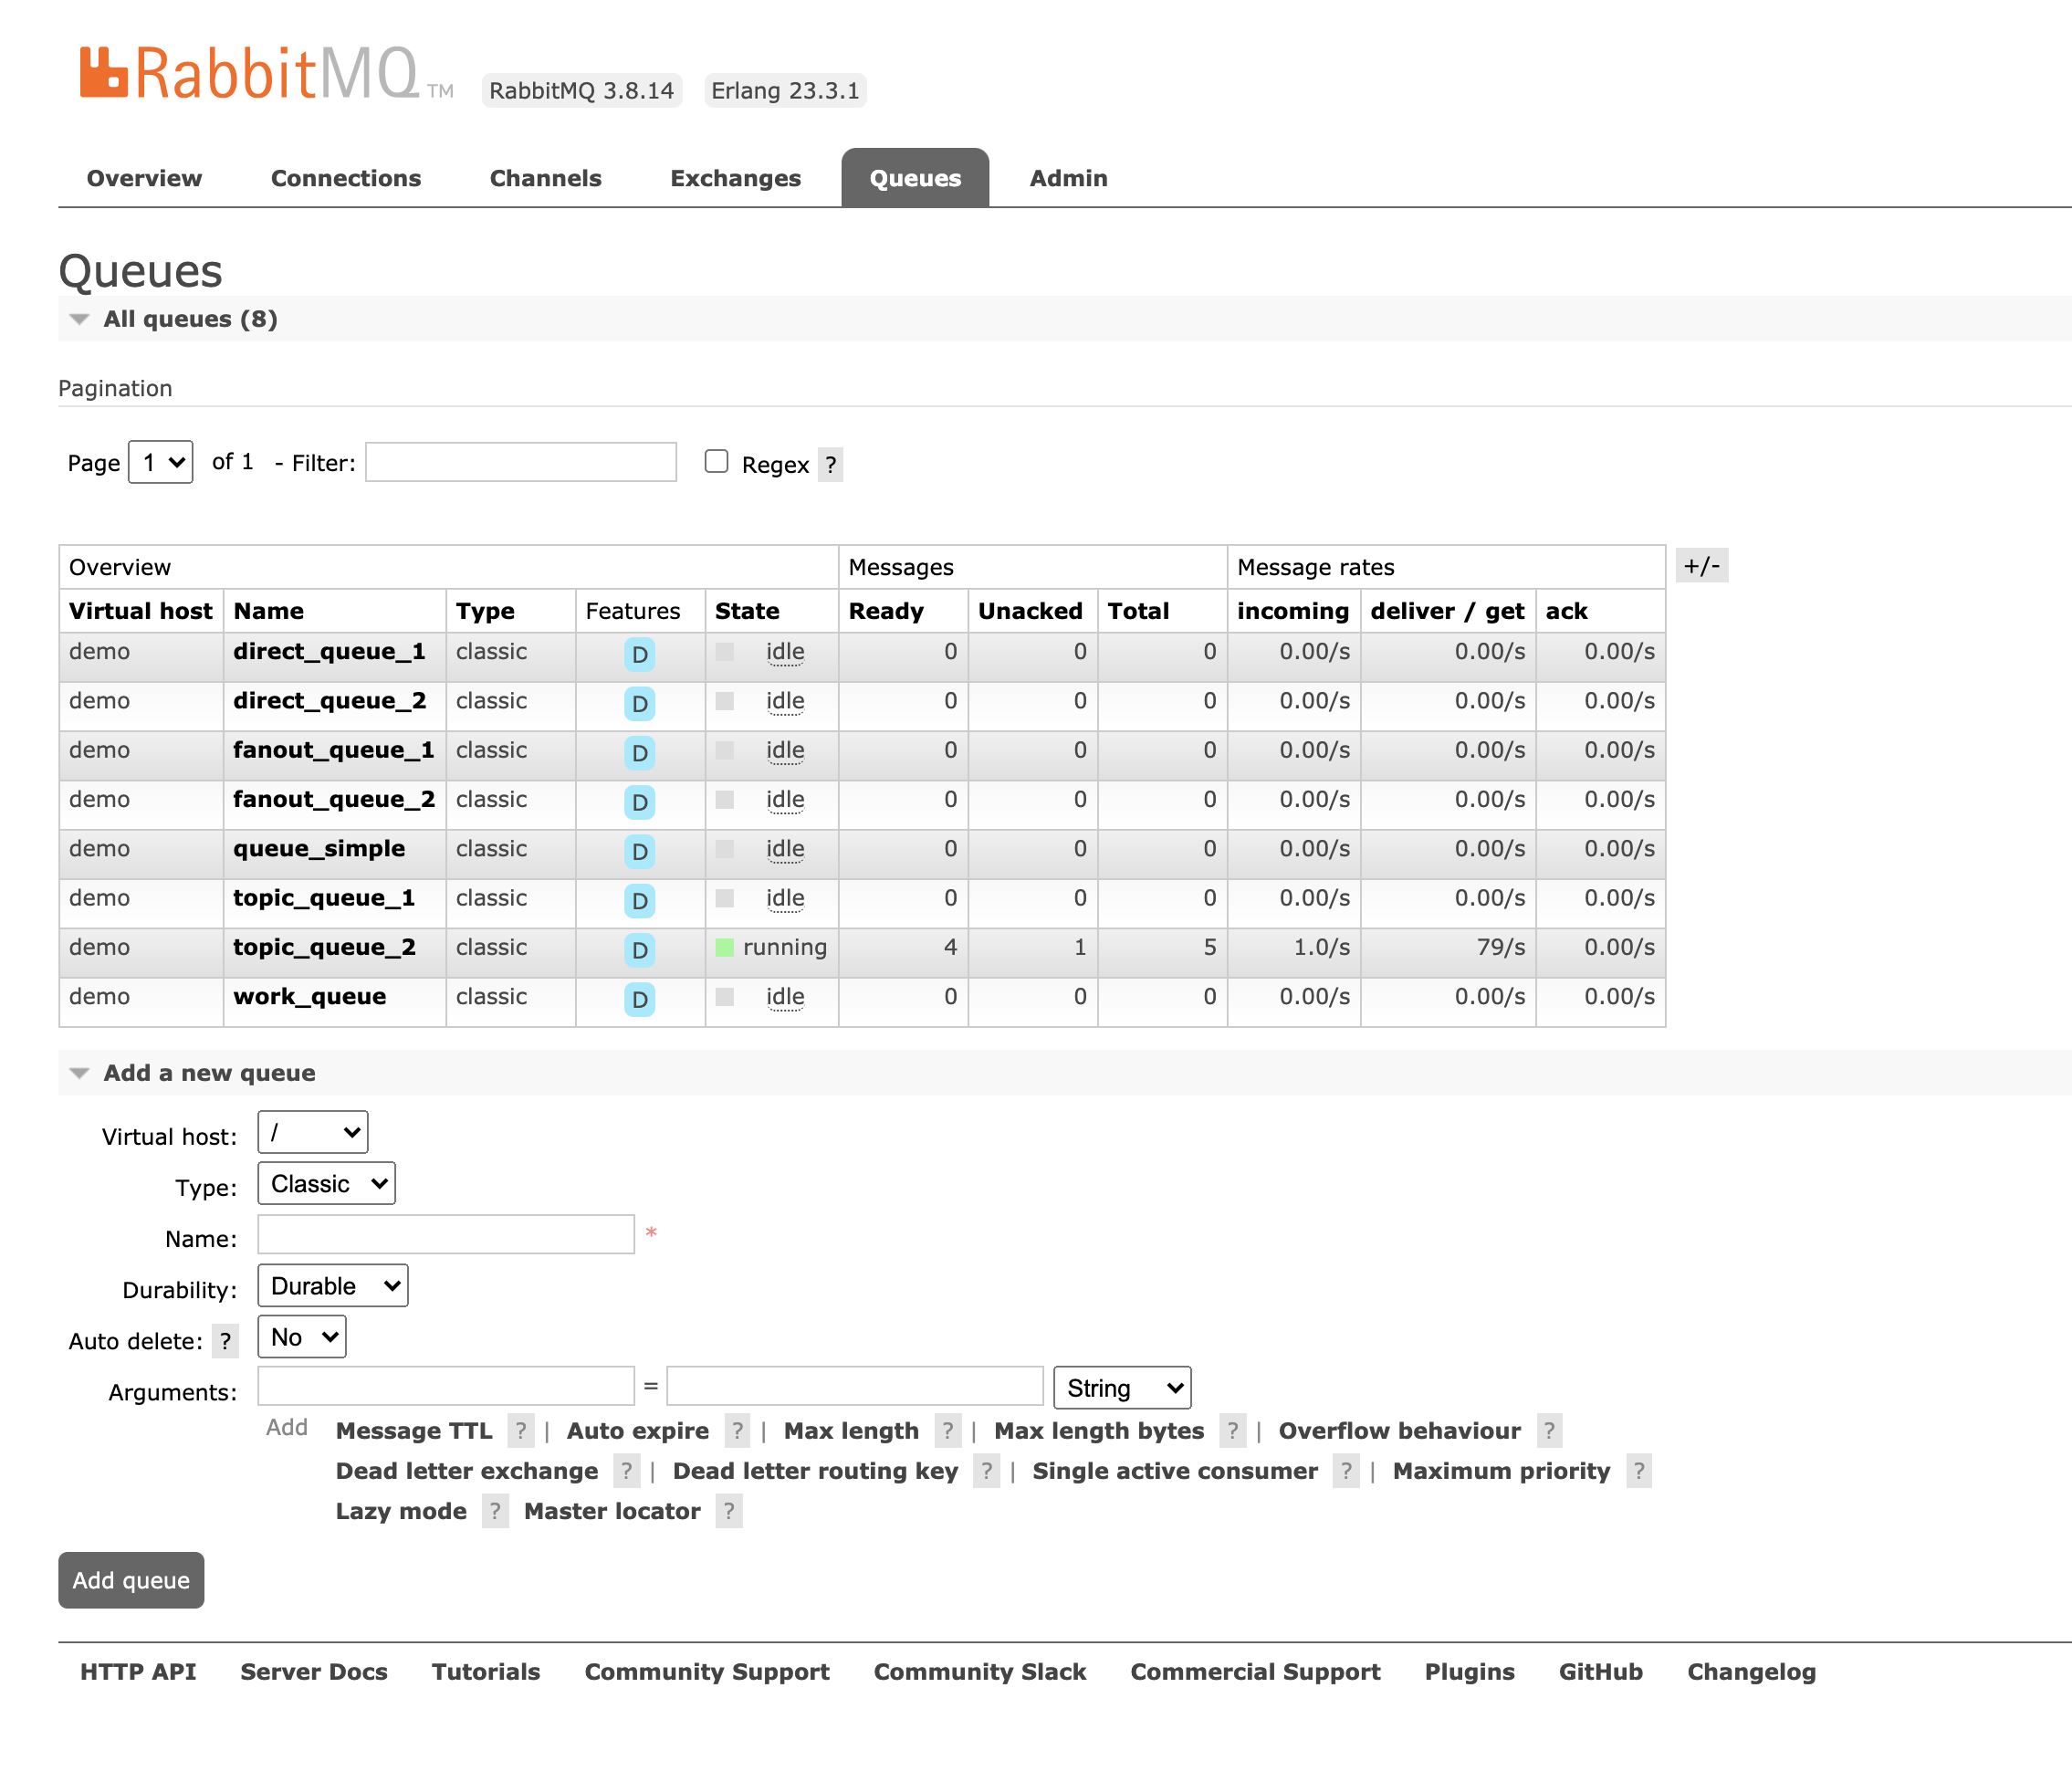
如果我们在消费端处理逻辑时出错会怎么样呢?修改消费端代码我们在消费时让它报错
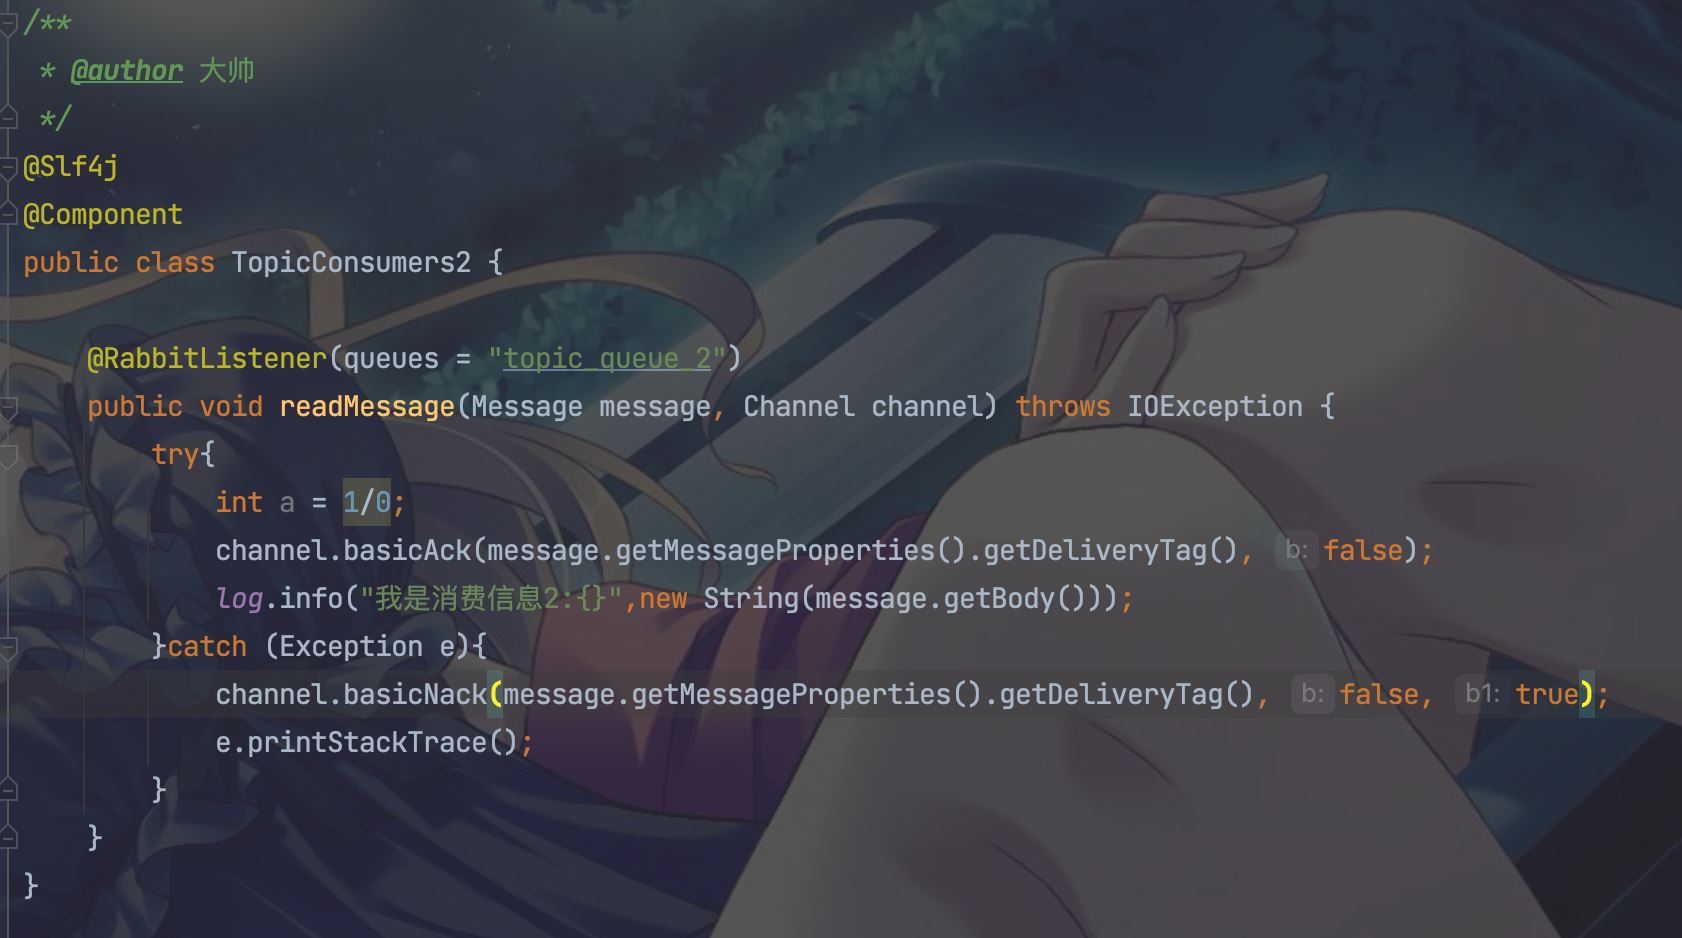
confirm回调为true,但是在rabbitmq的web界面会发现存在5条没有消费的消息
如果我们把
channel.basicNack(message.getMessageProperties().getDeliveryTag(),false,false);
中最后一个参数改为false呢,会发现在web管理界面没有未被消费的消息,说明这条消息已经被摒弃。
实际开发中,到底是打回到队列呢还是摒弃,要看自己的需求,但是打回队列应该有次数限制,不然会陷入死循环。
继续测试,将routingKey修改为一个没有的key,
7.5 结论
8. 项目示例代码:
下载地址:springboot-rabbitmq-demo_1619322789961

