一、基于D3.js (自由度高,写起来麻烦)
二、基于neovis.js (基于d3库,简洁,但样式固定,自由度低。)
三、基于neo4jd3.js (融合neovis与d3,数据格式可用d3\neo4j的,或根据需求自己重写方法) https://github.com/eisman/neo4jd3
Svg 不推荐在HTML4和XHTML中使用(但在HTML5允许)
效果:
1.引入官方js

定义背景/图片大小
用svg绘制背景、节点、线条、箭头。
1.请求json 数据(处理成可用等d3格式{node:{ },relaton:{source: ,target: ,type: })
2. d3默认按索引链接结点,要强制改为通过id链接它们(myerror: 注意 === 与 == 的不同,数据类型会导致错误)
3.构造力导向布局
力布局使用:https://github.com/d3/d3/wiki/%E5%8A%9B%E5%B8%83%E5%B1%80
D3.layout.force( )构造力导向布局,force.start( ) 启动模拟;
force.tick触发仿真第一步(如更新节点的x和y属性);
force.drag( )交互式拖动;
4.Select元素,并操作select,据需求自定义样式属性()。
选择器使用参考:https://github.com/d3/d3/wiki/%E9%80%89%E6%8B%A9%E5%99%A8#append
https://github.com/d3/d3/wiki/%E9%80%89%E6%8B%A9%E5%99%A8
【D3中,select 返回第一个匹配的元素,selectAll遍历次序中所有匹配的元素。】
代码:
<html>
<head>
    <meta charset="utf-8">
    <title>Force</title>
    <style>

        .nodetext {
            font-size: 12px ;
            font-family: SimSun;//字体
            fill:#000000;
        }
        .linetext {
            /*font-family: SimSun;*/
            fill:#1f77b4;
            fill-opacity:0.0;
        .circleImg {
            stroke: #ff7f0e;
            stroke-width: 1.5px;
    </style></head>
<body>
<script src="http://d3js.org/d3.v3.min.js" charset="utf-8"></script>
<script src="https://cdnjs.cloudflare.com/ajax/libs/d3/3.5.5/d3.min.js"></script>
<script src="https://code.jquery.com/jquery-3.2.1.min.js"></script>
<script>
    var width = 900;
    var height = 800;
    var img_w = 77;
    var img_h = 80;
    var radius = 30;	//圆形半径
    var svg = d3.select("body")
        .append("svg")
        .attr("width",width)
        .attr("height",height);
    var edges = [];
    d3.json("my.json",function(error,root){
        if( error ){
            return console.log(error);
        console.log(root);
//默认按索引链接结点,我强制改成通过id链接它们。
        root.edges.forEach(function (e) {
                var sourceNode = root.nodes.filter(function (n) {
                        return n.id === e.source;
                    })[0],
                    targetNode = root.nodes.filter(function (n) {
                        return n.id === e.target;
                    })[0];
                edges.push({
                 source: sourceNode,
                 target: targetNode,
                 relation: e.type
                })
        });
console.log(edges)
        //D3力导向布局
        var force = d3.layout.force()
            .nodes(root.nodes)
            .links(edges)
            .size([width,height])
            .linkDistance(200)
            .charge(-1500)
            .start();
        var defs = svg.append("defs");
        var arrowMarker = defs.append("marker")
            .attr("id","arrow")
            .attr("markerUnits","strokeWidth")//图最前端大小
            .attr("markerWidth","15")//标识长宽
            .attr("markerHeight","15")
            .attr("viewBox","0 0 12 12")//坐标系区域
            .attr("refX","17")
            .attr("refY","6")
            .attr("orient","auto");//方向
        var arrow_path = "M2,2 L10,6 L2,10 L6,6 L2,2";
        arrowMarker.append("path")
            .attr("d",arrow_path)
            .attr("fill","#ccc");
        //边
        var edges_line =svg.selectAll("line")
            .data(edges)
            .enter()
            .append("line")
            .attr("class","line")
            .style("stroke","#ddd")
            .style("linewidth",2)
            .attr("marker-end","url(#arrow)")
            .style("stroke-width",3);
        //边上的文字(人物之间的关系)
        var edges_text = svg.selectAll(".linetext")
            .append("text")
            .attr("class","linetext")
            .text(function(d){
                return d.relation;
            })
            .style("fill-opacity",1.0);//不透明度
        // 圆形图片节点(人物头像)
        var nodes_img = svg.selectAll("image")
            .data(root.nodes)
            .append("circle")
            .attr("class", "circleImg")
            .attr("r", radius)
            .attr("fill", function(d, i){
                //创建圆形图片
                var defs = svg.append("defs").attr("id", "imgdefs")
                var catpattern = defs.append("pattern")
                    .attr("id", "catpattern" + i)
                    .attr("height", 1)
                    .attr("width", 1)
                catpattern.append("image")
                    .attr("x", - (img_w / 2 - radius))
                    .attr("y", - (img_h / 2 - radius))
                    .attr("width", img_w)
                    .attr("height", img_h)
                    .attr("xlink:href", d.labels)
                return "url(#catpattern" + i + ")";
            // .on("mouseover",function(d,i){
            //     //显示连接线上的文字
            //     edges_text.style("fill-opacity",function(edge){
            //         if( parseInt(edge.source) === d || parseInt(edge.target) === d ){
            //             return 1.0;
            //         }
            //     });
            // })
            // .on("mouseout",function(d,i){
            //     //隐去连接线上的文字
            //         if( edge.source === d || edge.target === d ){
            //             return 0.0;
            .call(force.drag);
        var text_dx = -20;
        var text_dy = 20;
        var nodes_text = svg.selectAll(".nodetext")
            .style("stroke","#ff7f0e")
            .attr("class","nodetext")
            .attr("dx",text_dx)
            .attr("dy",text_dy)
                var uservalue = d.properties.username;
                var personvalue = d.properties.person;
                var phonevalue = d.properties.phone;
                if ( uservalue == undefined ){
                    uservalue = "";
                }
                if(personvalue == undefined){
                    personvalue = "";
                if (phonevalue == undefined){
                    phonevalue = "";
                return uservalue + phonevalue + personvalue;
            });
        force.on("tick", function(){
            //限制结点的边界
            root.nodes.forEach(function(d,i){
                d.x = d.x - img_w/2 < 0     ? img_w/2 : d.x ;
                d.x = d.x + img_w/2 > width ? width - img_w/2 : d.x ;
                d.y = d.y - img_h/2 < 0      ? img_h/2 : d.y ;
                d.y = d.y + img_h/2 + text_dy > height ? height - img_h/2 - text_dy : d.y ;
            //更新连接线的位置
            edges_line.attr("x1",function(d){ return d.source.x; });
            edges_line.attr("y1",function(d){ return d.source.y; });
            edges_line.attr("x2",function(d){ return d.target.x; });
            edges_line.attr("y2",function(d){ return d.target.y; });
            //更新连接线上文字的位置
            edges_text.attr("x",function(d){ return (d.source.x + d.target.x) / 2 ; });
            edges_text.attr("y",function(d){ return (d.source.y + d.target.y) / 2 ; });
            //更新结点图片和文字
            nodes_img.attr("cx",function(d){ return d.x });
            nodes_img.attr("cy",function(d){ return d.y });
            nodes_text.attr("x",function(d){ return d.x });
            nodes_text.attr("y",function(d){ return d.y + img_w/2; });
    });
</script>
</body>
</html>
mydata.json
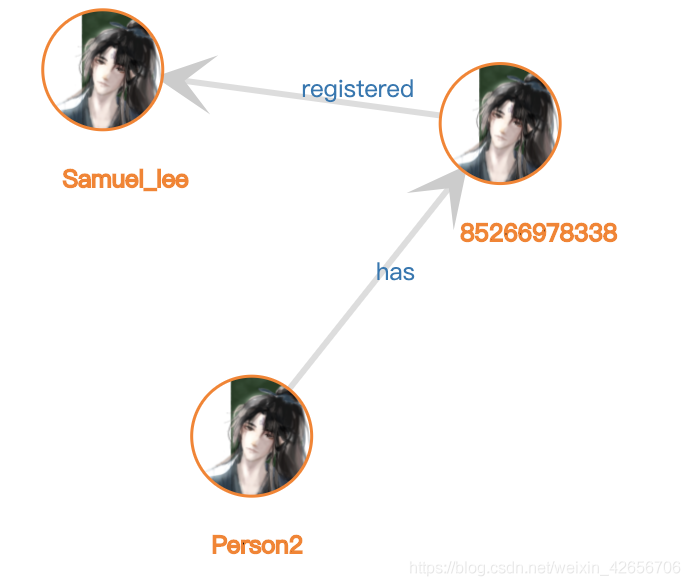
{
        "nodes": [{
          "id": "2",
          "labels": "./image/wode.png",
          "properties": {
            "person": "Person2"
          }
        }, {
          "id": "58688",
            "phone": "85266978333"
          "id": "128386",
            "username": "Samuel_lee"
        }],
  "edges": [{
          "id": "23943",
          "type": "has",
          "startNode": "2",
          "endNode": "58688",
          "properties": {},
          "source": "2",
          "target": "58688"
          "id": "94198",
          "type": "registered",
          "startNode": "58688",
          "endNode": "128386",
          "source": "58688",
          "target": "128386"
        }]
}https://github.com/eisman/neo4jd3
效果:
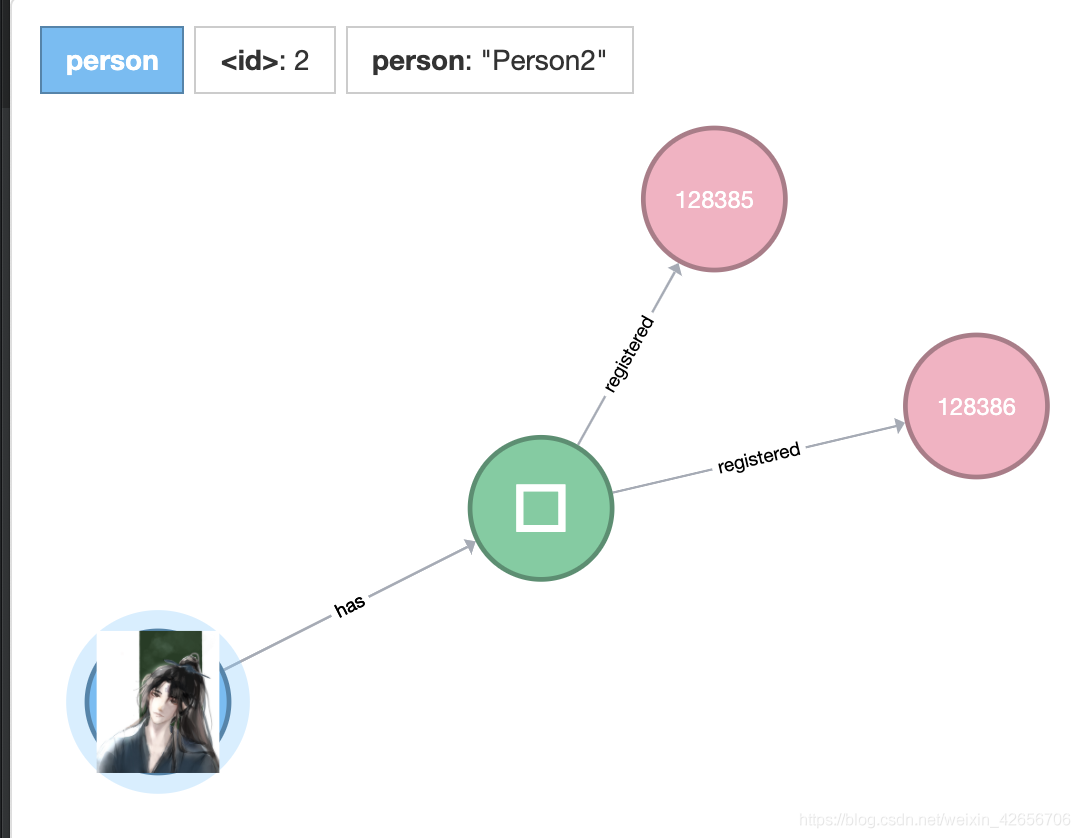
与neovis.js类似,根据d3/neo4j的数据格式,将数据传入,根据需求渲染结点图像关系,但样式固定。
可以重写js中的数据与方法。
在这里,出现了问题:我在js中修改的方法无法被使用。
根据排查,最后发现在代码末尾有一行注释:

源映射是用来为压缩后的代码调试提供方便的,为了提高性能,很多站点都会先压缩 JavaScript 代码然后上线,
但如果代码运行时出现错误,浏览器只会显示在已压缩的代码中的位置,很难确定真正的源码错误位置。
要更改js记得将这行注释删除。
<!doctype html>
<html>
    <head>
        <meta charset="utf-8">
        <meta http-equiv="X-UA-Compatible" content="IE=edge,chrome=1">
        <meta name="description" content="">
        <meta name="viewport" content="width=device-width">
        <title>neo4jd3.js</title>
        <link rel="stylesheet" href="css/bootstrap.min.css" rel="external nofollow" >
        <link rel="stylesheet" href="css/font-awesome.min.css" rel="external nofollow" >
        <link rel="stylesheet" href="css/neo4jd3.min.css?v=0.0.1" rel="external nofollow" >
        <script src="js/d3.min.js"></script>
        <script src="js/2.js?v=0.0.2"></script>
        <style>
            body,
            html,
            .neo4jd3 {
                height: 100%;
                overflow: hidden;
            }
        </style>
    </head>
    <body>
        <div id="neo4jd33"></div>
        <!-- Scripts -->
        <script type="text/javascript" >

            function init() {

                var neo4jd3 = new Neo4jd3('#neo4jd33', {
                    icons: {
                    },
                    images: {
                         'person': 'img/twemoji/wode.png',
                    minCollision: 50,
                    neo4jDataUrl:'./json/mydata.json',
                    nodeRadius: 30,
                    zoomFit: false
                });
            window.onload = init;
        </script>
        <script>
    </body>
</html>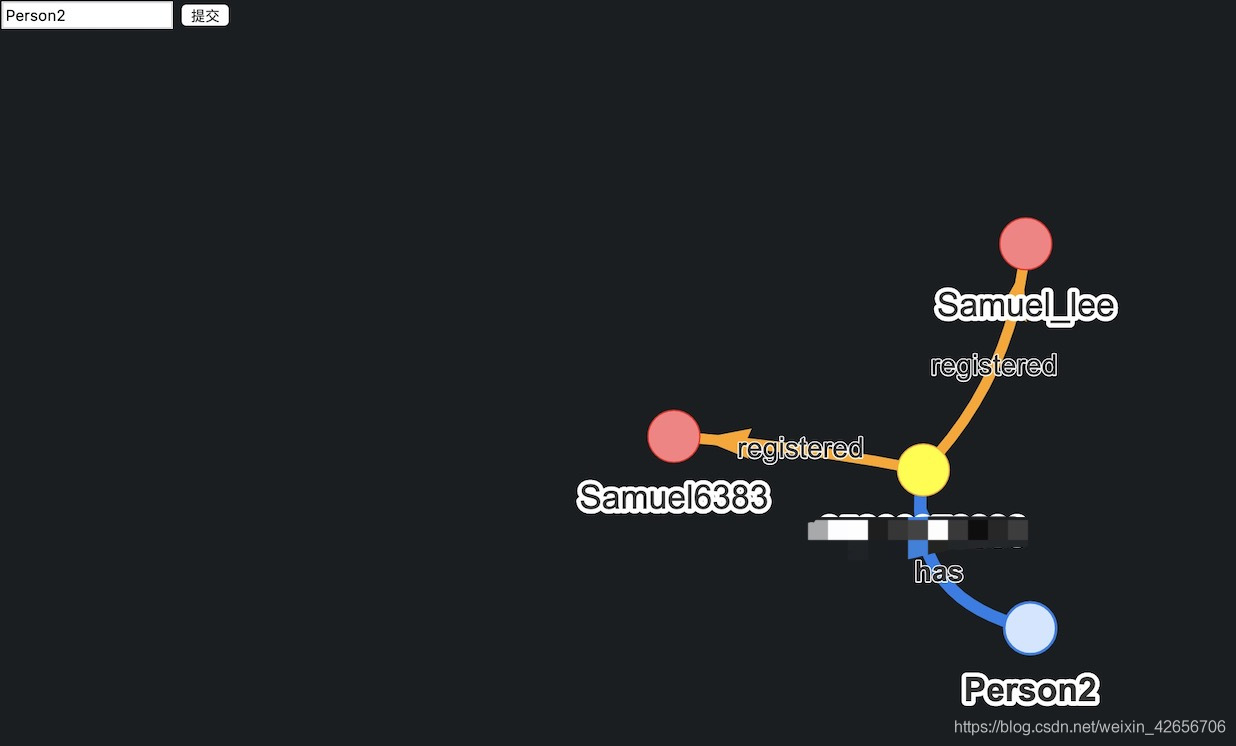
详细使用文档见:
https://www.npmjs.com/package/neovis.js
https://github.com/neo4j-contrib/neovis.js#readme
Neovis.js 需要链接 neo4j 的bolt地址,并书写cypher语句获取查询结果。
创建一个div,在其中制定οnlοad=“draw( )”,然后自己定义draw( )。
使用简单,但模板样式固定。
function draw() {

            var config = {
                container_id: "viz",
                server_url:"bolt://xxxxxxxx",
                server_user: "",
                server_password: "",
                labels: {
                    "person": {
                        "caption": "person",
                },
                    "phone":{
                        "caption": "phone",
                    },
                    "zello":{
                        "caption": "username",

                    }
                relationships: {
                    "has": {
                        "thickness": 0.003,
                        "caption": true
                    ,"registered":{
                 initial_cypher: "MATCH (n) RETURN n LIMIT 25",
              arrows: true
            };
            viz = new NeoVis.default(config);
            console.log(viz);
            viz.render();
        }
