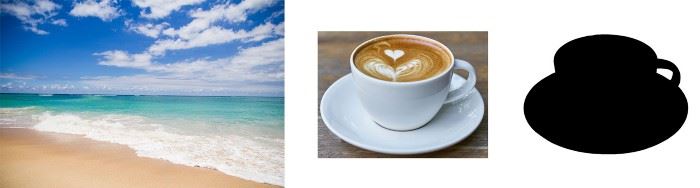
在本文中,我将展示如何将对象从一个图像添加到另一个图像。为此,我们需要:
1.背景图像;
2.对象
3.对象的mask(mask为黑色,其他空间为白色)。
在我们的例子中,背景是一张大海的照片,对象是一杯咖啡。在这里,他们是:
现在,使用jupiter notebook创建一个新文件。首先,我们需要导入必要的模块:
import cv2 # OpenCV
import numpy as np
import matplotlib.pyplot as plt
让我们在cv2.imread()函数的帮助下打开图像并显示它们。
注意!
由于某些原因,OpenCV以BGR格式读取图像(蓝色和红色被交换)。我们需要借助cv2.cvtColor()函数将BGR转换为RGB格式。
# Original image, which is the background
background = cv2.imread('background.jpg')
background = cv2.cvtColor(background, cv2.COLOR_BGR2RGB)

# Image of the object
img = cv2.imread('cup.png')
img = cv2.cvtColor(img, cv2.COLOR_BGR2RGB)

# Image the object's mask
mask = cv2.imread('cup_mask.png')
mask = cv2.cvtColor(mask, cv2.COLOR_BGR2RGB)

print("Background shape:", background.shape)
print("Image shape:", img.shape)
print("Mask shape:", img.shape)
# Background shape: (1280, 1920, 3)
# Image shape: (860, 1151, 3)
# Mask shape: (860, 1151, 3)
我们看到背景图像的高度为1280,宽度为1920,目标图像的高度为860,宽度为1151。
让我们看看这些图片:
plt.figure(figsize=(16,16))
plt.title("Background", fontsize=18)
plt.imshow(background);

fig, ax = plt.subplots(1, 2, figsize=(16, 7))
ax[0].imshow(img)
ax[0].set_title('Object', fontsize=18)
ax[1].imshow(mask)
ax[1].set_title('Mask', fontsize=18);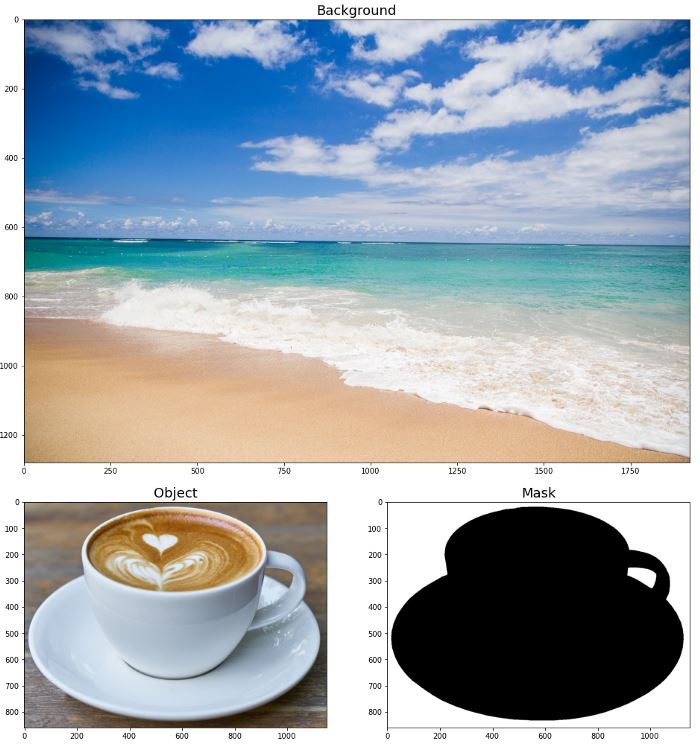
现在我们将定义一个函数,它将对象的mask转换为布尔数组。
在原始mask上,对象区域填充黑色,背景区域填充白色。
布尔数组具有与原始mask相同的高度和宽度,但只有一个通道。如果一个像素属于对象区域,它的值为True,否则为False。
布尔mask将帮助我们删除所有的背景像素。
def remove_obj_background(img_path, mask_path):
    '''
    Function returns:
    - image of the object with removed background in CV2 RGB format (numpy array with dimensions (width, height, 3))
    - boolean mask of the object (numpy array with dimensions (width, height))
    '''
    img = cv2.imread(img_path)
    img = cv2.cvtColor(img, cv2.COLOR_BGR2RGB)

    mask = cv2.imread(mask_path)
    mask = cv2.cvtColor(mask, cv2.COLOR_BGR2RGB)

    h, w = mask.shape[0], mask.shape[1]

    # Boolean mask is a numpy array with two dimensions: width and height.
    # On the original mask, object area is filled with black color, background area is filled with white color.
    # On the boolean mask, object area is filled with True, background area is filled with False.
    mask_boolean = mask[:,:,0] == 0
    img_with_removed_background = img * np.stack([mask_boolean, mask_boolean, mask_boolean], axis=2)

    return img_with_removed_background, mask_boolean

img_with_removed_background, mask_boolean = remove_obj_background('cup.png', 'cup_mask.png')
print("Shape of the image of the object:", img_with_removed_background.shape)
print("Shape of the boolean mask:", mask_boolean.shape)
print("\n")
# Image with removed background shape: (860, 1151, 3)
# Boolean mask shape: (860, 1151)

fig, ax = plt.subplots(1, 2, figsize=(16, 7))
ax[0].imshow(img_with_removed_background)
ax[0].set_title('Object with removed background', fontsize=18)
ax[1].imshow(mask_boolean)
ax[1].set_title('Boolean mask', fontsize=18);
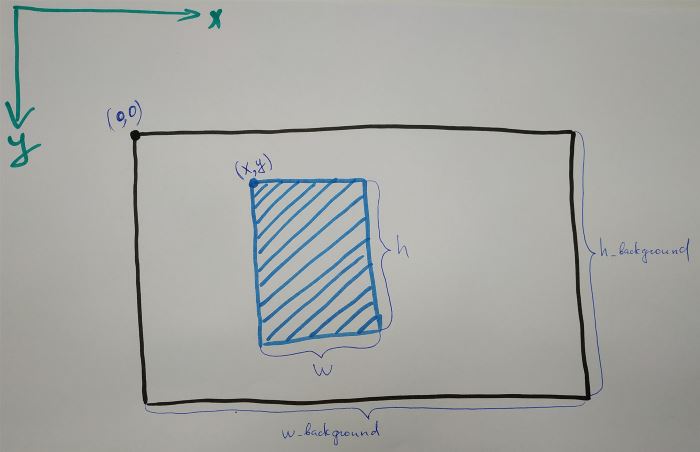
在我们定义向背景图像添加对象的函数之前,我需要解释和可视化几个图像重叠的情况。
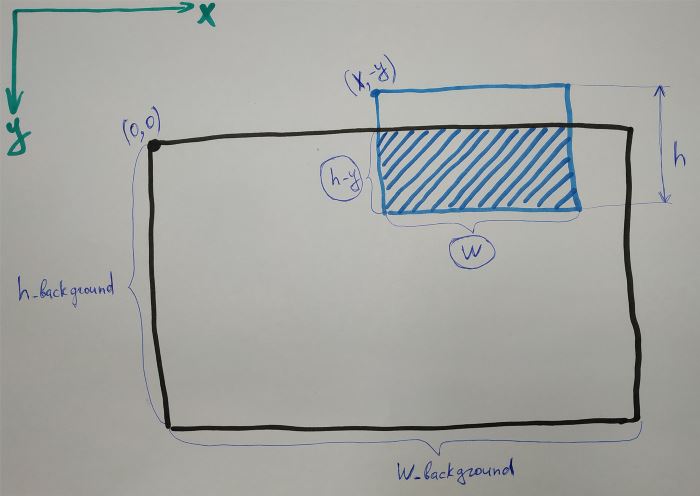
比如说,背景图像的高度是h_background,宽度是w_background,而目标图像的高度是h,宽度是w。
h应该小于h_background, w应该小于w_background。
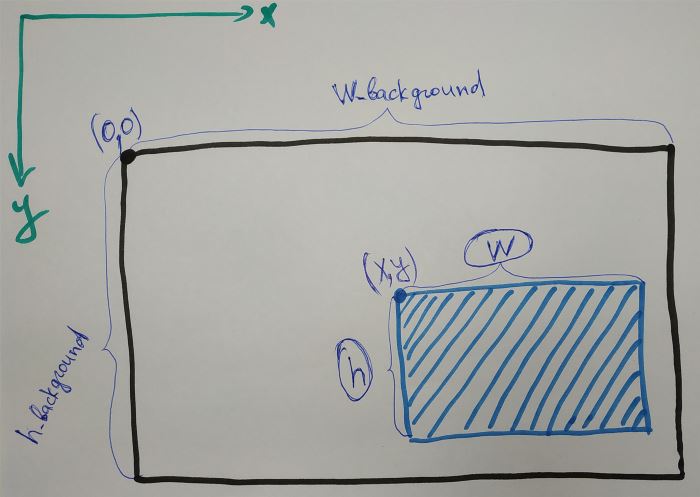
case1) 如果我们将物体放置在背景的中间,那么一切都很简单:大小为h x w的背景区域部分应该被物体替换掉。
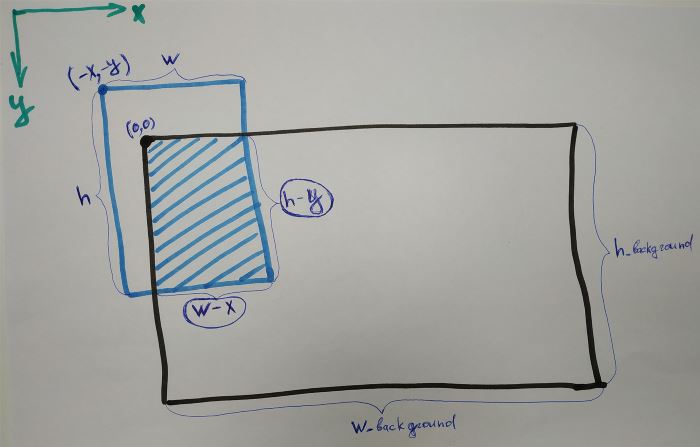
case2) 如果我们将物体放置在背景的左上角,那么物体的一部分可能在背景区域之外。在这种情况下,背景区域的大小(h - y) x (w - x)的部分应该被替换为对象。
这里-x和-y是对象图像左上角的坐标。符号' - '在这里是因为背景图像的左上角坐标x=0和y=0。从背景图像的左上角到对象左上角的所有区域的x坐标都是负的,高于背景图像的左上角的所有区域的y坐标都是负的。
case3) 如果我们将物体放置在背景的左下角,那么物体的一部分可能在背景区域之外。在这种情况下,背景区域大小为(h_background - y) x (w - x)的部分应该被替换为对象。
一般,面积可以计算为(h - max (0, y + h - h_background)) x (w - x),因为如果目标图像的最低边界在背景图像的最低边界之上,那么h x (w - x)区域应该被替换为目标。


case4) 如果我们将物体放在背景的右上角,那么物体的一部分可能会在背景区域之外。在这种情况下,大小为 (h - y) x (w_background - x) 的背景区域部分应替换为对象。
一般来说,面积可以计算为 (h - y) x (w - max(0, x + w - w_background)),因为如果物体图像的右边界在背景图像右边界的左侧,则 (h - y) x w 区域应替换为对象。

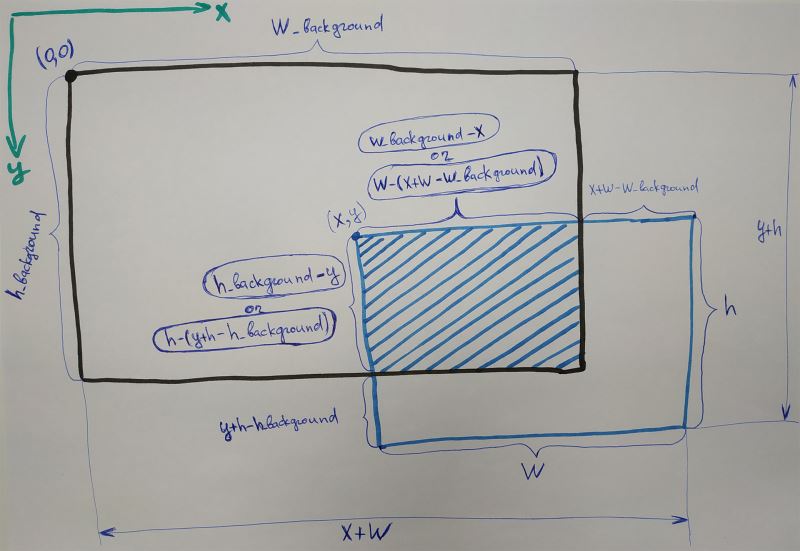
case5) 如果我们将物体放在背景的右下角,那么物体的一部分可能会在背景区域之外。在这种情况下,大小为 (h_background - y) x (w_background - x) 的背景区域部分应替换为对象。
一般来说,面积可以计算为 (h - max(0, y + h - h_background)) x (w - max(0, x + w - w_background)),因为如果物体图像的右侧部分在背景图像的右部分的左边,如果对象图像的最低部分高于背景图像的最低部分,则应将h x w区域替换为对象。
现在,考虑到上述所有情况,让我们定义函数:
def add_obj(background, img, mask, x, y):
    '''
    Arguments:
    background - background image in CV2 RGB format
    img - image of object in CV2 RGB format
    mask - mask of object in CV2 RGB format
    x, y - coordinates of the center of the object image
    0 < x < width of background
    0 < y < height of background

    Function returns background with added object in CV2 RGB format

    CV2 RGB format is a numpy array with dimensions width x height x 3
    '''

    bg = background.copy()

    h_bg, w_bg = bg.shape[0], bg.shape[1]

    h, w = img.shape[0], img.shape[1]

    # Calculating coordinates of the top left corner of the object image
    x = x - int(w/2)
    y = y - int(h/2)

    mask_boolean = mask[:,:,0] == 0
    mask_rgb_boolean = np.stack([mask_boolean, mask_boolean, mask_boolean], axis=2)

    if x >= 0 and y >= 0:

        h_part = h - max(0, y+h-h_bg) # h_part - part of the image which overlaps background along y-axis
        w_part = w - max(0, x+w-w_bg) # w_part - part of the image which overlaps background along x-axis

        bg[y:y+h_part, x:x+w_part, :] = bg[y:y+h_part, x:x+w_part, :] * ~mask_rgb_boolean[0:h_part, 0:w_part, :] + (img * mask_rgb_boolean)[0:h_part, 0:w_part, :]

    elif x < 0 and y < 0:

        h_part = h + y
        w_part = w + x

        bg[0:0+h_part, 0:0+w_part, :] = bg[0:0+h_part, 0:0+w_part, :] * ~mask_rgb_boolean[h-h_part:h, w-w_part:w, :] + (img * mask_rgb_boolean)[h-h_part:h, w-w_part:w, :]

    elif x < 0 and y >= 0:

        h_part = h - max(0, y+h-h_bg)
        w_part = w + x

        bg[y:y+h_part, 0:0+w_part, :] = bg[y:y+h_part, 0:0+w_part, :] * ~mask_rgb_boolean[0:h_part, w-w_part:w, :] + (img * mask_rgb_boolean)[0:h_part, w-w_part:w, :]

    elif x >= 0 and y < 0:

        h_part = h + y
        w_part = w - max(0, x+w-w_bg)

        bg[0:0+h_part, x:x+w_part, :] = bg[0:0+h_part, x:x+w_part, :] * ~mask_rgb_boolean[h-h_part:h, 0:w_part, :] + (img * mask_rgb_boolean)[h-h_part:h, 0:w_part, :]

    return bg
除了将背景、对象和mask图像传递给函数外,我们还将传递坐标x和y,它们定义了对象的中心位置。
坐标(0,0)是背景的左上角。
w_bg和h_bg是背景的宽度和高度。
x和y应满足以下条件:0 < x < w_bg和0 < y < h_bg。
让我们看看这个函数是如何工作的。
例1). 让我们把杯子放在背景的中央。背景的宽度是1920,高度是1280,所以对象的中心坐标是x=1920/2=960和y=1280/2=640。
composition_1 = add_obj(background, img, mask, 960, 640)
plt.figure(figsize=(15,15))
plt.imshow(composition_1);

例2). 让我们把杯子放在背景的左下角。这一次,对象的中心坐标是x=200和y=1100。
composition_2 = add_obj(composition_1, img, mask, 200, 1100)
plt.figure(figsize=(15,15))
plt.imshow(composition_2);

例 3). 让我们把杯子放在背景的右下角。这次对象中心的坐标是 x=1800 和 y=1100。
composition_3 = add_obj(composition_2, img, mask, 1800, 1100)
plt.figure(figsize=(15,15))
plt.imshow(composition_3);

例 4). 让我们把杯子放在背景的左上角。这次对象中心的坐标是 x=200 和 y=200。
composition_4 = add_obj(composition_3, img, mask, 200, 200)
plt.figure(figsize=(15,15))
plt.imshow(composition_4);

例5). 让我们把杯子放在背景的右上角。这一次,对象的中心坐标是x=1800和y=200。
composition_5 = add_obj(composition_4, img, mask, 1800, 200)
plt.figure(figsize=(15,15))
plt.imshow(composition_5);