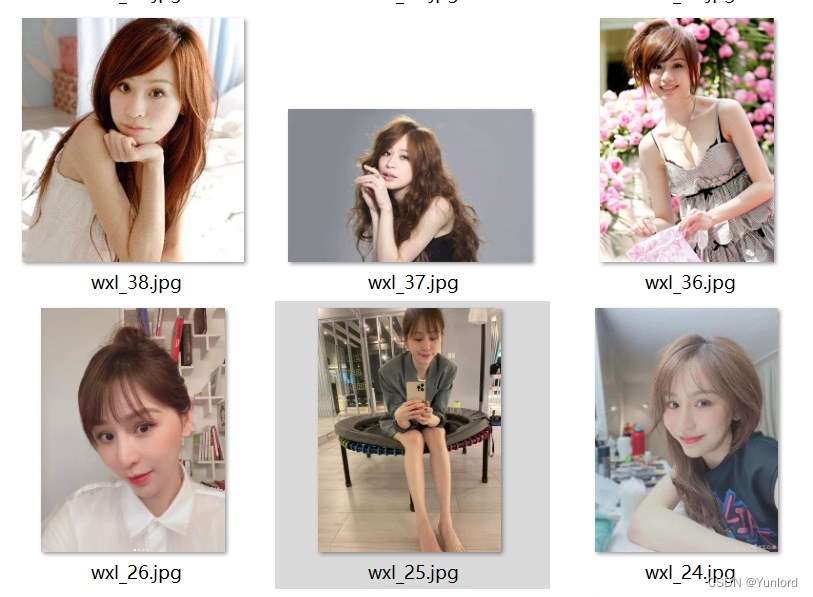
前段时间看到有人问如何使用Python实现多张图片组成文字的效果?觉得还挺有意思,于是尝试做了一下,刚好赶上端午节,所以打算从网上下载1000张王心凌的照片,组成端午安康的字样,给大家送上祝福。

首先我们需要从百度下载大量王心凌的图片,但是如果会去百度图片里一张张右键下载,但这样未免太麻烦了,所以打算直接用python写一个批量下载图片的代码,输入想要下载图片的关键字,然后输入想要下载图片的数量,就可以成功下载图片了!
代码主要分成三个部分:
def dowmloadPicture(html, keyword):
    global num
    # t =0
    pic_url = re.findall('"objURL":"(.*?)",', html, re.S)  # 先利用正则表达式找到图片url
    print('找到关键词:' + keyword + '的图片,即将开始下载图片...')
    for each in pic_url:
        print('正在下载第' + str(num + 1) + '张图片,图片地址:' + str(each))
        try:
            if each is not None:
                pic = requests.get(each, timeout=7)
            else:
                continue
        except BaseException:
            print('错误,当前图片无法下载')
            continue
        else:
            string = file + r'\\' + keyword + '_' + str(num) + '.jpg'
            fp = open(string, 'wb')
            fp.write(pic.content)
            fp.close()
            num += 1
        if num >= numPicture:
            return
def Find(url, A):
    global List
    print('正在检测图片总数,请稍等.....')
    t = 0
    i = 1
    s = 0
    while t < 1000:
        Url = url + str(t)
        try:
            # 这里搞了下
            Result = A.get(Url, timeout=7, allow_redirects=False)
        except BaseException:
            t = t + 60
            continue
        else:
            result = Result.text
            pic_url = re.findall('"objURL":"(.*?)",', result, re.S)  # 先利用正则表达式找到图片url
            s += len(pic_url)
            if len(pic_url) == 0:
                break
            else:
                List.append(pic_url)
                t = t + 60
    return s
def dowmloadPicture(html, keyword):
    global num
    # t =0
    pic_url = re.findall('"objURL":"(.*?)",', html, re.S)  # 先利用正则表达式找到图片url
    print('找到关键词:' + keyword + '的图片,即将开始下载图片...')
    for each in pic_url:
        print('正在下载第' + str(num + 1) + '张图片,图片地址:' + str(each))
        try:
            if each is not None:
                pic = requests.get(each, timeout=7)
            else:
                continue
        except BaseException:
            print('错误,当前图片无法下载')
            continue
        else:
            string = file + r'\\' + keyword + '_' + str(num) + '.jpg'
            fp = open(string, 'wb')
            fp.write(pic.content)
            fp.close()
            num += 1
        if num >= numPicture:
            return
使用效果:

当我们下载好了所需要的王心凌的照片,下一步我们需要用这些图片组成我们需要的文字。
所以首先准备一张要拼成的图片,比如需要组成的文字,如端午安康,我们可以用 PowerPoint)制作一个喜欢的文字样式,然后保存成jpg格式。

代码如下所示:
import photomosaic as pm

# 加载要拼成的图片image(jpg 格式,图片越大,得到的拼图的每个小图分辨率越高)
image = pm.imread("1.jpg", as_gray=False)
# 从指定文件夹加载图片库(需要比较多的图片才能获得较好的效果)
pool = pm.make_pool("wxl/*.jpg")
# 制作 50*50 的拼图马赛克
mosaic = pm.basic_mosaic(image, pool, (200, 200))
# 保存拼图
pm.imsave("mosaic.jpg", mosaic)
不过由于这个库版本问题,所以需要在库函数里面做一点点修改才能成才运行。
def crop_to_fit(image, shape):
    """
    Return a copy of image resized and cropped to precisely fill a shape.
    To resize a colored 2D image, pass in a shape with two entries. When
    ``len(shape) < image.ndim``, higher dimensions are ignored.
    Parameters
    ----------
    image : array
    shape : tuple
        e.g., ``(height, width)`` but any length <= ``image.ndim`` is allowed
    Returns
    -------
    cropped_image : array
    """
    # Resize smallest dimension (width or height) to fit.
    d = np.argmin(np.array(image.shape)[:2] / np.array(shape))
    enlarged_shape = (tuple(np.ceil(np.array(image.shape[:len(shape)]) *
                                    shape[d]/image.shape[d])) +
                      image.shape[len(shape):])
    resized = resize(image, enlarged_shape,
                     mode='constant', anti_aliasing=False)
    # Now the image is as large or larger than the shape along all dimensions.
    # Crop any overhang in the other dimension.
    crop_width = []
    for actual, target in zip(resized.shape, shape):
        overflow = actual - target
        # Center the image and crop, biasing left if overflow is odd.
        left_margin = int(np.floor(overflow / 2))
        right_margin = int(np.ceil(overflow / 2))
        crop_width.append((left_margin, right_margin))
    # Do not crop any additional dimensions beyond those given in shape.
    for _ in range(resized.ndim - len(shape)):
        crop_width.append((0, 0))
    cropped = crop(resized, crop_width)
    return cropped
在裁剪图片的时候输入需要是int型,所以把left_margin和right_margin强制转化成int型。
实现效果:
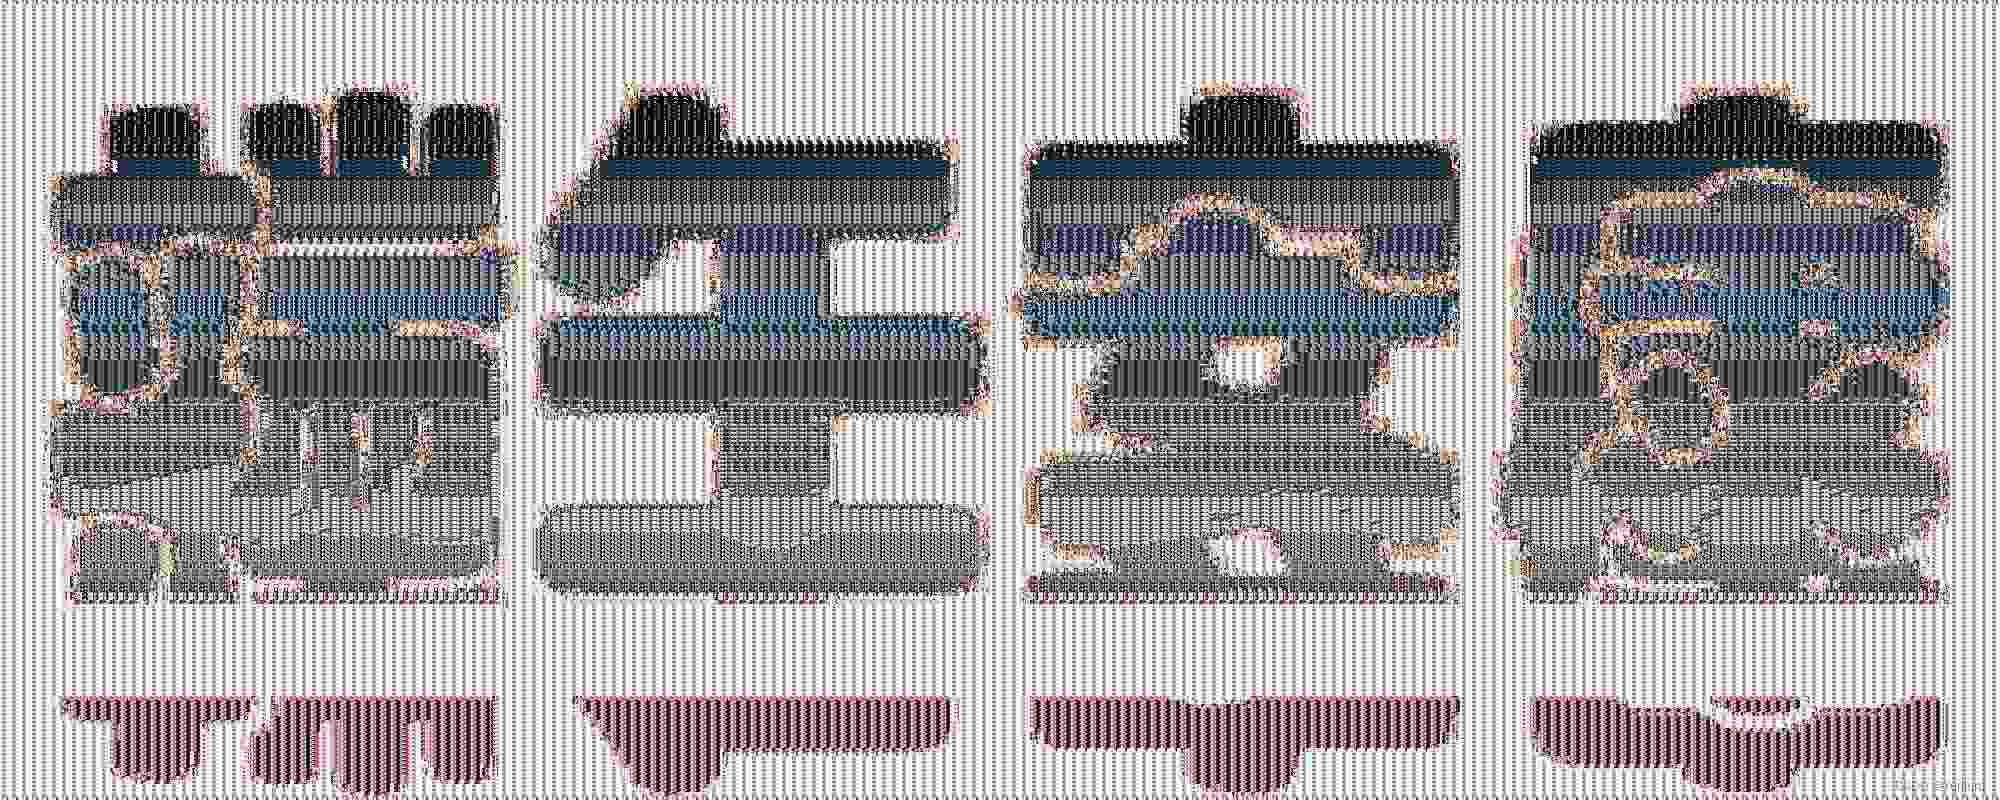
效果确实一般般,局部放大,可以观察出,生成图是由照片拼接而成的,所以整体大图的清晰度也与小照片的数量有关,也有可能是图片分辨率大小以及组成图片尺寸不一的原因,所以又尝试了另一种方法。
def readSourceImages(sourcepath,blocksize):
    print('开始读取图像')
    # 合法图像列表
    sourceimages = []
    # 平均颜色列表
    avgcolors = []
    for path in tqdm(glob.glob("{}/*.jpg".format(sourcepath))):
        image = cv2.imread(path, cv2.IMREAD_COLOR)
        if image.shape[-1] != 3:
            continue
        image = cv2.resize(image, (blocksize, blocksize))
        avgcolor = np.sum(np.sum(image, axis=0), axis=0) / (blocksize * blocksize)
        sourceimages.append(image)
        avgcolors.append(avgcolor)
    print('结束读取')
    return sourceimages,np.array(avgcolors)
通过这个方法能够获取照片集中的每张照片与组成的大图之间颜色的相似度,将相似的照片放到对应的位置。
实现效果:

感觉效果比原来要好一些,但是还是不够清晰。

