在这篇文章, 我们会创建一个 slider 滑块来对比两张图片。
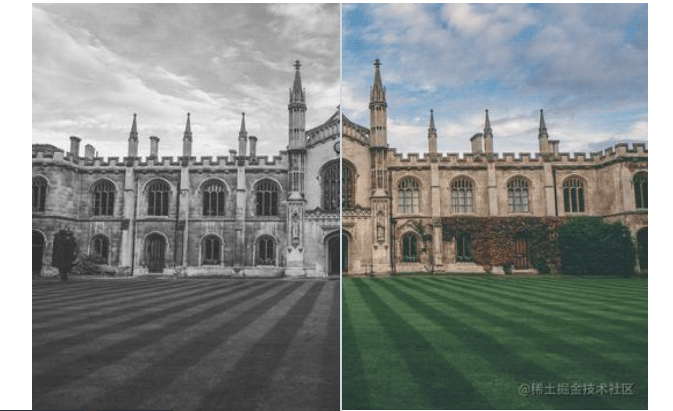
老样子,话不多说,先看效果。
.container {
  position: relative;
}
.resizer {
  background-color: #cbd5e0;
  cursor: ew-resize;
  height: 100%;
  left: 50%;
  position: absolute;
  top: 0;
  width: 2px;
}
.modified-image {
  background-position: top left;
  background-repeat: no-repeat;
  background-size: auto 100%;
  height: 100%;
  left: 0;
  position: absolute;
  top: 0;
  width: 50%;
  filter: grayscale(100%);
}// Query the element
const resizer = document.getElementById('dragMe');
const leftSide = resizer.previousElementSibling;
const rightSide = resizer.nextElementSibling;
// The current position of mouse
let x = 0;
let y = 0;
let leftWidth = 0;
// Handle the mousedown event
// that's triggered when user drags the resizer
const mouseDownHandler = function (e) {
// Get the current mouse position
x = e.clientX;
y = e.clientY;
leftWidth = leftSide.getBoundingClientRect().width;
// Attach the listeners to `document`
document.addEventListener('mousemove', mouseMoveHandler);
document.addEventListener('mouseup', mouseUpHandler);
};
const mouseMoveHandler = function (e) {
// How far the mouse has been moved
const dx = e.clientX - x;
const dy = e.clientY - y;
let newLeftWidth =
((leftWidth + dx) * 100) / resizer.parentNode.getBoundingClientRect().width;
newLeftWidth = Math.max(newLeftWidth, 0);
newLeftWidth = Math.min(newLeftWidth, 100);
leftSide.style.width = `${newLeftWidth}%`;
resizer.style.left = `${newLeftWidth}%`;
resizer.style.cursor = 'col-resize';
resizer.parentNode.style.cursor = 'col-resize';
leftSide.style.userSelect = 'none';
leftSide.style.pointerEvents = 'none';
rightSide.style.userSelect = 'none';
rightSide.style.pointerEvents = 'none';
};
const mouseUpHandler = function () {
resizer.style.removeProperty('cursor');
resizer.parentNode.style.removeProperty('cursor');
leftSide.style.removeProperty('user-select');
leftSide.style.removeProperty('pointer-events');
rightSide.style.removeProperty('user-select');
rightSide.style.removeProperty('pointer-events');
// Remove the handlers of `mousemove` and `mouseup`
document.removeEventListener('mousemove', mouseMoveHandler);
document.removeEventListener('mouseup', mouseUpHandler);
};
// Attach the handler
resizer.addEventListener('mousedown', mouseDownHandler);通过上面的示例可以看到,拖动中间的 slider 滑块,可以很清楚的看到图片的对比效果。
下面我们就来看看是如何实现的。
<div class="container">
  <!-- 修改后的图 -->
  <div class="modified-image"></div>
  <!-- slider 滑块 -->
  <div class="resizer" id="dragMe"></div>
  <!-- 原图 -->
  <img
    src="http://p3-juejin.byteimg.com/tos-cn-i-k3u1fbpfcp/361d53f154ec41668a661d1d927f0c2e~tplv-k3u1fbpfcp-watermark.image?"
  />
</div>
修改后的图放在底部,滑块在中间,原图在最上层。
.container {
  position: relative;
}
.modified-image {
  position: absolute;
  left: 0;
  top: 0;
  height: 100%;
  width: 50%;
}
修改后的元素初始默认占据 50% 的宽度。
我们不使用 img 元素来显示修改后的图片,而是使用背景图方式显示,因为图片可以进行缩放。
<div
  class="modified-image"
  style="background-image: url('http://p3-juejin.byteimg.com/tos-cn-i-k3u1fbpfcp/361d53f154ec41668a661d1d927f0c2e~tplv-k3u1fbpfcp-watermark.image?')"
></div>
因为使用背景图,所以修改后的图片元素需要设置更多样式,以达到最佳的显示效果。
.modified-image {
  background-position: top left;
  background-repeat: no-repeat;
  background-size: auto 100%;
  /* ... */
}
为了达到对比的效果,我们还要给修改后的图片添加一层滤镜效果。
.modified-image {
  filter: grayscale(100%);
  /* ... */
}
接下来设置 .resizer 元素的样式,相对而言要简单很多,只需要将它设置到中心位置即可。
.resizer {
  position: absolute;
  left: 50%;
  top: 0;
  height: 100%;
  width: 2px;
  background-color: #cbd5e0;
  cursor: ew-resize;
}
使用 position 属性将它定为到中间,注意将鼠标的展现形式更换为 cursor: ew-resize。
HTML 结构和 CSS 样式就差不多了,接下来处理 JavaScript 事件相关内容。
当我们移动 .resizer 元素时,需要事实计算鼠标移动了多远的距离。然后根据当前鼠标的位置,修改 .resizer 元素的位置,以及修改后图片的大小。
如何拖动一个元素其实很简单,还不是很清楚的同学可以去看看我之前的文章 《如何实现一个自定义的 range slider?元素拖动其实很简单》。
接下来来看看
const resizer = document.getElementById('dragMe');
// 上一个兄弟元素,也就是修改后的图片元素
const leftSide = resizer.previousElementSibling;
// 记录当前鼠标的位置
let x = 0;
let y = 0;
// 记录修改后图片的宽度
let leftWidth = 0;
// 点击 resizer 元素时触发 mousedown 事件
const mouseDownHandler = function (e) {
  // 获取当前鼠标位置
  x = e.clientX;
  y = e.clientY;
  leftWidth = leftSide.getBoundingClientRect().width;
  // 在 document 元素上添加事件
  document.addEventListener('mousemove', mouseMoveHandler);
  document.addEventListener('mouseup', mouseUpHandler);
};
const mouseMoveHandler = function (e) {
  // 计算鼠标移动距离
  const dx = e.clientX - x;
  const dy = e.clientY - y;
  let newLeftWidth =
    ((leftWidth + dx) * 100) / resizer.parentNode.getBoundingClientRect().width;
  newLeftWidth = Math.max(newLeftWidth, 0);
  newLeftWidth = Math.min(newLeftWidth, 100);
  // 设置修改后的图片元素的宽度
  leftSide.style.width = `${newLeftWidth}%`;
  resizer.style.left = `${newLeftWidth}%`;
};
// 给 resizer 元素添加事件
resizer.addEventListener('mousedown', mouseDownHandler);
代码有点长,需要你花点时间仔细看看才能理解。
最后还有一个需要注意的点,我们要保证鼠标滑块不会滑出可视范围,所以需要限制其最大值和最小值。
因为修改后的图片元素的宽度值时百分比类型,所以最小值为 0,最大值为 100。
const mouseMoveHandler = function (e) {
  // ...
  newLeftWidth = Math.max(newLeftWidth, 0);
  newLeftWidth = Math.min(newLeftWidth, 100);
};
