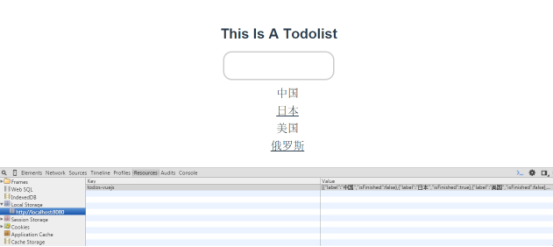
用vue.js实现一个todolist项目:input输入框输入的值会呈现在下方,并且会保存在localStorage里面,而且下方的列表点击之后也会有变化:
完整代码:
App.vue
<template>
 <div id="app">
 <h1 v-html = "title"></h1>
 <input v-model="newItem" v-on:keyup.enter="addNew" ></input>
 <ul>
  <li v-for="item in items" v-bind:class="{finished:item.isFinished}" v-on:click="toggleFinish(item)">{{item.label}}</li>
 </ul>
 </div>
</template>

<script>
import Store from './store'
export default {
 data:function(){
 return {
  title:"This Is A Todolist",
  items:Store.fetch(),
  newItem:""
 }
 },
 watch:{
 items:{
  handler:function(items){
  Store.save(items)
  },
  deep:true
 }
 },
 methods:{
 toggleFinish:function(item){
  item.isFinished = !item.isFinished
 },
 addNew:function(){
  this.items.push({
  label:this.newItem,
  "isFinished":false
  })
  this.newItem=""
 }
 }
}
</script>

<style>
.finished{
 text-decoration:underline;
}
li{
 list-style:none;
 font-size:1.6em;
 margin-top:10px;
}
#app {
 font-family: 'Avenir', Helvetica, Arial, sans-serif;
 -webkit-font-smoothing: antialiased;
 -moz-osx-font-smoothing: grayscale;
 text-align: center;
 color: #2c3e50;
 margin-top: 60px;
}
input{
 width:230px;
 height:40px;
 border-radius:20px;
 padding: 0.4em 0.35em;
 border:3px solid #CFCFCF;
 font-size: 1.55em;
}
</style>
store.js:
const STORAGE_KEY='todos-vuejs'
export default {
 fetch:function(){
  return JSON.parse(window.localStorage.getItem(STORAGE_KEY)||'[]');
 },
 save:function(items){
  window.localStorage.setItem(STORAGE_KEY,JSON.stringify(items))
 }
}
详细解析
ES6的写法:
export default {
 name: 'hello',
 data () {
 return {
  msg: 'Welcome to Your Vue.js App'
 }
 }
}
export default 和 export 区别:
1).export与export default均可用于导出常量、函数、文件、模块等
2).你可以在其它文件或模块中通过import+(常量 | 函数 | 文件 | 模块)名的方式,将其导入,以便能够对其进行使用
3).在一个文件或模块中,export、import可以有多个,export default仅有一个
4).通过export方式导出,在导入时要加{ },export default则不需要
1.export
/https://img.qb5200.com/download-x/demo1.js
export const str = 'hello world'
export function f(a){ return a+1}
对应的导入方式:

/https://img.qb5200.com/download-x/demo2.js
import { str, f } from 'demo1' //也可以分开写两次,导入的时候带花括号
2.export default
/https://img.qb5200.com/download-x/demo1.js
export default const str = 'hello world'
对应的导入方式:

/https://img.qb5200.com/download-x/demo2.js
import str from 'demo1' //导入的时候没有花括号
当最简单导入的时候,这个值是将被认为是”入口”导出值。
在App.vue中完成项目编写:
组件布局将在这里设置,.vue文件将由vue-loader进行加载,.vue内同时包含html、css、js源码,使组件的独立,组件之间可以尽可能地解耦,便于开发维护
先看一个简单示例:只要isFinished为true就加下划线,false就不加下划线:
<template>
 <div id="app">
 <h1 v-html = "title"></h1>
 <ul>
  <li v-for="item in items" v-bind:class="{finished:item.isFinished}">{{item.label}}</li>
 </ul>
 </div>
</template>

<script>
import Hello from './components/Hello'

export default {
 data:function(){
 return {
  title:"this is a todolist",
  items:[
  {
   label:"coding",
   "isFinished":false
  },
  {
   label:"walking",
   "isFinished":true
  }
  ]
 }
 }
}
</script>

<style>
.finished{
 text-decoration:underline;
}
#app {
 font-family: 'Avenir', Helvetica, Arial, sans-serif;
 -webkit-font-smoothing: antialiased;
 -moz-osx-font-smoothing: grayscale;
 text-align: center;
 color: #2c3e50;
 margin-top: 60px;
}
</style>
对于class的控制如上:如果是数组的话则可以渲染多个。
再进一步完成功能:点击没有下划线的li就会加下划线,有下划线就会去除下划线。
需要绑定事件:
还要添加方法toggleFinish():
 methods:{
 toggleFinish:function(item){
  item.isFinished = !item.isFinished
 }
 }
将input输入的值添加到列表下面
添加input:
<input v-model="newItem" v-on:keyup.enter="addNew" ></input>
data对象添加:
newItem:""
添加方法:
//addNew:function(){
// alert(this.newItem)
// this.newItem=""   //添加后加输入框清空
//}

addNew:function(){
 this.items.push({
 label:this.newItem,
 "isFinished":false
 })
 this.newItem=""
}
使用localStorage来存储
使用store.js:
const STORAGE_KEY='todos-vuejs'
export default {
 fetch:function(){
  return JSON.parse(window.localStorage.getItem(STORAGE_KEY)||'[]');
 },
 save:function(items){
  window.localStorage.setItem(STORAGE_KEY,JSON.stringify(items))
 }
}
两个方法:一个设置,一个获取
导入:
import Store from './store'
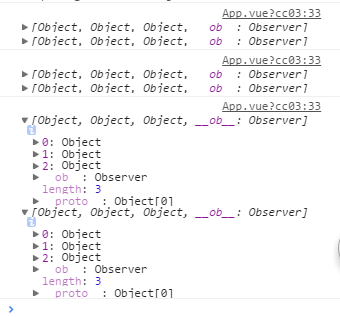
打印一下Store,console.log(Store),可以看到:

由于加入代码中每次都需要添加还有删除等等,如果每次都用到store的方法,这就有点麻烦了,所以这里就要用到watch观察。
 watch:{
 items:{
  handler:function(val,oldVal){
  console.log(val,oldVal)
  },
  deep:true
 }
 },
可以看到打印出:
使用save()方法:
 watch:{
 items:{
  handler:function(items){
  Store.save(items)
  },
  deep:true
 }
 },

一有变化就会触发。
将fetch()方法也加进去:
<script>
import Store from './store'
export default {
 data:function(){
 return {
  title:"<span>?</span>this is a todolist",
  items:Store.fetch(),
  newItem:""
 }
 },
 watch:{
 items:{
  handler:function(items){
  Store.save(items)
  },
  deep:true
 }
 },
 methods:{
 toggleFinish:function(item){
  item.isFinished = !item.isFinished
 },
 addNew:function(){
  this.items.push({
  label:this.newItem,
  "isFinished":false
  })
  this.newItem=""
 }
 }
}
</script>

