
> 上篇介绍了 ByteBuf 的简单读写操作以及读写指针的基本介绍,本文继续对 ByteBuf 的基本操作进行解读。
# 读写指针回滚
这里的 demo 例子还是使用上节使用的。
```java
ByteBuf buf = Unpooled.buffer(15);
String content = "ytao公众号";
buf.writeBytes(content.getBytes());
System.out.println(String.format("\nwrite: ridx=%s widx=%s cap=%s", buf.readerIndex(), buf.writerIndex(), buf.capacity()));
byte[] dst = new byte[4];
buf.readBytes(dst);
System.out.println(String.format("\nread(4): ridx=%s widx=%s cap=%s", buf.readerIndex(), buf.writerIndex(), buf.capacity()));
```
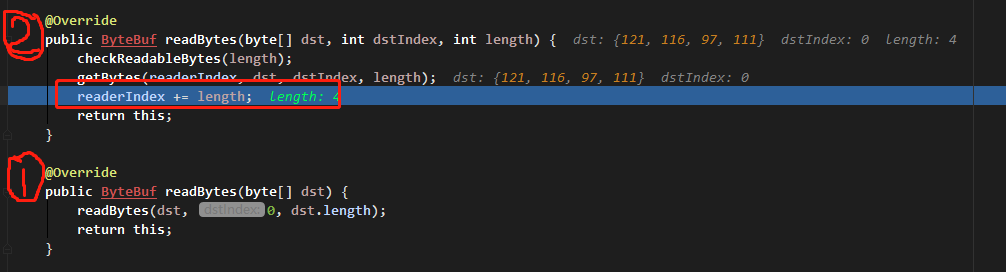
进入 readBytes 方法,可以看到每次读取的时候,指针是累加的,如图:
但是,有时我们可能需要对当前操作进行回滚,让指针回到之前的位置。这时,mark 和 reset 搭配使用,可以实现该操作需求。
mark 用来记录可能需要回滚的当前位置,reset 是将指针回滚至 mark 记录的值。
比如,接着面的 demo,再读取三个字节,然后回滚读取三个字节的操作。
```java
buf.markReaderIndex();
dst = new byte[3];
buf.readBytes(dst);
System.out.println(String.format("\nmarkRead and read(3): ridx=%s widx=%s cap=%s", buf.readerIndex(), buf.writerIndex(), buf.capacity()));
buf.resetReaderIndex();
System.out.println(String.format("\nresetReaderIndex: ridx=%s widx=%s cap=%s", buf.readerIndex(), buf.writerIndex(), buf.capacity()));
```
先将读索引进行 mark,然后读取内容,在调用读取的 reset,指针索引如下:
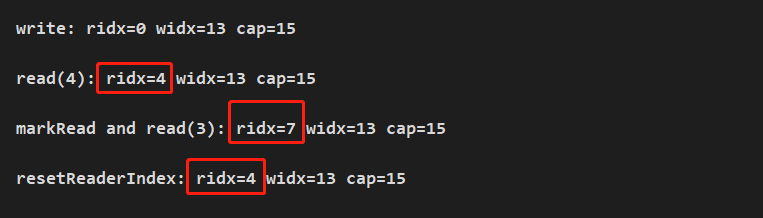
读指针累加到 7 后,又重新回滚至 4 的位置。
同样,写指针也是如此操作进行回滚。所以 mark 和 reset 都有一个读和写。

以及

# 读写指针清空
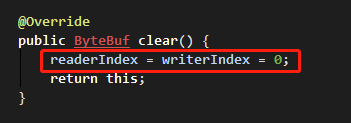
将读写指针清为初始值,使用 clear() 函数。
```java
ByteBuf buf = Unpooled.buffer(15);
String content = "ytao公众号";
buf.writeBytes(content.getBytes());
System.out.println(String.format("\nwrite: ridx=%s widx=%s cap=%s", buf.readerIndex(), buf.writerIndex(), buf.capacity()));
buf.markWriterIndex();
byte[] dst = new byte[4];
buf.readBytes(dst);
System.out.println(String.format("\nread(4): ridx=%s widx=%s cap=%s", buf.readerIndex(), buf.writerIndex(), buf.capacity()));
buf.markReaderIndex();
buf.clear();
System.out.println(String.format("\nclear: ridx=%s widx=%s cap=%s", buf.readerIndex(), buf.writerIndex(), buf.capacity()));
```
执行结果:
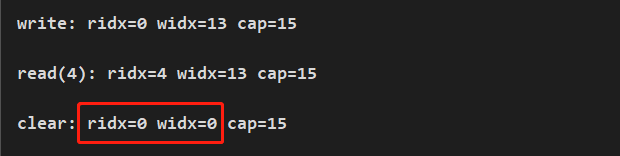
clear 只会将指针的位置重置为初始值,并不会清空缓冲区里的内容,如下图。同时,也可使用 mark 和 reset 进行验证,这里不再进行演示。
# 查找字符位置
查找字符是在很多场景下,都会使用到,比如前面文章讲过的粘包/拆包处理,就有根据字符串进行划分包数据。其实现原理就是根据查找指定字符进行读取。
ByteBuf 也提供多种不同的查找方法进行处理:
## indexOf
indexOf 函数,拥有三个参数,查找开始位置索引 `fromIndex`, 查询位置最大的索引 `toIndex`,查找字节 `value`。
```java
// fromIndex 为 0, toIndex 为 13, value 为 a
int i = buf.indexOf(0, 13, (byte)'a');
System.out.println("[a]索引位置:"+i);
```
在索引 0~13 中返回查找的字符 a 索引位置:

indexOf 源码实现:
```java
// ByteBuf 实现类
@Override
public int indexOf(int fromIndex, int toIndex, byte value) {
return ByteBufUtil.indexOf(this, fromIndex, toIndex, value);
}
// ByteBufUtil 类
public static int indexOf(ByteBuf buffer, int fromIndex, int toIndex, byte value) {
// 判断查询起始和终点索引大小
if (fromIndex <= toIndex) {
return firstIndexOf(buffer, fromIndex, toIndex, value);
} else {
return lastIndexOf(buffer, fromIndex, toIndex, value);
}
}
private static int firstIndexOf(ByteBuf buffer, int fromIndex, int toIndex, byte value) {
fromIndex = Math.max(fromIndex, 0);
if (fromIndex >= toIndex || buffer.capacity() == 0) {
return -1;
}
// 从起始索引进行遍历到终点索引,如果这区间有查找的字节,就返回第一个字节的位置,否则返回 -1
for (int i = fromIndex; i < toIndex; i ++) {
if (buffer.getByte(i) == value) {
return i;
}
}
return -1;
}
private static int lastIndexOf(ByteBuf buffer, int fromIndex, int toIndex, byte value) {
fromIndex = Math.min(fromIndex, buffer.capacity());
if (fromIndex < 0 || buffer.capacity() == 0) {
return -1;
}
// 从起始索引进行遍历到终点索引倒着遍历,获取的是查找区间的最后一个字节位置
for (int i = fromIndex - 1; i >= toIndex; i --) {
if (buffer.getByte(i) == value) {
return i;
}
}
return -1;
}
```
## bytesBefore
bytesBefore 函数拥有三个重载方法:

bytesBefore 函数的实现,就是在 indexOf 上进行一层查找区间的封装,最后都是在 indexOf 中实现查找。
```java
@Override
public int bytesBefore(int index, int length, byte value) {
// 最终都进入 indexOf 中查找
int endIndex = indexOf(index, index + length, value);
if (endIndex < 0) {
return -1;
}
// 返回相对查找起始索引的位置
return endIndex - index;
}
```
**注意:**这里返回的是相对查找起始索引的位置。
## forEachByte
forEachByte 函数有两个重载方法:

这里涉及到一个 ByteBufProcessor 接口,这个是对一些常用的字节,其中包括 空,空白键,换行等等进行了抽象定义。
forEachByte 函数实现主要逻辑:
```java
private int forEachByteAsc0(int index, int length, ByteBufProcessor processor) {
if (processor == null) {
throw new NullPointerException("processor");
}
if (length == 0) {
return -1;
}
final int endIndex = index + length;
// 起始 -> 终点索引,进行遍历
int i = index;
try {
do {
// 如果可以匹配上字节,返回该索引位置
if (processor.process(_getByte(i))) {
i ++;
} else {
return i;
}
} while (i < endIndex);
} catch (Exception e) {
PlatformDependent.throwException(e);
}
// 查找区间遍历完没有匹配上,返回 -1
return -1;
}
```
## forEachByteDesc
forEachByteDesc 也是有两个重载方法:

forEachByteDesc 从函数名字可以看出,指的倒序查找。意指从查找区间最大索引到最小索引进行遍历:
```java
private int forEachByteDesc0(int index, int length, ByteBufProcessor processor) {
if (processor == null) {
throw new NullPointerException("processor");
}
if (length == 0) {
return -1;
}
// 从最大索引开始,进行遍历
int i = index + length - 1;
try {
do {
if (processor.process(_getByte(i))) {
i --;
} else {
return i;
}
// 直到 i 小于查找区间最小索引值时,遍历完成
} while (i >= index);
} catch (Exception e) {
PlatformDependent.throwException(e);
}
// 没有找到指定字节返回 -1
return -1;
}
```
查找操作的具体实现还是比较好理解,进入代码查看实现一般都能读懂。
# 复制
ByteBuf 复制后会生成一个新的 ByteBuf 对象。
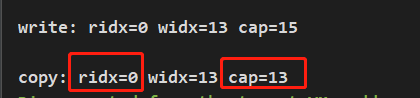
**copy()** 整个对象被复制,其所有数据都是该对象自身维护,与旧对象无任何关联关系。包括缓冲区内容,但是该方法的的容量默认为旧 buf 的可读区间大小,读索引为 0,写索引为旧数据写索引的值。
```java
ByteBuf buf2 = buf.copy();
System.out.println(String.format("\ncopy: ridx=%s widx=%s cap=%s", buf2.readerIndex(), buf2.writerIndex(), buf2.capacity()));
```
执行结果:
**copy(int index, int length)** 为指定复制的起始位置及长度,其他与上面 copy() 类似。
**duplicate()** 这个也是复制,但是与 copy 函数不同的是,复制后生成的 ByteBuf 和旧的 ByteBuf 是共享一份缓冲区内容的。它复制的只是自己可以单独维护的一份索引。并且它复制的默认容量也是和旧的一样。
# 对象引用/回收
ByteBuf 对象被引用后,可以调用 **retain()** 函数进行累计计数。每调用一次 retain() 则会 +1。
其在 AbstractReferenceCountedByteBuf 实现:
```java
@Override
public ByteBuf retain() {
for (;;) {
int refCnt = this.refCnt;
if (refCnt == 0) {
throw new IllegalReferenceCountException(0, 1);
}
// 达到最大值时,抛出异常
if (refCnt == Integer.MAX_VALUE) {
throw new IllegalReferenceCountException(Integer.MAX_VALUE, 1);
}
// 保证线程安全,这里 CAS 进行累加
if (refCntUpdater.compareAndSet(this, refCnt, refCnt + 1)) {
break;
}
}
return this;
}
@Override
public boolean compareAndSet(T obj, int expect, int update) {
// unsafe 为jdk的 Unsafe 类
return unsafe.compareAndSwapInt(obj, offset, expect, update);
}
```
同样,可以进行添加多个引用,自己指定数量,**retain(int increment)** 带参函数实现,和上面 +1 实现思路一样,代码就不贴出来了。
ByteBuf 在申请内存使用完后,需要对其进行释放,否则可能会造成资源浪费及内存泄漏的风险。这也是 ByteBuf 自己实现的一套有效回收机制。
释放的函数为 **release()**,它的实现就是每次 -1。直到为 1 时,调用释放函数 **deallocate()** 进行释放。
其在 AbstractReferenceCountedByteBuf 实现:
```java
@Override
public final boolean release() {
for (;;) {
int refCnt = this.refCnt;
if (refCnt == 0) {
throw new IllegalReferenceCountException(0, -1);
}
// 引用数量 -1
if (refCntUpdater.compareAndSet(this, refCnt, refCnt - 1)) {
当引用数量为 1 时,符合释放条件
if (refCnt == 1) {
deallocate();
return true;
}
return false;
}
}
}
```
同样,释放也支持一次释放多个引用数量,也是通过指定数量,传递给 **release(int decrement)** 进行引用数量的减少并释放对象。
# 总结
> 本文对 ByteBuf 中最基本,最常用 API 进行的解读,这也是在实际开发中或阅读相关代码时,可能会遇到的基本 API,通过两篇文章的说明,相信对 ByteBuf 的基本使用不会存在太大问题,还有些未分析到的 API,根据自己对 ByteBuf 已有的理解,差不多也能进行分析。
个人博客: [https://ytao.top](https://ytao.top)
关注公众号 【ytao】,更多原创好文