简单说, Thymeleaf 是一个跟 Velocity、FreeMarker 类似的模板引擎,它可以完全替代 JSP 。相较与其他的模板引擎,它有如下三个极吸引人的特点:
1.Thymeleaf 在有网络和无网络的环境下皆可运行,即它可以让美工在浏览器查看页面的静态效果,也可以让程序员在服务器查看带数据的动态页面效果。这是由于它支持 html 原型,然后在 html 标签里增加额外的属性来达到模板+数据的展示方式。浏览器解释 html 时会忽略未定义的标签属性,所以 thymeleaf 的模板可以静态地运行;当有数据返回到页面时,Thymeleaf 标签会动态地替换掉静态内容,使页面动态显示。
2.Thymeleaf 开箱即用的特性。它提供标准和spring标准两种方言,可以直接套用模板实现JSTL、 OGNL表达式效果,避免每天套模板、该jstl、改标签的困扰。同时开发人员也可以扩展和创建自定义的方言。
3.Thymeleaf 提供spring标准方言和一个与 SpringMVC 完美集成的可选模块,可以快速的实现表单绑定、属性编辑器、国际化等功能。
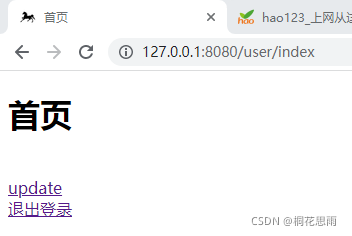
我们紧接着 上一篇 文章,我们使用账号 jack 和账号 Tom 来分别登录,在上一篇文章测试中可以看到,这两个账号无论哪一个登录,首页页面都会显示 add 页面和 update 页面两个超链接,而对于这两个账号来说,一个拥有访问 add 页面的权限,一个拥有访问 update 页面的权限。那么问题来了,如何才能根据不同用户的身份角色信息来显示不同的页面内容呢?这就要使用 shiro 标签了
thymeleaf 模板引擎使用 shiro 标签
<dependency>
    <groupId>com.github.theborakompanioni</groupId>
    <artifactId>thymeleaf-extras-shiro</artifactId>
    <version>2.0.0</version>
</dependency>
配置类 ShiroConfig
@Configuration
public class ShiroConfig {

    // 安全管理器
    @Bean
    public DefaultWebSecurityManager getDefaultWebSecurityManager(UserRealm userRealm) {
        DefaultWebSecurityManager defaultWebSecurityManager = new DefaultWebSecurityManager();
        defaultWebSecurityManager.setRealm(userRealm);
        return defaultWebSecurityManager;
    }

    // thymeleaf模板引擎中使用shiro标签时,要用到
    @Bean
    public ShiroDialect getShiroDialect() {
        return new ShiroDialect();
    }

    @Bean
    public ShiroFilterFactoryBean shiroFilter(DefaultWebSecurityManager defaultWebSecurityManager) {
        ShiroFilterFactoryBean shiroFilterFactoryBean = new ShiroFilterFactoryBean();
        shiroFilterFactoryBean.setSecurityManager(defaultWebSecurityManager);
        // 设置登录页面url
        shiroFilterFactoryBean.setLoginUrl("/user/login");
        shiroFilterFactoryBean.setSuccessUrl("/user/index");
        shiroFilterFactoryBean.setUnauthorizedUrl("/user/unauthorized");

        // 注意此处使用的是LinkedHashMap是有顺序的,shiro会按从上到下的顺序匹配验证,匹配了就不再继续验证
        Map<String, String> filterChainDefinitionMap = new LinkedHashMap<>();

        filterChainDefinitionMap.put("/layer/**", "anon");// 静态资源放行
        filterChainDefinitionMap.put("/img/**", "anon");
        filterChainDefinitionMap.put("/jquery/**", "anon");
        // add.html页面放行
        filterChainDefinitionMap.put("/user/add", "authc");
        // update.html必须认证
        filterChainDefinitionMap.put("/user/update", "authc");
        // index.html必须通过认证或者通过记住我登录的,才可以访问
        filterChainDefinitionMap.put("/user/index", "user");
        // 设置授权,只有user:add权限的才能请求/user/add这个url
        filterChainDefinitionMap.put("/user/add", "perms[user:add]");
        filterChainDefinitionMap.put("/user/update", "perms[user:update]");

        shiroFilterFactoryBean.setFilterChainDefinitionMap(filterChainDefinitionMap);
        return shiroFilterFactoryBean;
    }
}
index.html 页面
shiro 的命名空间:xmlns:shiro=http://www.pollix.at/thymeleaf/shiroshiro 标签
<!DOCTYPE html>
<html lang="en" xmlns:th="http://www.thymeleaf.org" xmlns:shiro="http://www.pollix.at/thymeleaf/shiro">
<head>
    <meta charset="UTF-8">
    <title>首页</title>
    <link rel="shortcut icon" type="image/x-icon" th:href="@{/img/favicon.ico}" rel="external nofollow" />
</head>
<body>
    <h1>首页</h1>

    <a shiro:hasPermission="'user:add'" th:href="@{/user/add}" rel="external nofollow" >add</a><br>
    <a shiro:hasPermission="'user:update'" th:href="@{/user/}" rel="external nofollow" >update</a>
    update
    <a th:href="@{/user/logout}" rel="external nofollow" >退出登录</a>
</body>
</html>
shiro 标签说明
https://shiro.apache.org/jsp-tag-library.html
https://github.com/apache/shiro/blob/main/web/src/main/resources/META-INF/shiro.tld
| 标签 | 含义 |
|---|---|
| shiro:principal | 当前用户的登录信息,用户名之类 |
| shiro:guest="" | 验证是否是游客,即未认证的用户 |
| shiro:user="" | 验证是否是已认证或已记住用户 |
| shiro:authenticated="" | 验证是否是已认证用户,不包括已记住用户 |
| shiro:notAuthenticated= “” | 未认证用户,但是 已记住用户 |
| shiro:lacksRole=“admin” | 表示没有 admin 角色的用户 |
| shiro:hasAllRoles=“admin, user1” | 表示需要同时拥有两种角色 |
| shiro:hasAnyRoles=“admin, user1” | 表示 拥有其中一个角色即可 |
| shiro:lacksPermission=“admin:delete” | 类似于 shiro:lacksRole |
| shiro:hasAllPermissions=“admin:delete, admin:edit” | 类似于 shiro:hasAllRoles |
| shiro:hasAnyPermission=“admin:delete, admin:edit” | 类似于 hasAnyRoles |
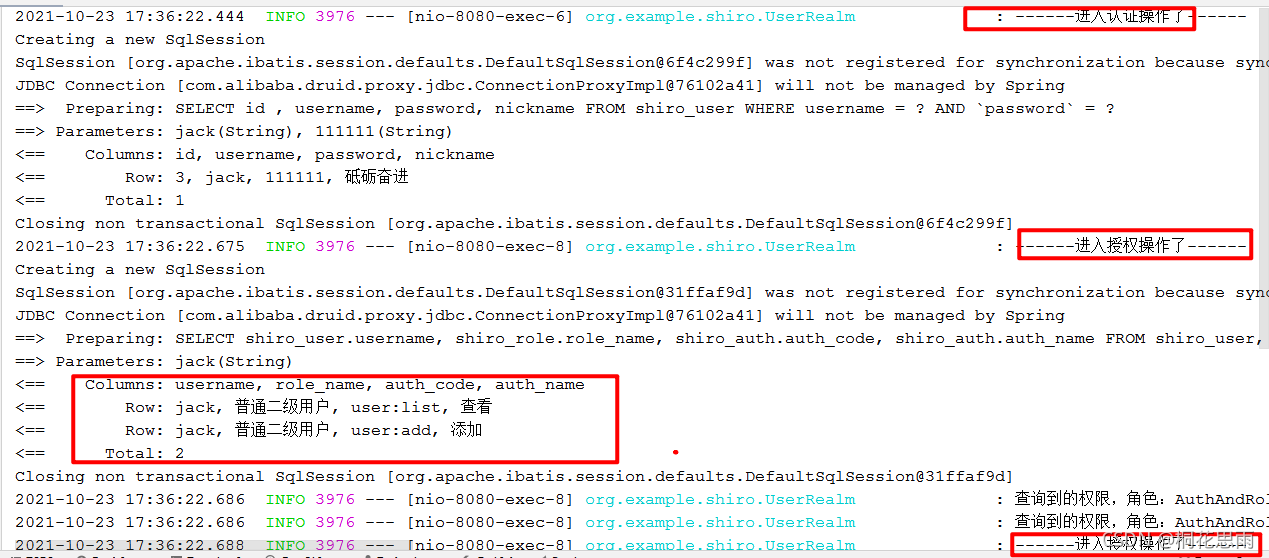
首先使用账号 jack 来登录,查看首页页面,如下

再看控制台日志,如下,注意账号 jack 拥有的权限,在 index.html 页面有两个 <shiro:hasPermission> 标签,故而进行了两次授权操作
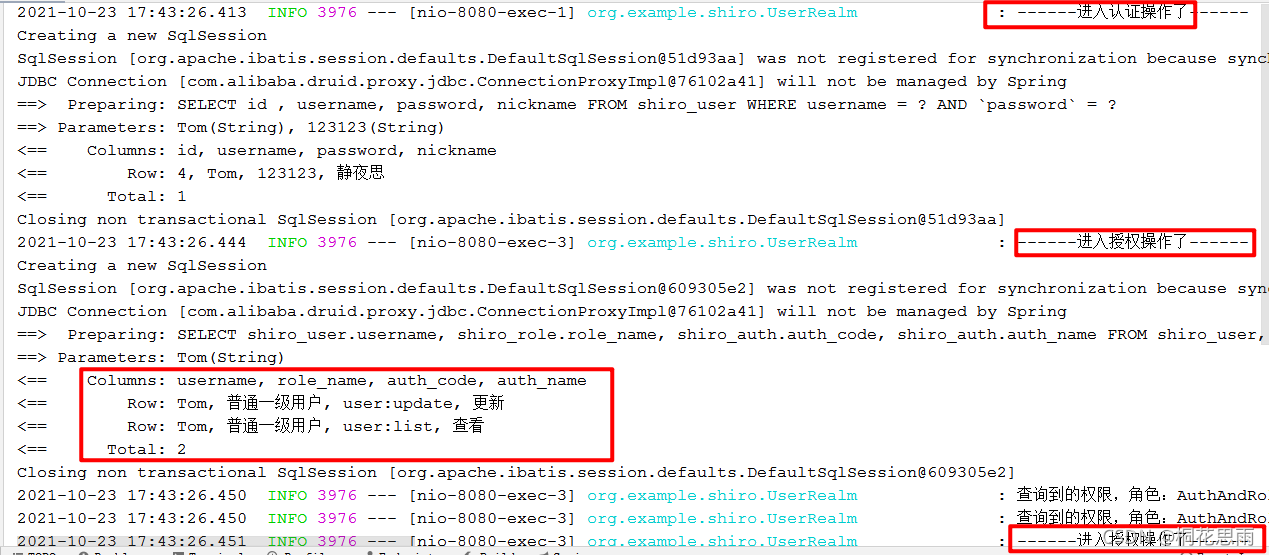
再使用账号 Tom 来登录,查看首页页面,如下
再看控制台日志,如下,注意账号 Tom 拥有的权限,在 index.html 页面有两个 <shiro:hasPermission> 标签,故而进行了两次授权操作