前言:
假设我们已经了解vue组件常见的有父子组件通信,兄弟组件通信。而父子组件通信很简单,父组件会通过 props 向下传数据给子组件,当子组件有事情要告诉父组件时会通过 $emit 事件告诉父组件。那么当两个组件之间不是父子关系,怎样传递数据呢?
先来看一下这个例子:
我们封装了一个名为 NestedDir 的子组件(嵌套目录的意思),内容如下(用到了element ui组件):
<!-- NestedDir.vue -->
<template>
  <ul class="nest_wrapper">
    <li v-for="(el, index) in nested" :key="index">
      <div v-if="el.type ==='dir'" class="dir">
        <p>{{el.name}}</p>
        <div class="btn_group">
          <el-button type="warning" size="mini" @click="add({id: el.id, type: 'dir'})">新增目录</el-button>
          <el-button type="warning" size="mini" @click="add({id: el.id, type: 'file'})">新增文件</el-button>
        </div>
      </div>
      <div v-if="el.type ==='file'" class="file">
        <p>{{el.name}}</p>
      </div>
      <NestedDir v-if="el.children" :nested="el.children"/>
    </li>
  </ul>
</template>

<script>
export default {
  name: "NestedDir",
  props: {
    nested: {
      type: Array,
    }
  },
  methods: {
    add(el) {
      this.$emit('change', el)
    }
  }
}
</script>
可以看出这个 NestedDir 接收父级传来的 nested 数组类型的数据,并且它的内部点击 新增目录、新增文件,可以触发 父级 监听的 change 事件。比较特殊的是这个组件中调用了自己:
<NestedDir v-if="el.children" :nested="el.children"/>
不过要注意的是调用自己的时候我们并没有在它上面监听它内部传来的change事件,这也是导致二级目录点击新增按钮无效的原因。
我们传递给它的 nested 数据结构大概是下面的样子:
[{
    "id": 1,
    "name": "目录1",
    "type": "dir",
    "children": [{
        "id": 2,
        "name": "目录3",
        "type": "dir",
        "children": [],
        "pid": 1
    }, {
        "id": 3,
        "name": "文件2",
        "type": "file",
        "pid": 1
    }]
}, {
    "id": 4,
    "name": "目录2",
    "type": "dir",
    "children": []
}, {
    "id": 5,
    "name": "文件1",
    "type": "file",
    "children": []
}]
父组件中调用 NestedDir:
<!-- directory.vue -->
<template>
  <div style="width: 50%;box-shadow: 0 0 4px 2px rgba(0,0,0,.1);margin: 10px auto;padding-bottom: 10px;">
    <!-- 顶部按钮组 -->
    <div class="btn_group">
      <el-button type="warning" size="mini" @click="showDialog({type: 'dir'})">新增目录</el-button>
      <el-button type="warning" size="mini" @click="showDialog({type: 'file'})">新增文件</el-button>
    </div>
    <!-- 嵌套组件 -->
    <NestedDir :nested="catalog" @change="handleChange"/>
    <!-- 新增弹出框 -->
    <el-dialog :title="title" :visible.sync="dialogFormVisible" width="300px">
      <el-form :model="form">
        <el-form-item label="名称">
          <el-input v-model="form.name" autocomplete="off"></el-input>
        </el-form-item>
      </el-form>
      <div slot="footer" class="dialog-footer">
        <el-button @click="dialogFormVisible = false">取 消</el-button>
        <el-button type="primary" @click="confirm">确 定</el-button>
      </div>
    </el-dialog>
  </div>
</template>

<script>
import NestedDir from "./NestedDir";

export default {
  name: "directory",
  components: {
    NestedDir
  },
  created() {
    this.catalog = this.getTree()
  },
  computed: {
    maxId() {
      return this.arr.lastIndex + 2
    },
    topNodes() {
      this.arr.forEach(item => {
        if (item.children) item.children = []
      })
      return this.arr.filter(item => !item.pid)
    }
  },
  data() {
    return {
      arr: [
        {id: 1, name: '目录1', type: 'dir', children: []},
        {id: 2, name: '目录3', type: 'dir', children: [], pid: 1},
        {id: 3, name: '文件2', type: 'file', pid: 1},
        {id: 4, name: '目录2', type: 'dir', children: []},
        {id: 5, name: '文件1', type: 'file'},
      ],
      title: '',
      dialogFormVisible: false,
      form: {
        id: '',
        name: '',
        type: '',
        pid: ''
      },
      catalog: []
    }
  },
  methods: {
    handleChange(el) {
      this.showDialog(el)
    },
    confirm() {
      this.arr.push({...this.form})
      this.dialogFormVisible = false
      this.catalog = this.getTree()
      this.form = {
        id: '',
        name: '',
        type: '',
        pid: '' , // 父级的id
      }
    },
    showDialog(el) {
      if (el.type === 'dir') {
        this.title = '新增目录'
        this.form.children = []
        this.form.type = 'dir'
      } else {
        this.title = '新增文件'
        this.form.type = 'file'
      }
      if (el.id) {
        this.form.pid = el.id
        this.form.id = this.maxId
      } else {
        this.form.id = this.maxId
      }
      this.dialogFormVisible = true
    },
    getTree() {
      this.topNodes.forEach(node => {
        this.getChildren(this.arr, node.children, node.id)
      })
      return this.topNodes
    },
    getChildren(data, result, pid) {
      for (let item of data) {
        if (item.pid === pid) {
          const newItem = {...item, children: []}
          result.push(newItem)
          this.getChildren(data, newItem.children, item.id)
        }
      }
    }
  }
}
</script>

<style scoped>
.btn_group {
  padding: 20px 10px;
  background-color: rgba(87, 129, 189, 0.13);
}
</style>
渲染出的页面是下面的样子:
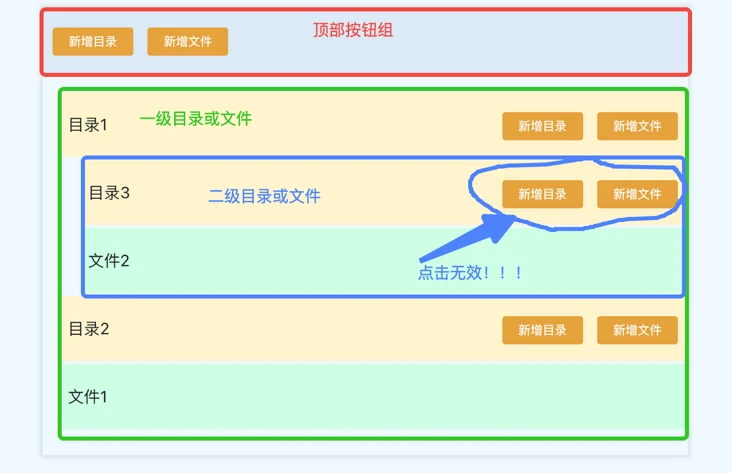
我们构造出了一个理论上可以无限嵌套的目录结构,但是经过测试发现 在二级目录上的 新增按钮 点击是没有任何反应的,原因是我们在 NestedDir 中调用了它自己并没有监听内部的change事件(上边提到过),所以它无法触发 父级的-父级 的监听事件。
如何解决?
它其实就是一个Vue实例,有$emit、$on、$off方法,允许从一个组件向另一组件传递数据,而不需要借助父组件。具体做法是在一个组件$emit,在另一个组件$on,可以像下面这样做:
// main.js
import Vue from 'vue'
import App from './App.vue'

export const eventBus = new Vue(); // creating an event bus.

new Vue({
  render: h => h(App),
}).$mount('#app')
这样我们来改造一下 directory.vue,只需要改动srcipt部分:
<script>
import NestedDir from "./NestedDir";
import { eventBus } from "../main";

export default {
  name: "directory",
  components: {
    NestedDir
  },
  created() {
    this.catalog = this.getTree()

    eventBus.$on('change', function (data) {
      // todo 向之前一样处理即可
    })
  },
  destroyed() {
    eventBus.$off('change')
  },
  computed: {
    maxId() {
      return this.arr.lastIndex + 2
    }
  },
  data() {
    return {
      arr: [
        {id: 1, name: '目录1', type: 'dir', children: []},
        {id: 2, name: '目录3', type: 'dir', children: [], pid: 1},
        {id: 3, name: '文件2', type: 'file', pid: 1},
        {id: 4, name: '目录2', type: 'dir', children: []},
        {id: 5, name: '文件1', type: 'file'},
      ],
      title: '',
      dialogFormVisible: false,
      form: {
        id: '',
        name: '',
        type: '',
        pid: ''
      },
      catalog: []
    }
  },
  methods: {
    handleChange(el) {
      this.showDialog(el)
    },
    confirm() {
      this.arr.push({...this.form})
      this.dialogFormVisible = false
      this.catalog = this.getTree()
      this.form = {
        id: '',
        name: '',
        type: '',
        pid: '' , // 父级的id
      }
    },
    showDialog(el) {
      if (el.type === 'dir') {
        this.title = '新增目录'
        this.form.children = []
        this.form.type = 'dir'
      } else {
        this.title = '新增文件'
        this.form.type = 'file'
      }
      if (el.id) {
        this.form.pid = el.id
        this.form.id = this.maxId
      } else {
        this.form.id = this.maxId
      }
      this.dialogFormVisible = true
    },
    getTree() {
      this.topNodes.forEach(node => {
        this.getChildren(this.arr, node.children, node.id)
      })
      return this.topNodes
    },
    getChildren(data, result, pid) {
      for (let item of data) {
        if (item.pid === pid) {
          const newItem = {...item, children: []}
          result.push(newItem)
          this.getChildren(data, newItem.children, item.id)
        }
      }
    }
  }
}
</script>引入了import { eventBus } from "../main";
在页面创建时加入事件监听,销毁时移除事件监听:
created() {
  eventBus.$on('change', function (data) {
    this.handleChange(data)
  })
},
destroyed() {
  eventBus.$off('change')
}
NestedDir.vue 中也需要做相应改动,只需要修改methods中的add方法:
import { eventBus } from "../main";

//...略

methods: {
  add(el) {
    // this.$emit('change', el)
    eventBus.$emit('change', el)
  }
}
这样点击二级目录的新增按钮,就可以正常触发弹出框了。
上面的eventBus只在Vue2中有效,Vue3中已经移除了$on, $off 这些方法,所以下一篇文章打算自己做一个Vue的插件来处理这种类似于Pub/Sub的情况。

