1、编写语言:electron、vue
2、更新库:"electron-updater": "4.3.5"
下面直接上步骤源码
import { autoUpdater } from 'electron-updater'
import { app, ipcMain } from 'electron'


// 服务器静态文件地址,文章后面附上ng配置及需要上传的文件
const updateUrl = 'http://***/updateExe/'

// 检测更新,在你想要检查更新的时候执行,renderer事件触发后的操作自行编写
function updateHandle (updateConfig) {
  let message = {
    error: '检查更新出错',
    checking: '正在检查更新……',
    updateAva: '检测到新版本,正在下载……',
    updateNotAva: '现在使用的就是最新版本,不用更新'
  }
  // 设置是否自动下载,默认是true,当点击检测到新版本时,会自动下载安装包,所以设置为false
  autoUpdater.autoDownload = false
  // 设置服务器更新地址
  autoUpdater.setFeedURL({
    provider: 'generic',
    url: updateUrl
  })
  autoUpdater.on('error', function (err) {
    sendUpdateMessage('error',err||message.error)
  })
  autoUpdater.on('checking-for-update', function () {
    sendUpdateMessage('checking-for-update',message.checking)
  })
  // 版本检测结束,准备更新
  autoUpdater.on('update-available', function (info) {
    sendUpdateMessage('update-available',message.updateAva)
  })
  autoUpdater.on('update-not-available', function (info) {
    sendUpdateMessage('update-not-available',message.updateNotAva)
  })
  // 更新下载进度事件
  autoUpdater.on('download-progress', function (progressObj) {
    sendUpdateMessage('download-progress',progressObj.percent)
  })
  // 下载完成
  autoUpdater.on('update-downloaded', function (event, releaseNotes, releaseName, releaseDate, updateUrl, quitAndUpdate) {
    sendUpdateMessage('update-downloaded','下载完成')
  })

  // 通过main进程发送事件给renderer进程,提示更新信息
  function sendUpdateMessage (name,text) {
    // 窗口对象自行修改
    let loginWindow = global.browserList.logins[0]
    loginWindow.webContents.send('UpdateMessage', {name,text})
  }
}

// 触发更新检测
ipcMain.on('checkForUpdates', () => {
  autoUpdater.checkForUpdates()
})

//  开始下载,通过渲染进程发起
ipcMain.on('downloadUpdate', () => {
    autoUpdater.downloadUpdate()
})

//  下载完成,退出且重新安装
ipcMain.on('updateSuccess', () => {
    // 加载更新程序
    autoUpdater.quitAndInstall()
    // 关闭当前electron
    app.quit()
})

export default updateHandleimport updateHandle from '@/mainFolder/util/autoUpdater.js' //自动更新 // ... 省略其次代码,为了更新代码更明了 //自动更新 updateHandle()
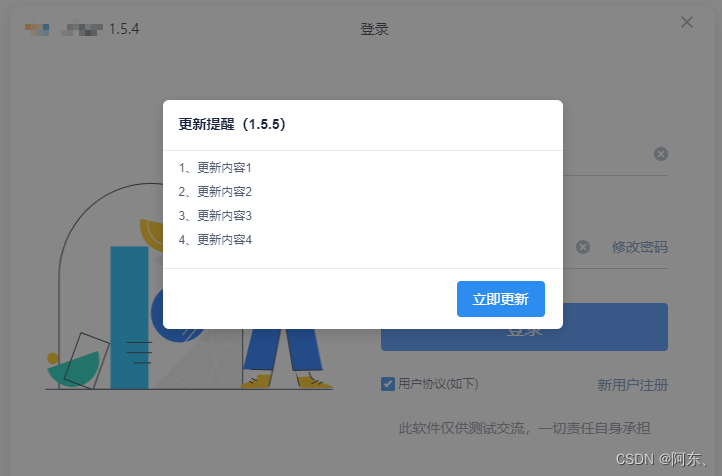
<template>
    <div>
        <Modal
            v-model="modal"
            :mask-closable='false'
            :title="'更新提醒(' + newVersion +')'"
            width="400"
            ok-text="立即更新"
            cancel-text="取消"
            :closable='false'
            @on-ok='updataDown'
        >
            <p v-for='(item, index) in navJson' :key='index + "navJson"'>{{ index+1 }}、{{item}}</p>
        </Modal>
        <Modal
            v-model="Progress"
            :mask-closable='false'
            :title="'正在更新(' + newVersion +')'"
            width="400"
            :closable='false'
        >
            <Progress :percent="percent" status="active" ></Progress>
            <div slot="footer">
            </div>
        </Modal>
    </div>
</template>

<script>


// this.$ipcRenderer 等同于 window.require("electron").ipcRenderer
export default {
    data() {
        return {
            modal: false,
            Progress: false,
            percent: 0,
            newVersion: '0.0.0',
            isOnMessage: false,
            navJson: []
        }
    },
    created () {
        // 在这里执行之前,可以是登录接口查询到版本不对之后再触发检测更新
        // ...登录api省略了,造数据演示
        let result = {
            newVersion: '2.0.0',
            updateNavJson: '["更新内容1","更新内容2","更新内容3","更新内容4"]'
        }
        this.onUpdateExe(result)
    },
    methods: {
        onUpdateExe(res) {
            if (this.isOnMessage) return
            const { newVersion = '', updateNavJson = "" } = res
            try {
                this.navJson = JSON.parse(updateNavJson) || []
            } catch (error) {
                console.log(error)
            }
            this.isOnMessage = true
            this.newVersion = newVersion
            console.log('收到更新版本号', res, this.navJson)
            // 自动更新过程
            this.$ipcRenderer.on('UpdateMessage', this.updateExe.bind(this))
            // 检查是否需要更新
            this.$ipcRenderer.send('checkForUpdates')
        },
        updateExe(e, data){
            console.log('渲染层收到消息:',data)
            // 更新提示弹窗
            if(data.name == 'update-available'){
                this.modal = true
            }else if(data.name == 'download-progress'){    // 下载进度
                this.percent = Math.ceil(data.text)
            }else if(data.name == 'update-downloaded'){
                this.$Message.success('下载完成,准备重启')
                setTimeout(() => {
                    this.$ipcRenderer.send('updateSuccess')
                },2000)
            }
        },
        //开始升级
        updataDown(){
            this.Progress = true
            this.$ipcRenderer.send('downloadUpdate')
        }
    },
}
</script>

<style lang="scss" scoped>
   /deep/.ivu-modal-body {
        max-height: 120px;
        overflow-y: scroll;
        padding-top: 5px;
        p {
            line-height: 24px;
            height: 24px;
            font-size: 12px;

        }
   }
   /deep/.ivu-modal-footer {
        button:nth-child(1) {
            display: none;
        }
   }
</style>electronBuilder: {
builderOptions: {
productName: 'soft', // 打包文件名称,尽可能用英文
// ...
publish: [
{
"provider": "generic",
"url": `http://***/updateExe/`
}
],
}
}// nginx配置静态文件目录
http {
server {
# 增加这一个配置
location /updateExe/ {
alias /usr/item/updateExe/;
}
}
}备注:
1、5步骤配置ng静态文件访问链接,有文件服务器的可跳过
2、文章中的 http://***/updateExe/ 的 ***记得替换成服务器公网ip
效果如下: