后端
@app.route('/upload')
def upload_test():
    return render_template('new.html')
前端:new.html
<!DOCTYPE html>
<html lang="en">
<head>
    <meta charset="UTF-8">
    <title>Title</title>
</head>
    <body>
        <div>
            <form method="post" action="http://localhost:6600/up_photo" enctype="multipart/form-data">
            <input type="file" size="30" name="photo"/>
            <br>
<!--            <input type="text" class="txt_input" name="name" style="margin-top:15px;"/>-->
            <input type="submit" value="提交信息" class="button-new" style="margin-top:15px;"/>
            </form>
        </div>
    </body>
</html>
后端
***stream获取图像文件,另外[‘photo’]与前端name="photo"属性对其
@app.route('/up_photo', methods=['post'])
def up_photo():
    img1 = request.files['photo']
    print(type(img1))

    img = Image.open(img1.stream)


	# 保存图片
img1.save(file_path)使用Flask远程上传图片到服务器,并把获取到的图片显示到前端页面上。
目录结构:

static/images' 文件夹用来存放上传过来的图片templates’文件夹下的两个html文件定义显示页面upload_pictures.py 是工程代码'static/images' 文件夹用来存放上传过来的图片‘templates’文件夹下的两个html文件定义显示页面upload_pictures.py 是工程代码
upload_pictures.py 代码:
# coding:utf-8

from flask import Flask, render_template, request, redirect, url_for, make_response,jsonify
from werkzeug.utils import secure_filename
import os
import cv2
import time

from datetime import timedelta

#设置允许的文件格式
ALLOWED_EXTENSIONS = set(['png', 'jpg', 'JPG', 'PNG', 'bmp'])

def allowed_file(filename):
    return '.' in filename and filename.rsplit('.', 1)[1] in ALLOWED_EXTENSIONS

app = Flask(__name__)
# 设置静态文件缓存过期时间
app.send_file_max_age_default = timedelta(seconds=1)


# @app.route('/upload', methods=['POST', 'GET'])
@app.route('/upload', methods=['POST', 'GET'])  # 添加路由
def upload():
    if request.method == 'POST':
        f = request.files['file']

        if not (f and allowed_file(f.filename)):
            return jsonify({"error": 1001, "msg": "请检查上传的图片类型,仅限于png、PNG、jpg、JPG、bmp"})

        user_input = request.form.get("name")

        basepath = os.path.dirname(__file__)  # 当前文件所在路径

        upload_path = os.path.join(basepath, 'static/images', secure_filename(f.filename))  # 注意:没有的文件夹一定要先创建,不然会提示没有该路径
        # upload_path = os.path.join(basepath, 'static/images','test.jpg')  #注意:没有的文件夹一定要先创建,不然会提示没有该路径
        f.save(upload_path)

        # 使用Opencv转换一下图片格式和名称
        img = cv2.imread(upload_path)
        cv2.imwrite(os.path.join(basepath, 'static/images', 'test.jpg'), img)

        return render_template('upload_ok.html',userinput=user_input,val1=time.time())

    return render_template('upload.html')


if __name__ == '__main__':
    # app.debug = True
    app.run(host='0.0.0.0', port=8987, debug=True)
upload.html 文件代码:
<!DOCTYPE html>
<html lang="en">
<head>
    <meta charset="UTF-8">
    <title>Flask上传图片演示</title>
</head>
<body>
    <h1>使用Flask上传本地图片并显示示例一</h1>
    <form action="" enctype='multipart/form-data' method='POST'>
        <input type="file" name="file" style="margin-top:20px;"/>
        <br>
        <i>请输入你当前的心情(开心、超开心、超超开心):</i>
        <input type="text" class="txt_input" name="name"  value="超超开心" style="margin-top:10px;"/>
        <input type="submit" value="上传" class="button-new" style="margin-top:15px;"/>
    </form>
</body>
</html>
upload_ok.html文件代码:
<!DOCTYPE html>
<html lang="en">
<head>
<meta charset="UTF-8">
<title>Flask上传图片演示</title>
</head>
<body>
<h1>使用Flask上传本地图片并显示示例一</h1>
<form action="" enctype='multipart/form-data' method='POST'>
<input type="file" name="file" style="margin-top:20px;"/>
<br>
<i>请输入你当前的心情(开心、超开心、超超开心):</i>
<input type="text" class="txt_input" name="name" value="超超开心" style="margin-top:10px;"/>
<input type="submit" value="上传" class="button-new" style="margin-top:15px;"/>
</form>
<h1>阁下的心情是:{{userinput}}!</h1>
<img src="{{ url_for('static', filename= './images/test.jpg',_t=val1) }}" width="400" height="400" alt="你的图片被外星人劫持了~~"/>
</body>
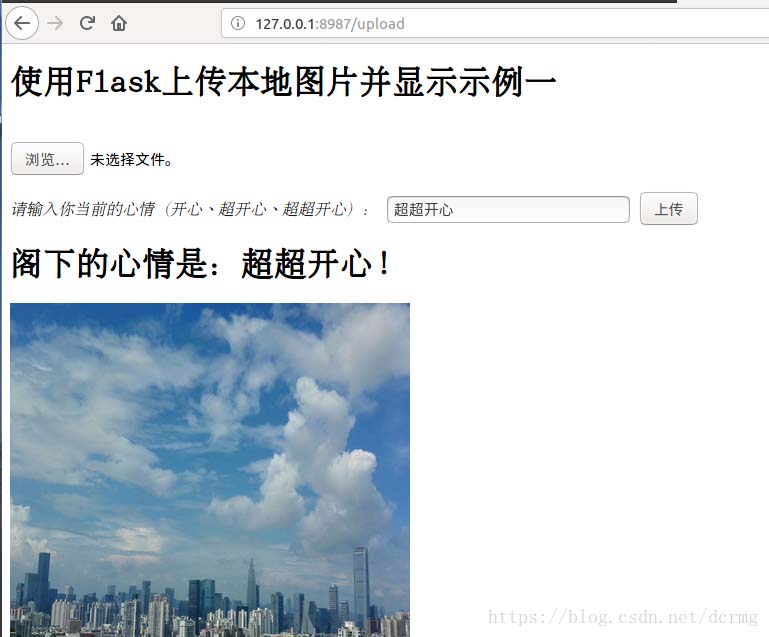
</html>直接运行 python upload_pictures.py 就行了,定义了端口号8987,在本机上访问 '127.0.0.1:8987/upload' ,出现以下界面:

点击'浏览' 并上传后,上传的图片保存到了 ‘static/images'目录下,显示结果:
目录结构:

目录文件介绍同方法一。
upload_pictures.py 代码:
# coding:utf-8

from flask import Flask,render_template,request,redirect,url_for,make_response,jsonify
from werkzeug.utils import secure_filename
import os
import cv2

from datetime import timedelta

#设置允许的文件格式
ALLOWED_EXTENSIONS = set(['png', 'jpg', 'JPG', 'PNG', 'bmp'])

def allowed_file(filename):
    return '.' in filename and filename.rsplit('.', 1)[1] in ALLOWED_EXTENSIONS

app = Flask(__name__)
# 设置静态文件缓存过期时间
app.send_file_max_age_default = timedelta(seconds=1)

@app.route('/upload', methods=['POST', 'GET'])  # 添加路由
def upload():
    if request.method == 'POST':
        f = request.files['file']

        if not (f and allowed_file(f.filename)):
            return jsonify({"error": 1001, "msg": "请检查上传的图片类型,仅限于png、PNG、jpg、JPG、bmp"})

        user_input = request.form.get("name")

        basepath = os.path.dirname(__file__)  # 当前文件所在路径

        upload_path = os.path.join(basepath, 'static/images',secure_filename(f.filename))  #注意:没有的文件夹一定要先创建,不然会提示没有该路径
        f.save(upload_path)

        image_data = open(upload_path, "rb").read()
        response = make_response(image_data)
        response.headers['Content-Type'] = 'image/png'
        return response

    return render_template('upload.html')

if __name__ == '__main__':
    # app.debug = True
    app.run(host = '0.0.0.0',port = 8987,debug= True)
upload.html 文件代码:
<!DOCTYPE html>
<html lang="en">
<head>
    <meta charset="UTF-8">
    <title>Flask上传图片演示</title>
</head>
<body>
    <h1>使用Flask上传本地图片并显示示例二</h1>
    <form action="" enctype='multipart/form-data' method='POST'>
        <input type="file" name="file" style="margin-top:20px;"/>
        <br>
        <i>请输入你当前的心情(开心、超开心、超超开心):</i>
        <input type="text" class="txt_input" name="name"  value="超超开心" style="margin-top:10px;"/>
        <input type="submit" value="上传" class="button-new" style="margin-top:15px;"/>
    </form>
</body>
</html>
运行 python upload_pictures.py ,端口号定义的是8987,在本机上访问 '127.0.0.1:8987/upload' ,出现以下界面:
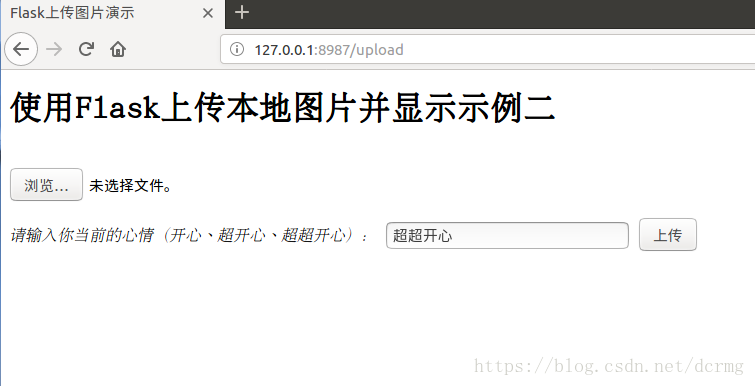
点击'浏览' 并上传后,上传的图片保存到了 ‘static/images'目录下,显示结果:

方法二显示出来的图片覆盖了整个页面。
tips: 如果是在其他机器上访问,把127.0.0.1的IP换成服务器的IP就行了。
以上为个人经验,希望能给大家一个参考,也希望大家多多支持。

