在上一篇文章中# Android进阶宝典 -- KOOM线上APM监控最全剖析,我详细介绍了对于线上App内存监控的方案策略,其实除了内存指标之外,经常有用户反馈卡顿问题,其实这种问题是最难定位的,因为不像Crash有完整的堆栈信息,而且卡顿问题可能转瞬即逝,那么如何健全完整的线上卡顿监控,可能就需要我们对于Android系统的消息处理有一个清晰的认知。
这里我不会完整的从Handler源码来分析Android的消息体系,而是从Handler自身的特性引申出线上卡顿监控的策略方案。
首先当我们启动一个App的时候,是由AMS通知zygote进程fork出主进程,其中主进程的入口就是ActivityThread的main方法,在这个方法中开启Loop死循环来处理系统消息。
Looper.loop();
在ActivityThread中,有一个内部类ApplicationThread,这个类是system_server的一个代理对象,负责App主进程与system_server进程的通信(如果对这块有疑问的,可以看之前的文章都有详细的介绍)。
private class ApplicationThread extends IApplicationThread.Stub {
    private static final String DB_INFO_FORMAT = "  %8s %8s %14s %14s  %s";
    @Override
    public final void bindApplication(String processName, ApplicationInfo appInfo,
            ProviderInfoList providerList, ComponentName instrumentationName,
            ProfilerInfo profilerInfo, Bundle instrumentationArgs,
            IInstrumentationWatcher instrumentationWatcher,
            IUiAutomationConnection instrumentationUiConnection, int debugMode,
            boolean enableBinderTracking, boolean trackAllocation,
            boolean isRestrictedBackupMode, boolean persistent, Configuration config,
            CompatibilityInfo compatInfo, Map services, Bundle coreSettings,
            String buildSerial, AutofillOptions autofillOptions,
            ContentCaptureOptions contentCaptureOptions, long[] disabledCompatChanges,
            SharedMemory serializedSystemFontMap) {
        if (services != null) {
            if (false) {
                // Test code to make sure the app could see the passed-in services.
                for (Object oname : services.keySet()) {
                    if (services.get(oname) == null) {
                        continue; // AM just passed in a null service.
                    }
                    String name = (String) oname;
                    // See b/79378449 about the following exemption.
                    switch (name) {
                        case "package":
                        case Context.WINDOW_SERVICE:
                            continue;
                    }
                    if (ServiceManager.getService(name) == null) {
                        Log.wtf(TAG, "Service " + name + " should be accessible by this app");
                    }
                }
            }
            // Setup the service cache in the ServiceManager
            ServiceManager.initServiceCache(services);
        }
        setCoreSettings(coreSettings);
        AppBindData data = new AppBindData();
        data.processName = processName;
        data.appInfo = appInfo;
        data.providers = providerList.getList();
        data.instrumentationName = instrumentationName;
        data.instrumentationArgs = instrumentationArgs;
        data.instrumentationWatcher = instrumentationWatcher;
        data.instrumentationUiAutomationConnection = instrumentationUiConnection;
        data.debugMode = debugMode;
        data.enableBinderTracking = enableBinderTracking;
        data.trackAllocation = trackAllocation;
        data.restrictedBackupMode = isRestrictedBackupMode;
        data.persistent = persistent;
        data.config = config;
        data.compatInfo = compatInfo;
        data.initProfilerInfo = profilerInfo;
        data.buildSerial = buildSerial;
        data.autofillOptions = autofillOptions;
        data.contentCaptureOptions = contentCaptureOptions;
        data.disabledCompatChanges = disabledCompatChanges;
        data.mSerializedSystemFontMap = serializedSystemFontMap;
        sendMessage(H.BIND_APPLICATION, data);
    }
}
我们可以看到,每个方法的最后,其实都是调用了sendMessage方法,通过Handler发送消息;为啥会用到Handler呢,是因为App进程与system_server进程通信是通过Binder实现的,Binder会开辟Binder线程池,那么此时这个方法的调用是在子线程中完成,像bindApplication最终需要调用Application的onCreate方法,但这个方法是在主线程中,因此需要Handler完成线程切换。
所以整个App消息体系都是通过Handler来支持起来的,看下图
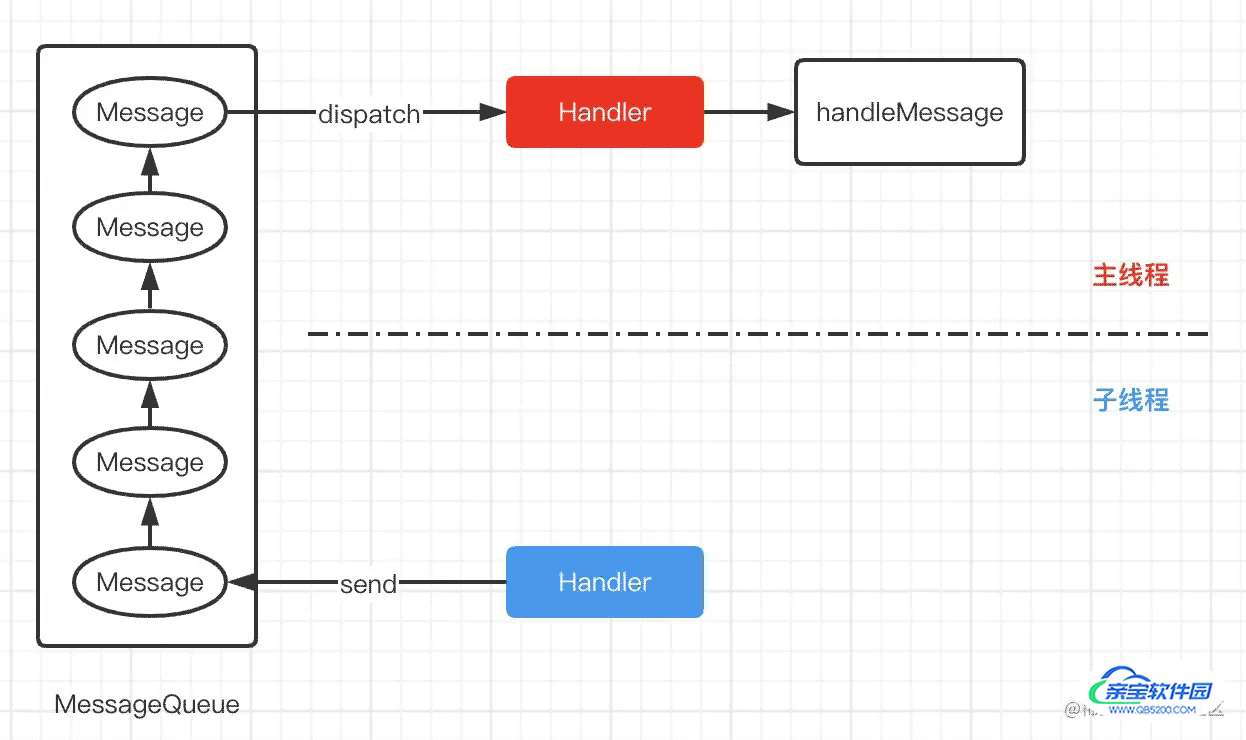
因为Android对于消息的时效性要求非常高,需要一个高速执行的状态,一旦有消息执行耗时造成阻塞就会产生卡顿,所以通过Handler来监听消息的执行速度,通过设定阈值判断是否产生卡顿,从而获取堆栈消息来定位问题。
我们先去看下Looper源码,看如何处理分发消息的
public static void loop() {
    final Looper me = myLooper();
    if (me == null) {
        throw new RuntimeException("No Looper; Looper.prepare() wasn't called on this thread.");
    }
    if (me.mInLoop) {
        Slog.w(TAG, "Loop again would have the queued messages be executed"
                + " before this one completed.");
    }
    me.mInLoop = true;
    // Make sure the identity of this thread is that of the local process,
    // and keep track of what that identity token actually is.
    Binder.clearCallingIdentity();
    final long ident = Binder.clearCallingIdentity();
    // Allow overriding a threshold with a system prop. e.g.
    // adb shell 'setprop log.looper.1000.main.slow 1 && stop && start'
    final int thresholdOverride =
            SystemProperties.getInt("log.looper."
                    + Process.myUid() + "."
                    + Thread.currentThread().getName()
                    + ".slow", 0);
    me.mSlowDeliveryDetected = false;
    /**在这里开启死循环*/
    for (;;) {
        if (!loopOnce(me, ident, thresholdOverride)) {
            return;
        }
    }
}
在Looper的loop方法中,开启一个死循环,然后调用了loopOnce方法
private static boolean loopOnce(final Looper me,
        final long ident, final int thresholdOverride) {
        /**第一步,从MessagQueue中取出消息*/
    Message msg = me.mQueue.next(); // might block
    if (msg == null) {
        // No message indicates that the message queue is quitting.
        return false;
    }
    // This must be in a local variable, in case a UI event sets the logger
    /**这里关注下这个打点信息*/
    final Printer logging = me.mLogging;
    if (logging != null) {
        logging.println(">>>>> Dispatching to " + msg.target + " "
                + msg.callback + ": " + msg.what);
    }
    try {
        /**第二步,调用Handler的dispatchMessage方法*/
        msg.target.dispatchMessage(msg);
        if (observer != null) {
            observer.messageDispatched(token, msg);
        }
        dispatchEnd = needEndTime ? SystemClock.uptimeMillis() : 0;
    } catch (Exception exception) {
        if (observer != null) {
            observer.dispatchingThrewException(token, msg, exception);
        }
        throw exception;
    } finally {
        ThreadLocalWorkSource.restore(origWorkSource);
        if (traceTag != 0) {
            Trace.traceEnd(traceTag);
        }
    }
    //......
    /**消息执行完成的打点*/
    if (logging != null) {
        logging.println("<<<<< Finished to " + msg.target + " " + msg.callback);
    }
    return true;
}
这里我们需要关注的有两个点:
(1)看消息是如何被分发执行的,在注释中,我标注了关键的二步;
(2)从消息被执行之前,到消息执行之后,有两处打点信息分别为:Dispatching to和Finished to,这个就是代表消息执行的整个过程,如果我们能够拿到这两段之间的耗时,是不是就可以完成我们的方案策略。
通过源码我们可以看到,这个Printer是我们可以自定义传入的,那也就是说,我们可以在我们自定义的Printer中插入计时的代码,就可以监控每个消息执行的耗时了。
public void setMessageLogging(@Nullable Printer printer) {
    mLogging = printer;
}
所以根据上面的源码分析,业内有一款适用于卡顿监控的组件 - Blockcanary
implementation 'com.github.markzhai:blockcanary-android:1.5.0'
使用方式:
BlockCanary.install(this, BlockCanaryContext()).start()
所以我们看一下Blockcanary的源码,它的思想就是我们提到的通过setMessageLogging方法注入自己的代码。
public void start() {
    if (!mMonitorStarted) {
        mMonitorStarted = true;
        Looper.getMainLooper().setMessageLogging(mBlockCanaryCore.monitor);
    }
}
在start方法中,就是调用了setMessageLogging方法,传入了一个Printer对象,这个实现类就是LooperMonitor,其中需要实现println方法.
class LooperMonitor implements Printer {
    @Override
    public void println(String x) {
        if (mStopWhenDebugging && Debug.isDebuggerConnected()) {
            return;
        }
        /** mPrintingStarted 默认false */
        if (!mPrintingStarted) {
            mStartTimestamp = System.currentTimeMillis();
            mStartThreadTimestamp = SystemClock.currentThreadTimeMillis();
            mPrintingStarted = true;
            startDump();
        } else {
            final long endTime = System.currentTimeMillis();
            mPrintingStarted = false;
            if (isBlock(endTime)) {
                notifyBlockEvent(endTime);
            }
            stopDump();
        }
    }
    private boolean isBlock(long endTime) {
        return endTime - mStartTimestamp > mBlockThresholdMillis;
    }
 }
我们知道,在Looper的loop方法中,会调用两次print方法,所以在第一次调用println方法的时候,会记录一个系统时间;第二次进入的时候,会再次记一次系统时间,前后两次时间差如果超过一个阈值mBlockThresholdMillis,那么认为是发生了卡顿。
private void notifyBlockEvent(final long endTime) {
    final long startTime = mStartTimestamp;
    final long startThreadTime = mStartThreadTimestamp;
    final long endThreadTime = SystemClock.currentThreadTimeMillis();
    HandlerThreadFactory.getWriteLogThreadHandler().post(new Runnable() {
        @Override
        public void run() {
            mBlockListener.onBlockEvent(startTime, endTime, startThreadTime, endThreadTime);
        }
    });
}
如果发生了卡顿,那么就会将堆栈信息记录到文件当中,但是这样处理真的能够帮助到我们吗?
当然Blockcanary确实能够帮助我们确认卡顿发生的一个大致范围,但是我们看下面的图

当方法B执行完成之后触发了卡顿阈值,这个时候堆栈当中存在方法A的堆栈信息和方法B的堆栈信息,那么我们会认为因为方法B的原因产生了卡顿吗?其实不然,如果堆栈信息中也包含了其他方法,那么Handler监控其实也只是给出了一个大粒度的范围,分析起来还是会有问题。
基于前面我们对于Blockcanary的分析,其存在的一个重大弊端就是无法获取细颗粒度的数据,例如每个方法执行的耗时,当打印出堆栈信息之后,附加上每个方法的耗时,这样就能准确地定位出耗时方法的存在。
private fun funcA() {
    funcB()
}
private fun funcB() {
    Thread.sleep(400)
    funcC()
}
private fun funcC() {
    funcD()
}
private fun funcD() {
    Thread.sleep(100)
}
例如还是以500ms为卡顿阈值,那么当执行方法A的时候,系统检测到了卡顿的发生,如果给到一个堆栈信息如下:
D方法 耗时100ms
C方法 耗时100ms
B方法 耗时400ms
A方法 耗时500ms
这样是不是就一目了然了,显然是方法B中有一个非常耗时的操作,那么如何获取每个方法执行的时间呢?
private fun funcA() {
    val startTime = System.currentTimeMillis()
    funcB()
    val deltaTime = System.currentTimeMillis() - startTime
}
上述这种方式可以获取方法耗时,如果我们仅在测试阶段想测试某个方法耗时可以这么做,但是工程中成千上万的方法,如果靠自己手动这么添加岂不是要累死,所以就需要字节码插桩来帮忙在每个方法中加入上述代码逻辑。
如果有看过Android进阶宝典 -- 从字节码插桩技术了解美团热修复这篇文章的伙伴,可能对于字节码插桩有些了解了。其实字节码插桩,就是在class文件中写代码。
因为不管是Java还是Kotlin最终都会编译成class字节码,而我们日常开发中肯定是在Java(Kotlin)层上写代码,而字节码插桩则是在class文件上写代码。
因此整个字节码插桩的流程就是

其中难点就在于解析出class文件中包含的信息之后,需要严格按照class字节码的规则来进行修改,只要有一个地方改错了,那么生成的.class文件就无法使用,所以如果要我们自己修改显然是很难,因此各路Android大佬考虑到这个问题,就开源出很多框架提供给我们使用。
首先,我们先引入ASM依赖
implementation 'org.ow2.asm:asm:9.1'
implementation 'org.ow2.asm:asm-util:9.1'
implementation 'org.ow2.asm:asm-commons:9.1'
我们可以根据2.1小节的这个流程图,利用ASM中的工具完成字节码插桩。
public class TestFunctionRunTime {
    public TestFunctionRunTime() {
    }
    public void funA() throws InterruptedException {
        Thread.sleep(2000);
    }
}
例如,我们想在funA中插入计算耗时的方法,那么首先需要得到这个类的class文件
fun transform() {
    //IO操作,获取文件流
    val fis =
        FileInputStream("/storage/emulated/0/TestFunctionRunTime.class")
    //用于读取class文件中信息
    val cr = ClassReader(fis)
    val cw = ClassWriter(ClassWriter.COMPUTE_MAXS)
    //开始分析字节码
    cr.accept(
        MyClassVisitor(Opcodes.ASM9, cw),
        ClassReader.SKIP_FRAMES or ClassReader.SKIP_DEBUG
    )
}
首先,获取class文件这里我作为示例直接通过IO加载某个路径下的class文件,通过ASM中提供的ClassReader和ClassWriter来读取class中的文件信息,然后调用ClassReader的accept方法,开始分析class文件。
class MyClassVisitor(api: Int, classVisitor: ClassVisitor) : ClassVisitor(api, classVisitor) {
    override fun visitMethod(
        access: Int,
        name: String?,
        descriptor: String?,
        signature: String?,
        exceptions: Array<out String>?
    ): MethodVisitor {
        /**这里假设就对一个方法插桩*/
        return if (name == "funA") {
            val methodVisitor =
                super.visitMethod(access, name, descriptor, signature, exceptions)
            MyMethodVisitor(api, methodVisitor, access, name, descriptor)
        } else {
            super.visitMethod(access, name, descriptor, signature, exceptions)
        }
    }
    override fun visitField(
        access: Int,
        name: String?,
        descriptor: String?,
        signature: String?,
        value: Any?
    ): FieldVisitor {
        return super.visitField(access, name, descriptor, signature, value)
    }
    override fun visitAnnotation(descriptor: String?, visible: Boolean): AnnotationVisitor {
        return super.visitAnnotation(descriptor, visible)
    }
}
因为在一个类中,会存在很多属性,例如变量、方法、注解等等,所以在ASM中的ClassVisitor类中,提供了这些属性的访问权利,例如visitMethod可以访问方法,假如我们想要对funA进行插桩,那么就需要做一些自定义的操作,这里就可以使用ASM提供的AdviceAdapter来完成方法执行过程中代码的插入。
class MyMethodVisitor(
    val api: Int,
    val methodVisitor: MethodVisitor,
    val mAccess: Int,
    val methodName: String,
    val descriptor: String?
) : AdviceAdapter(api, methodVisitor, mAccess, methodName, descriptor) {
    /**当方法开始执行的时候*/
    override fun onMethodEnter() {
        super.onMethodEnter()
    }
    /**当方法执行结束的时候*/
    override fun onMethodExit(opcode: Int) {
        super.onMethodExit(opcode)
    }
}
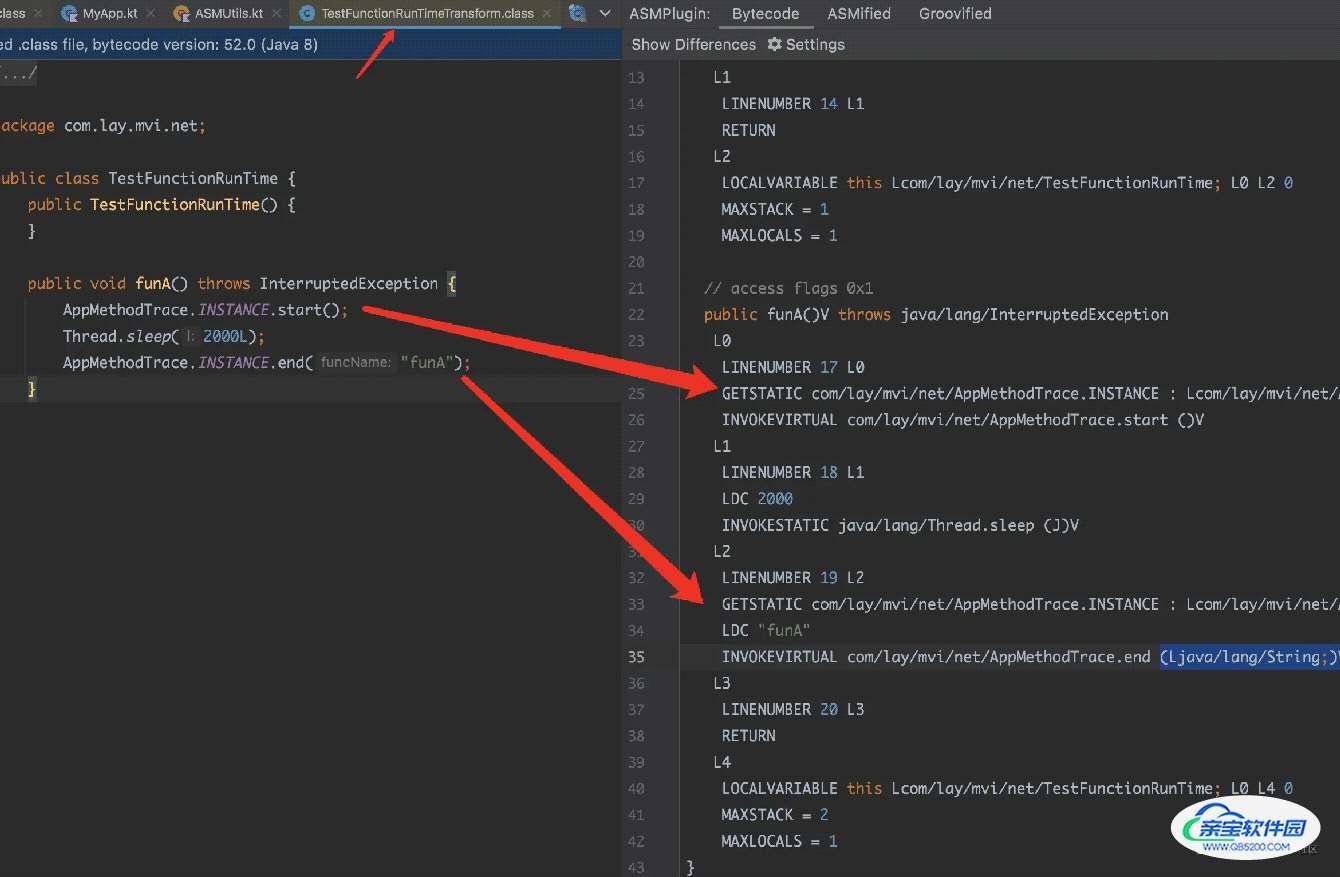
假设我们对于每个方法,都插入以下两行代码,那么我们在操作字节码的时候,需要看一下当这个方法被编译成字节码之后,是什么样的。
public void funA() throws InterruptedException {
    Long startTime = System.currentTimeMillis();
    Thread.sleep(2000L);
    Log.e("TestFunctionRunTime", "duration=>" + (System.currentTimeMillis() - startTime));
}
插入代码之前的字节码如下:
 public funA()V throws java/lang/InterruptedException
   L0
    LINENUMBER 18 L0
    LDC 2000
    INVOKESTATIC java/lang/Thread.sleep (J)V
   L1
    LINENUMBER 19 L1
    RETURN
   L2
    LOCALVARIABLE this Lcom/lay/mvi/net/TestFunctionRunTime; L0 L2 0
    MAXSTACK = 2
    MAXLOCALS = 1
插入代码之后的字节码如下:
public funA()V throws java/lang/InterruptedException
   L0
    LINENUMBER 17 L0
    INVOKESTATIC java/lang/System.currentTimeMillis ()J
    INVOKESTATIC java/lang/Long.valueOf (J)Ljava/lang/Long;
    ASTORE 1
   L1
    LINENUMBER 18 L1
    LDC 2000
    INVOKESTATIC java/lang/Thread.sleep (J)V
   L2
    LINENUMBER 19 L2
    LDC "TestFunctionRunTime"
    NEW java/lang/StringBuilder
    DUP
    INVOKESPECIAL java/lang/StringBuilder.<init> ()V
    LDC "duration=>"
    INVOKEVIRTUAL java/lang/StringBuilder.append (Ljava/lang/String;)Ljava/lang/StringBuilder;
    INVOKESTATIC java/lang/System.currentTimeMillis ()J
    ALOAD 1
    INVOKEVIRTUAL java/lang/Long.longValue ()J
    LSUB
    INVOKEVIRTUAL java/lang/StringBuilder.append (J)Ljava/lang/StringBuilder;
    INVOKEVIRTUAL java/lang/StringBuilder.toString ()Ljava/lang/String;
    INVOKESTATIC android/util/Log.e (Ljava/lang/String;Ljava/lang/String;)I
    POP
   L3
    LINENUMBER 20 L3
    RETURN
   L4
    LOCALVARIABLE this Lcom/lay/mvi/net/TestFunctionRunTime; L0 L4 0
    LOCALVARIABLE startTime Ljava/lang/Long; L1 L4 1
    MAXSTACK = 6
    MAXLOCALS = 2
}
首先我们看如果按照我们这种加代码的方式,当然没问题,但是在进行插桩的时候,将会写很多的字节码指令,看下面的代码,我仅仅贴出L2代码块就需要这么多,写的多通常就会出问题。
visitLdcInsn(methodName)
visitTypeInsn(NEW, "java/lang/StringBuilder")
visitInsn(DUP)
visitMethodInsn(INVOKESPECIAL, "java/lang/StringBuilder", "<init>", "()V", false)
visitLdcInsn(""duration=>"")
visitMethodInsn(
    INVOKEVIRTUAL,
    "java/lang/StringBuilder",
    "append",
    "(Ljava/lang/String;)Ljava/lang/StringBuilder",
    false
)
visitMethodInsn(INVOKESTATIC, "java/lang/System", "currentTimeMillis", "()J", false)
visitVarInsn(ALOAD, 1)
visitMethodInsn(INVOKEVIRTUAL, "java/lang/Long", "longValue", "()J", false)
visitInsn(LSUB)
visitMethodInsn(
    INVOKEVIRTUAL,
    "java/lang/StringBuilder",
    "append",
    "(J)Ljava/lang/StringBuilder",
    false
)
visitMethodInsn(
    INVOKEVIRTUAL,
    "java/lang/StringBuilder",
    "toString",
    "()Ljava/lang/String",
    false
)
visitMethodInsn(
    INVOKEVIRTUAL,
    "android/util/Log",
    "e",
    "(Ljava/lang/String;Ljava/lang/String;)I",
    false
)
visitInsn(POP)
所以简单一点就是封装一个方法,因为这个插桩是在编译时将代码插入,所以不影响
object AppMethodTrace {
    private var startTime: Long = 0L
    fun start() {
        startTime = System.currentTimeMillis()
    }
    fun end(funcName: String) {
        val endTime = System.currentTimeMillis()
        Log.e("AppMethodTrace", "$funcName 耗时为${endTime - startTime}")
    }
}
看这样就变得非常简便了,而且写起来也是非常清晰
public funA()V throws java/lang/InterruptedException
   L0
    LINENUMBER 17 L0
    GETSTATIC com/lay/mvi/net/AppMethodTrace.INSTANCE : Lcom/lay/mvi/net/AppMethodTrace;
    INVOKEVIRTUAL com/lay/mvi/net/AppMethodTrace.start ()V
   L1
    LINENUMBER 18 L1
    LDC 2000
    INVOKESTATIC java/lang/Thread.sleep (J)V
   L2
    LINENUMBER 19 L2
    GETSTATIC com/lay/mvi/net/AppMethodTrace.INSTANCE : Lcom/lay/mvi/net/AppMethodTrace;
    LDC "funA"
    INVOKEVIRTUAL com/lay/mvi/net/AppMethodTrace.end (Ljava/lang/String;)V
   L3
    LINENUMBER 20 L3
    RETURN
   L4
    LOCALVARIABLE this Lcom/lay/mvi/net/TestFunctionRunTime; L0 L4 0
    MAXSTACK = 2
    MAXLOCALS = 1
那么通过onMethodEnter和onMethodExit两个方法的处理,就可以完成对字节码插入的操作。
class MyMethodVisitor(
    val api: Int,
    val methodVisitor: MethodVisitor,
    val mAccess: Int,
    val methodName: String,
    val descriptor: String?
) : AdviceAdapter(api, methodVisitor, mAccess, methodName, descriptor) {
    /**当方法开始执行的时候*/
    override fun onMethodEnter() {
        super.onMethodEnter()
        visitFieldInsn(
            GETSTATIC,
            "com/lay/mvi/net/AppMethodTrace",
            "INSTANCE",
            "Lcom/lay/mvi/net/AppMethodTrace"
        )
        visitMethodInsn(INVOKEVIRTUAL, "com/lay/mvi/net/AppMethodTrace", "start", "()V", false)
    }
    /**当方法执行结束的时候*/
    override fun onMethodExit(opcode: Int) {
        super.onMethodExit(opcode)
        visitFieldInsn(
            GETSTATIC,
            "com/lay/mvi/net/AppMethodTrace",
            "INSTANCE",
            "Lcom/lay/mvi/net/AppMethodTrace"
        )
        /**方法名可以动态拿到*/
        visitLdcInsn(methodName)
        visitMethodInsn(
            INVOKEVIRTUAL,
            "com/lay/mvi/net/AppMethodTrace",
            "end",
            "(Ljava/lang/String;)V",
            false
        )
    }
}
最终,通过分析处理字节码之后,将修改后的字节码重新输出到新的文件,在实际的应用开发中,是需要覆盖之前的字节码文件的。
//输出结果
val bytes = cw.toByteArray()
val fos =
    FileOutputStream("/storage/emulated/0/TestFunctionRunTimeTransform.class")
fos.write(bytes)
fos.flush()
fos.close()
如果伙伴们第一次使用,建议还是熟悉所有的字节码指令以及ASM的API,这样我们在写的时候就非常迅速了。
通过前面我们对于Blockcanary的了解,通过Handler虽然能够获取卡顿时的堆栈信息,但是无法获取到方法的执行耗时,所以通过ASM字节码插桩统计方法耗时配合Handler,就能够精确地定位到卡顿的方法,有时间的伙伴们可以去看下腾讯的Matrix。
最后还要啰嗦一下,其实对于字节码插桩,像美团的热修复框架采用的字节码插桩技术就是ASM,但方式并不是只有这一种,像Javassist、kotlinpoet/javapoet都具备插桩的能力;我们在做线上卡顿监控的时候,其实就是在做一个系统,所以不能从一个点出发,像运用到系统能力之外,同样也会使用到三方框架作为辅助手段,目的就是为了能够达到快速定位、快速响应的能力。

