path:配置路由访问的路径
name:给路由起名字(命名路由)
component:访问路由时,渲染的组件
{
	  path: '/',
	  name: 'index',
	  component: () => import('../views/IndexView.vue')
},
App.vue
vue-route标签作用:路由匹配到的组件将渲染到这里
<template>
  <router-view/>
</template>
router-link标签作用:路由导航(路由跳转的链接)
声明式导航
<router-link to="/login"></router-link>
<router-link :to="{path:'/login'}"></router-link>
编程式导航
推荐使用路由的名字进行跳转,不推荐直接写路径
<button @click="$router.push('/login')">登录按钮</button>
<button @click="$router.push({path:'/login'})">登录按钮</button>
<button @click="$router.push({name:'login'})">登录按钮</button>$router:路由对象
在app.use(router)在注册路由时,会给app设置全局属性$router
<button @click="loginBtn">登录按钮</button>

<script>
	export default{
		methods:{
			loginBtn(){
				this.$router.push('/login')
			}
		}
	}
</script>通过调用app.use(router),我们可以在任意组件中以this.$router的形式访问它,并且以this.$router的形式访问当前路由

当访问http://localhost:8080/#/project这个路由
会跳转到http://localhost:8080/#/login这个路由
{
	  path: '/project',
	  name:'project',
	  // 路由重定向配置
	  redirect:{
		  name:'login',
		  }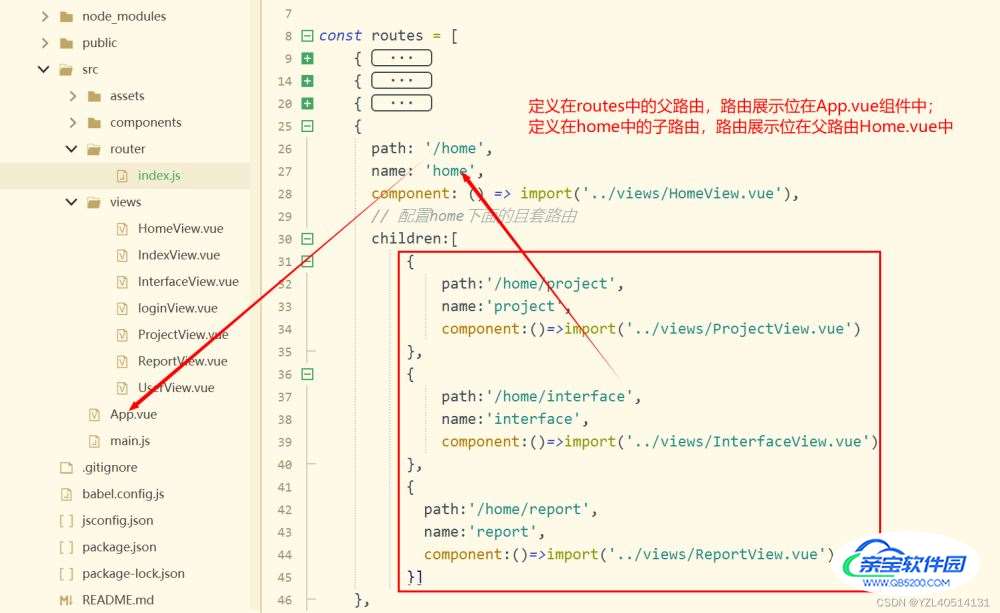
},index.js:路由配置
{
      path: '/home',
      name: 'home',
      component: () => import('../views/HomeView.vue'),
	  // 配置home下面的且套路由
	  children:[
		  {
			  path:'/home/project',
			  name:'project',
			  component:()=>import('../views/ProjectView.vue')
		  },
		  {
			  path:'/home/interface',
			  name:'interface',
			  component:()=>import('../views/InterfaceView.vue')
		  },
		  {
			path:'/home/report',
			name:'report',
			component:()=>import('../views/ReportView.vue')
		  }]
},
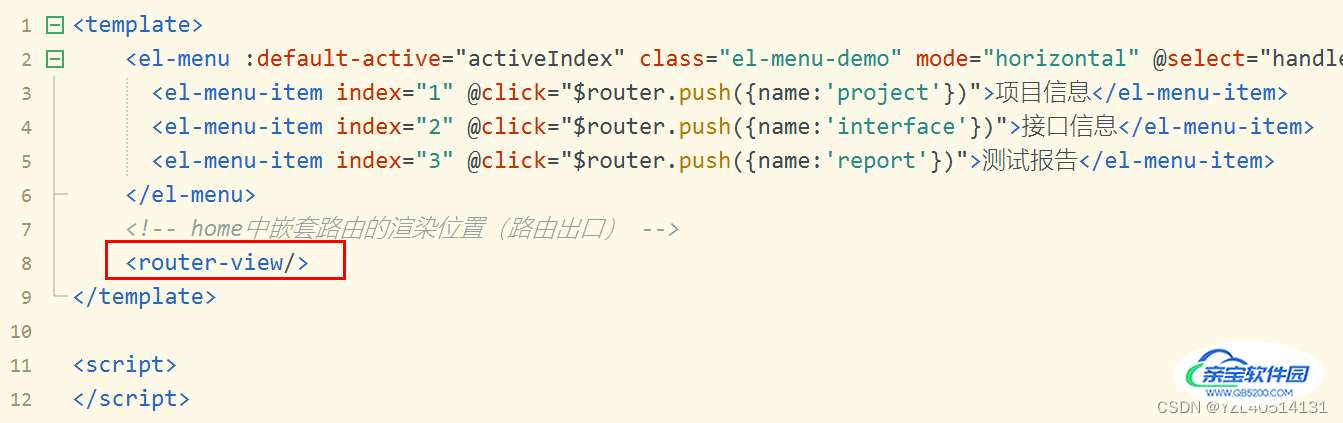
HomeView.vue组件
<template>
	<el-menu :default-active="activeIndex" class="el-menu-demo" mode="horizontal" @select="handleSelect">
	  <el-menu-item index="1" @click="$router.push({name:'project'})">项目信息</el-menu-item>
	  <el-menu-item index="2" @click="$router.push({name:'interface'})">接口信息</el-menu-item>
	  <el-menu-item index="3" @click="$router.push({name:'report'})">测试报告</el-menu-item>
	</el-menu>
	<!-- home中嵌套路由的渲染位置(路由出口) -->
	<router-view/>
</template>

<script>
</script>

<style>
</style>
特别注意
把不变的内容写到父路由中,并且父路由中预留路由展示位。将变化的内容写到子路由中

{
		path:'/user/:id',
		name:'user',
		component: () => import('../views/UserView.vue')
},
访问路由:http://localhost:8080/#/user/666
UserView.vue组件
获取路由的路径参数
<template>
	<h1>User页面</h1>
	<!-- 获取路由的路径参数 -->
	<h3>路由中匹配的id:{{$route.params.id}}</h3>

</template>

<script>
</script>

<style>
</style>
获取路由的查询参数
<template>
	<h1>User页面</h1>
	<!-- 获取路由的查询参数 -->
	<h4>查询参数name:{{$route.query.name}}</h4>

</template>

<script>
</script>

<style>
</style>
特别注意
$router和$route的区别:$router:路由管理器对象,一般用于路由跳转$route:表示当前访问的路由,用来获取当前路由参数的一些信息
<router-link :to="{name:'user',params:{id:888},query:{name:111}}">user页面</router-link>
<button @click="$router.push({name:'user',params:{id:666},query:{name:222}})">user按钮</button> 设置路由导航守卫(控制前端的路由访问权限)
router.beforeEach(async (to, from) => {
	/*
	1、判断用户是否登录
		1.1从本地获取用户身份信息(存储在cookie或者localstroge中的token,session)
		window.cookieStore.get('token')
		window.localStorage.getItem('token')
		window.sessionStore.getItem('token')
		1.2验证token是否有效
		*/
	   // const isAuthenticated=true
	   // if (
	   //     // 检查用户是否已登录
	   //     !isAuthenticated &&
	   //     // ❗️ 避免无限重定向
	   //     to.name !== 'Login'
	   //   ) {
	   //     // 将用户重定向到登录页面
	   //     return { name: 'Login' }
	   //   }
	   // })
 })

